Tam-rail, Multi-angle bracket installation instructions, 5° angle application – TAMKO TAM-RAIL User Manual
Page 4: 45° angle application, 45° corner application, 33° - 38° stair application
22.5° Angle Application
(Tools Required: Tape measure, miter saw)
1. Place the multi-angle brackets on the top and
bottom rails making sure the bracket front goes
on the rail fi rst.
2. Measure the distance between the mounting
surfaces.
3. With the bracket on the rail, cut the rail and
bracket to the required length with the miter saw
set at 22.5°. (FIG. 1)
45° Angle Application
(Tools Required: Tape measure, miter saw)
NOTE: It is necessary to have a 5” mount-
ing surface when mounting a 45° bracket
that is not a corner mount.
1. Place the multi-angle brackets on the top
and bottom rails making sure the bracket front
goes on the rail fi rst.
2. Measure the distance between the mounting
surfaces.
3. With the bracket on the rail, cut the rail and
bracket to the required length with the miter
saw set at a 45°. (FIG. 1)
45° Corner Application
(Tools Required: Speed square, jigsaw,
sandpaper, miter saw, duct tape)
1. With the bracket end fl ush with the end
of the rail, trim 1 1/2” off the length of the
bracket and rail. (FIG. 2)
2. Use the speed square to scribe a 45° line
from each mounting corner on the top and
bottom of the bracket until they cross. (FIG. 3)
3. Use the duct tape to hold the bracket in
place on the rail during the cutting.
4. Use the jigsaw to cut out the scribed areas
on the top and bottom of the bracket. It may
be necessary to lightly sand the cut area on
the bracket.
5. It may be necessary to caulk the seams
where the bracket meets the mounting
surface.
Multi-Angle Bracket
Installation Instructions
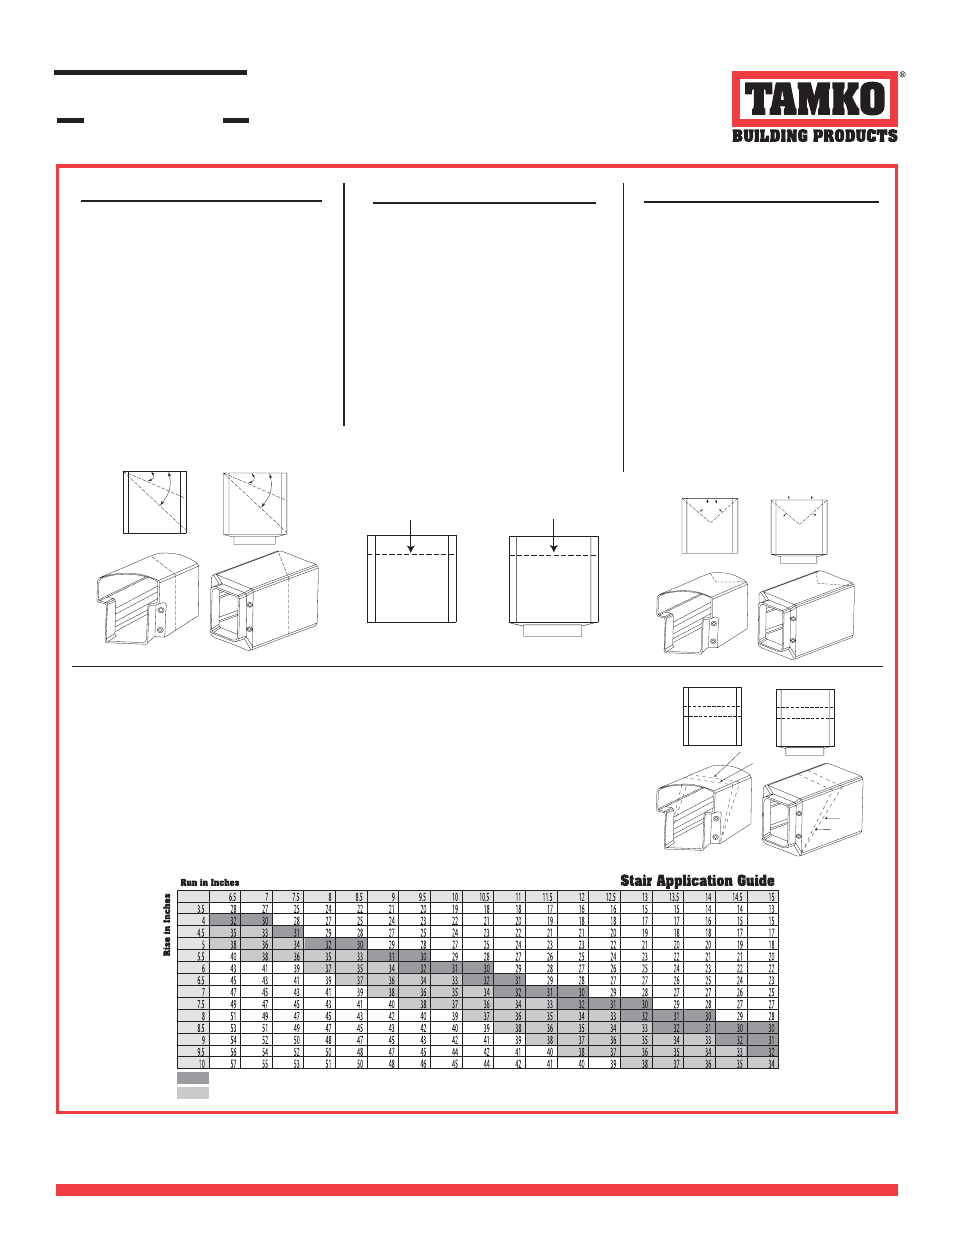
33° - 38° Stair Application
(Tools Required: Tape measure, miter saw)
1. Place the multi-angle brackets on the top and
bottom rails making sure the bracket front goes
on the rail fi rst.
2. Place the bottom rail with brackets on the stair
tread (baluster holes facing upward) allowing the
brackets to extend past the mounting surfaces.
Be sure to leave the same distance between the
last baluster hole and the mounting surface at
each end.
3. Scribe the brackets where they cross the mount-
ing surface for the correct cut.
4. Cut the rail and bracket at the scribe mark for
the desired angle.
5. With the bottom rail beside the mounting sur-
faces, place a baluster in the last holes at the top
and bottom of the rail.
6. Place the top rail on the balusters allowing
the top rail brackets to extend past the mounting
surfaces.
7. Scribe the brackets where they cross the mount-
ing surface for the correct cut.
8. Cut the rail and bracket at the scribe mark for
the desired angle.
33º Angle
38º Angle
33º Angle
38º Angle
NOTE: TAM-RAIL Railing Stair Kits only accommodate a 30°-32° angle of slope.
NOTE: The Multi-Angle Bracket can be used for stair applications that range from 33°-38°.
4RIM
FIG. 2
FIG. 1
FIG. 3
RAILING SYSTEMS
TAM-RAIL
®
© 2008 TAMKO Building Products, Inc. TAMKO and TAM-RAIL are Registered Trademarks of TAMKO Building Products, Inc.
For assistance, information regarding, or to receive a
copy of TAMKO’s Limited Warranty, contact us at
1-800-641-4691 or visit us online at tamko.com.
It is the responsibility of the installer to meet all building code and safety requirements and to obtain all
required building permits. These instructions are only a guide and may not address every circumstance.
TAMKO Building Products Inc. shall not be held liable for improper or unsafe installations. These
application instructions were current at the time of printing. To obtain a copy of the most current version of
the application instructions, visit us online at tamrail.com or call us at 1-800-641-4691.