Heritage, Vintage, Laminated asphalt shingles phillipsburg, ks – TAMKO HERITAGE VINTAGE User Manual
Page 6
Central District
220 West 4th St., Joplin, MO 64801
800-641-4691
09/14
Northeast District
4500 Tamko Dr., Frederick, MD 21701
800-368-2055
Southeast District
2300 35th St., Tuscaloosa, AL 35401
800-228-2656
Southwest District
7910 S. Central Exp., Dallas, TX 75216
800-443-1834
Western District
5300 East 43rd Ave., Denver, CO 80216
800-530-8868
Visit Our Web Site at
tamko.com
HERITAGE
®
VINTAGE
®
LAMINATED ASPHALT SHINGLES
Phillipsburg, KS
6
After the underlayment has been secured, install the recommended
corrosion resistant metal (26 gauge galvanized metal or an
equivalent) in the valley. Secure the valley metal to the roof deck.
Overlaps should be 12" and cemented.
Following valley metal application; a 9" to 12" wide strip of TAMKO
Moisture Guard Plus
®
, TW Underlayment or TW Metal & Tile
Underlayment should be applied along the edges of the metal valley
flashing (max. 6" onto metal valley flashing) and on top of the valley
underlayment. The valley will be completed with shingle application.
SHINGLE APPLICATION INSTRUCTIONS (OPEN VALLEY)
• Snap two chalk lines, one on each side of the valley centerline
over the full length of the valley flashing. Locate the upper
ends of the chalk lines 3" to either side of the valley centerline.
• The lower end should diverge from each other by 1/8" per foot.
Thus, for an 8' long valley, the chalk lines should be 4" either
side of the centerline at the eaves and for a 16' valley 5".
As shingles are applied toward the valley, trim the last shingle in
each course to fit on the chalk line. Never use a shingle trimmed
to less than 12" in length to finish a course running into a valley. If
necessary, trim the adjacent shingle in the course to allow a longer
portion to be used.
• Clip 1" from the upper corner of each shingle on a 45° angle
to direct water into the valley and prevent it from penetrating
between the courses.
• Form a tight seal by cementing the shingle to the valley lining
with a 3" width of TAM-PRO or TAMKO Plastic Roof Cements
(conforming to ASTM D 4586).
CAUTION: Adhesive must be applied in smooth, thin, even layers.
Excessive use of adhesive will cause blistering to this product.
TAMKO assumes no responsibility for blistering.
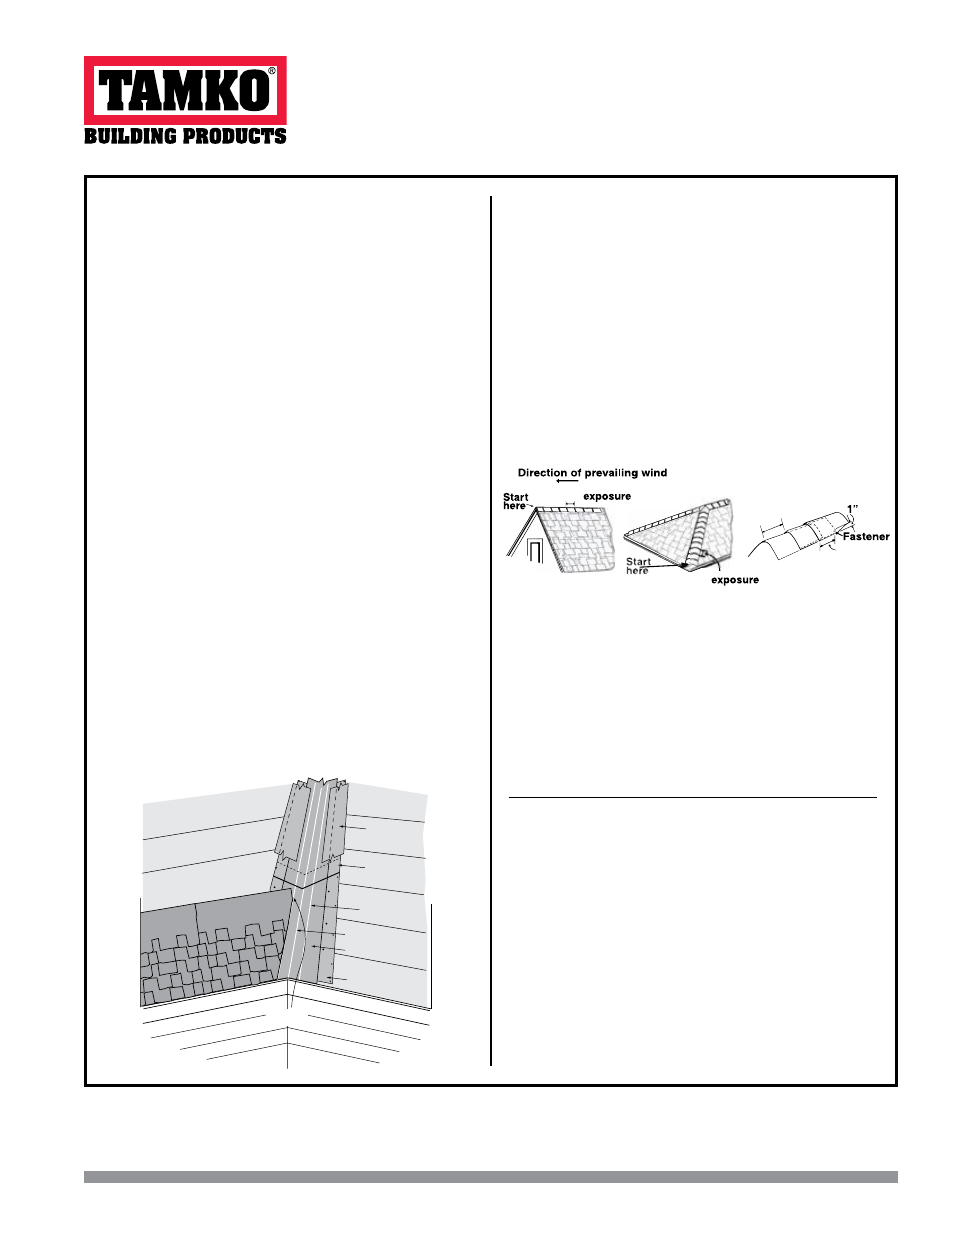
8. HIP AND RIDGE FASTENING DETAIL
Apply the shingles with a 5-1/8 in. exposure beginning at the bottom
of the hip or from the end of the ridge opposite the direction of the
prevailing winds. Secure each shingle with one fastener on each
side, 5-5/8 in. back from the exposed end and 1 in. up from the
edge. TAMKO recommends the use of TAMKO Heritage Vintage
Hip & Ridge shingle products.
Fasteners should be 1/4 in. longer than the ones used for shingles.
It is recommended that a 2-layer application of Vintage Hip and
Ridge be applied to roof to enhance the overall appearance. When
the second layer is applied, offset this layer by 1/4 in. to create a
“shadow” effect.
IMPORTANT: PRIOR TO INSTALLATION, CARE NEEDS TO BE
TAKEN TO PREVENT DAMAGE WHICH CAN OCCUR WHILE
BENDING SHINGLE IN COLD WEATHER.
THESE ARE THE MANUFACTURER’S APPLICATION
I N S T R U C T I O N S F O R T H E R O O F I N G C O N D I T I O N S
DESCRIBED. TAMKO BUILDING PRODUCTS, INC. ASSUMES
NO RESPONSIBILITY FOR LEAKS OR OTHER ROOFING
DEFECTS RESULTING FROM FAILURE TO FOLLOW THE
MANUFACTURER’S INSTRUCTIONS. FAILURE TO FOLLOW
THESE INSTRUCTIONS WILL ADVERSELY AFFECT COVERAGE
UNDER THE LIMITED WARRANTY. SEE THE LIMITED
WARRANTY FOR DETAILS. IF YOU HAVE ANY QUESTIONS
REGARDING THESE APPLICATION INSTRUCTIONS, PLEASE
CONTACT TAMKO’S TECHNICAL SERVICES DEPARTMENT AT
800-641-4691.
Information included in these application instructions was current at time of printing. To
obtain a copy of the most current version of these application instructions, visit us online
at tamko.com or call us at 800-641-4691.
TAMKO®, Moisture Guard Plus®, Tam-Shield®, TAM-PRO®, Heritage® and Vintage® are
registered trademarks and SuperX 30 is a trademark of TAMKO Building Products, Inc.
5
5
/
8
"
5
1
/
8
"
5
1
/
8
"
5
1
/
8
"
Underlayment
End shingles trimmed
to chalk line
12" top lap
Chalk lines diverge
1/8" per foot
Valley centerline
Metal valley flashing
Valley underlayment
Self-adhered strip in ply
(maximum 6" onto metal
valley flashing)
VINTAGE OPEN VALLEY DETAIL
(CONTINUED from page 5)
JP69915