Heritage, Vintage, Laminated asphalt shingles phillipsburg, ks – TAMKO HERITAGE VINTAGE User Manual
Page 5: Continued from page 4)
Central District
220 West 4th St., Joplin, MO 64801
800-641-4691
09/14
Northeast District
4500 Tamko Dr., Frederick, MD 21701
800-368-2055
Southeast District
2300 35th St., Tuscaloosa, AL 35401
800-228-2656
Southwest District
7910 S. Central Exp., Dallas, TX 75216
800-443-1834
Western District
5300 East 43rd Ave., Denver, CO 80216
800-530-8868
Visit Our Web Site at
tamko.com
HERITAGE
®
VINTAGE
®
LAMINATED ASPHALT SHINGLES
Phillipsburg, KS
5
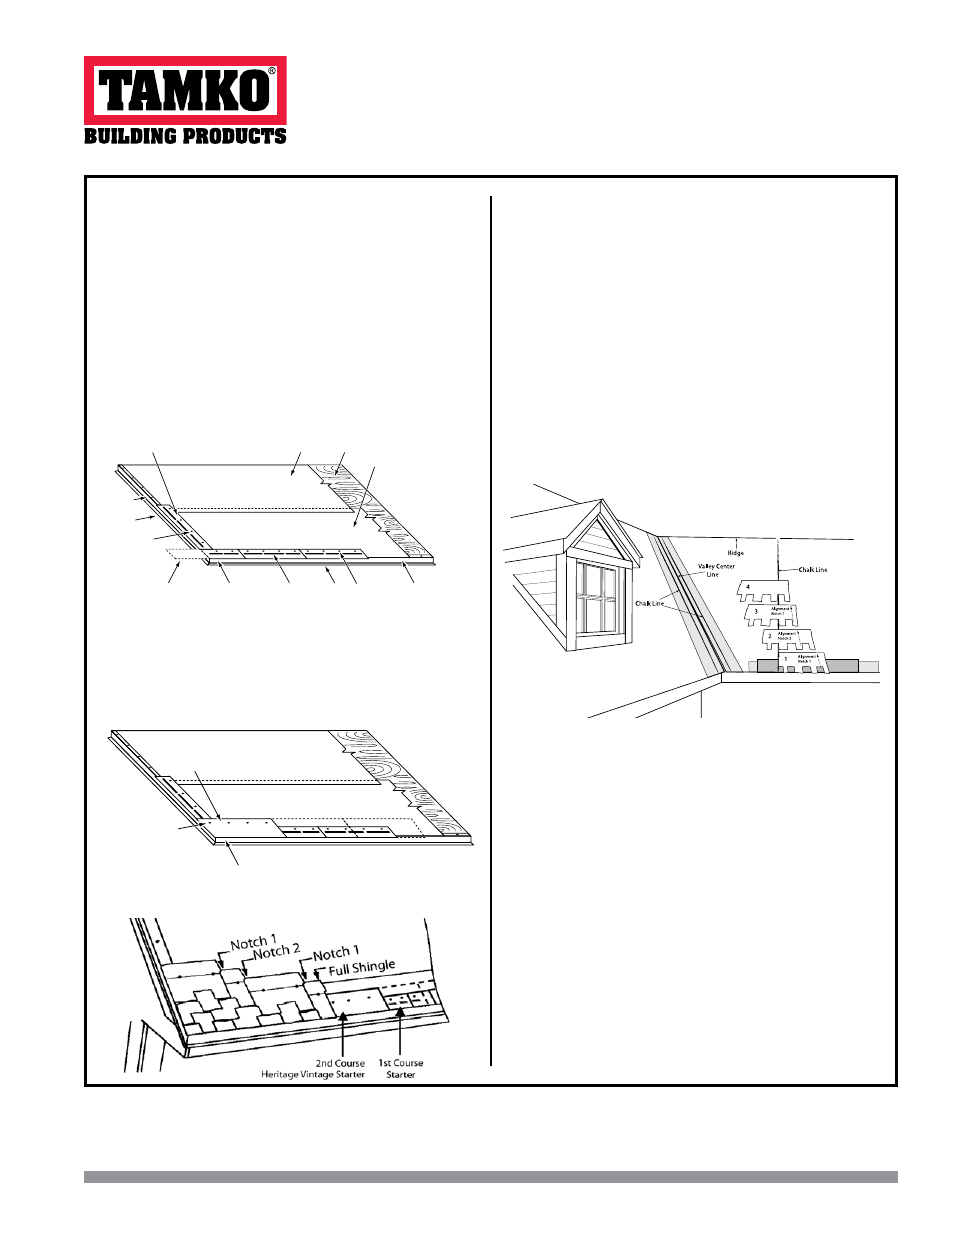
SHINGLE APPLICATION STARTING NEAR VALLEY:
IMPORTANT: USE
ALIGNMENT NOTCHES TO START SHINGLE
COURSES, DO NOT MEASURE IT.
Some roof layouts may not allow for application to begin at a rake
edge, and may require you to begin shingle application near a valley.
To begin shingle application starting near a valley, strike a chalk line
from the top point of the ridge down to the eave on one side of the
valley. This will be the reference line to shingle from, starting on the
right side of the line using the left to right instructions. Fill in the left
side of the chalk line applying shingles right to left. Install both sides
of the chalk line as shingle courses go up the roof.
Refer to Valley
Application in Section 7 of these instructions to complete the
valley. As shingles are applied toward the valley trim the last shingle
in each course to fit the chalk line in the valley. Never use a shingle
trimmed to less than 12" in length to finish a course running into a
valley. If necessary, trim the adjacent shingle in the course to allow
a longer portion to be used.
SHINGLE APPLICATION STARTING AT VALLEY
6. LOW SLOPE APPLICATION
On pitches 2 in. per foot to 4 in. per foot cover the deck with two
layers of underlayment. Begin by applying the underlayment in a
1/2-sheet width along the eaves and overhanging the rake edge
by 1/4 to 3/4 in. if drip edge is not present. If drip edge is present,
align shingle edge with drip edge flashing. Place a full-sheet width
over the 1/2-sheet width starter piece, completely overlapping it.
All succeeding courses will be positioned to overlap the preceding
course by 1/2-sheet width. If winter temperatures average 25°F or
less, thoroughly cement the laps of the entire underlayment to each
other with TAM-PRO or TAMKO Plastic Roof Cement from eaves
and rakes to a point of a least 24 in. inside the interior wall line of
the building. As an alternative, TAMKO’s Moisture Guard Plus
®
, TW
Metal and Tile Underlayment, or TW Underlayment self-adhering
underlayment may be used in lieu of the cemented felts.
7. VALLEY APPLICATION
TAMKO recommends an open valley construction with Heritage
Vintage shingles.
To begin, center a sheet of TAMKO Moisture Guard Plus
®
, TW
Underlayment or TW Metal & Tile Underlayment in the valley.
5. APPLICATION INSTRUCTIONS
STARTER COURSE: Two starter course layers must be applied
prior to application of Heritage Vintage Shingles.
The first starter course may consist of TAMKO Shingle Starter,
TAMKO 10-inch Starter or three tab self-sealing type shingles. If
self-sealing three tab shingles are used, remove the exposed tab
portion and install with the factory applied adhesive adjacent to the
eaves. To offset the end joints of the Vintage Starter, remove 1/2 of
the first starter shingle. Attach the first starter course with approved
fasteners along a line parallel to and 1.5 in. to 3 in. above the eave
edge. The starter course should overhang both the eave and rake
edge 1/4 in. to 3/8 in. if drip edge flashing is not used along the
eaves or rakes. If drip edge flashing is present, install shingles even
with the drip edge.
FIRST STARTER COURSE APPLICATION
Over the first starter course at the eave edge, install Heritage Vintage
Starter and begin at the left rake edge with a full size shingle and
continue across the roof nailing the Heritage Vintage Starter along
a line parallel to and 6 in. from the eave edge.
SHINGLE APPLICATION OVER STARTERS
(CONTINUED from page 4)
(Continued)
Eave flashing or
asphalt saturated felt
Drip edge
Fasteners
located
1-1/2" to 3"
from eave edge
Self-sealing
adhesive
positioned
along eaves
or rake edge
Fasteners
located 1-1/2" to 3"
from rake edge
Starter strips overhang
eaves and rakes
1/4" to 3/8" if no drip edge
flashing is present. If drip
edge flashing is present,
install shingles even with
drip edge.
Underlayment Deck
Eave
Start first strip with 1/2 shingle
removed, then follow with full
strips in order to offset with the
first shingle course.
For maximum wind resistance along rakes, install any
TAMKO starter shingle including sealant or cement shingles
to underlayment and each other in a 4" (102 mm) width of
TAM-PRO® SBS Flashing Cement, TAMKO or TAM-PRO®
Plastic Roof Cement, or TAMKO Tam-Seal Adhesive.
Drip
edge
Rake
Starter strips overhang eaves and rakes
1/4" to 3/8" if no drip edge flashing is present.
If drip edge flashing is present, install shingles
even with drip edge.
Nail Vintage Starter
6" from the eave edge
For SECOND STARTER COURSE use
Heritage Vintage Starter (12-1/2" x 36")
20 pieces per bundle. 60 lineal ft. per bundle.
SECOND STARTER COURSE APPLICATION