Part 3 - clamps & truck installation, Step 4, Step 5 – TracRac IM T-Rac G2 User Manual
Page 8
TracRac Inc. 994 Jefferson St. Fall River, MA 02721 l 800-501-1578
Instruction Manual
Part 3 - Clamps & Truck Installation
Base Clamp Assembly
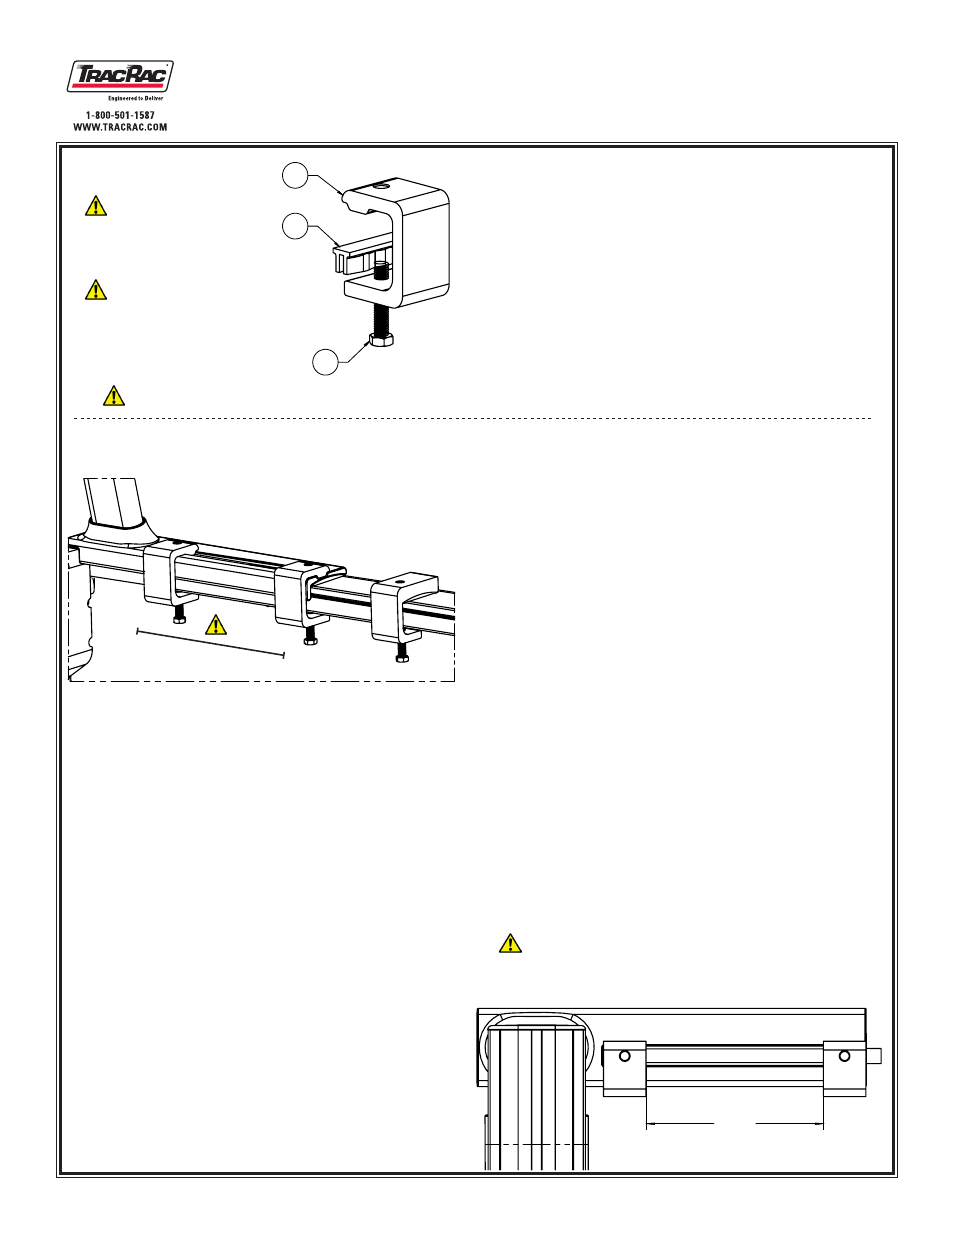
Take a TB Front Clamp (Item 4) and thread a 3/8”-16
1.
HHCS (Item 22) through the bottom as shown.
Now take a C channel clamp foot (Item 23) and
2.
place it on top of the 3/8” HHCS as shown.
Repeat steps one and two for the remaining seven
3.
clamps.
Step 4
Front Upright and Base Clamp Assembly
Now take the rounded shims (Item 7) and place
1.
them on the sidewalls of you truck approximately
where the uprights will sit.
The front uprights will be directly behind the rear win-
dow. Place the unit as far forward as possible
Place the front uprights on top of the rounded
2.
shims (Item 7) making sure that the rubber shims
are completely under the bases.
With one pair of uprights now on the truck, they
3.
must be secured using two Modular Clamps (Item
4). When positioning the clamps make sure they
are spaced as far apart as possible.
First torque the clamps on either side of the rack
4.
towards the cab, then follow with the other two
clamps towards the rear of the truck. Torque down
the HHCS to 14 lb-ft using a 9/16” socket and a
torque wrench.
Rear Upright and Base Clamp Assembly
The rear uprights should sit as far towards the tailgate
as possible without the base hanging off the back of
the bed rail, while maximizing the distance between the
clamps (note step 6)
Place the rear uprights on top of the rounded shims
5.
(Item 7) making sure that the rubber shims are
completely under the bases.
With the second pair of uprights now on the truck
6.
they must be secured using two of the previously
assembled (Item 4) clamps (2 per upright). When
positioning the clamps make sure they are spaced
at least 7 5/16 inches apart. Any less of a distance
will reduce the load capacity of the rack. You may
adjust the position of the rack on the bed to ensure
that this distance can be achieved
Repeat step 4
7.
Finally with the uprights secured you now want to
8.
take a measuring tape and center your crossbars.
Once centered use your 7/32” Allen Driver to fully
secure your crossbars. Torque the BHCS to 27 ft-
lbs.
Step 5
Note: clamp feet must be used to ensure proper tension
between the rack and the truck bed and prevent damage
Figure 4.1
n
ote
: B
e
sure
to
keep
the
ruBBer
shim
under
the
Base
when
tightening
the
clamps
max distance possible
Figure 5.1
When tightening the 3/8” button head cap
screws ensure that the Allen Driver is fully seated
in the bolt so that it will not strip
7
5/16
In.
4
23
22
We recommend
that you apply Loc-Tite
(red) to any thread that is
engaged with the clamp.
HHCS (Item 22)
should be re-torqued
every 5000 miles.