Using the timer, English – Denon DRA-F101 User Manual
Page 15
15
ENGLISH
9
USING THE TIMER
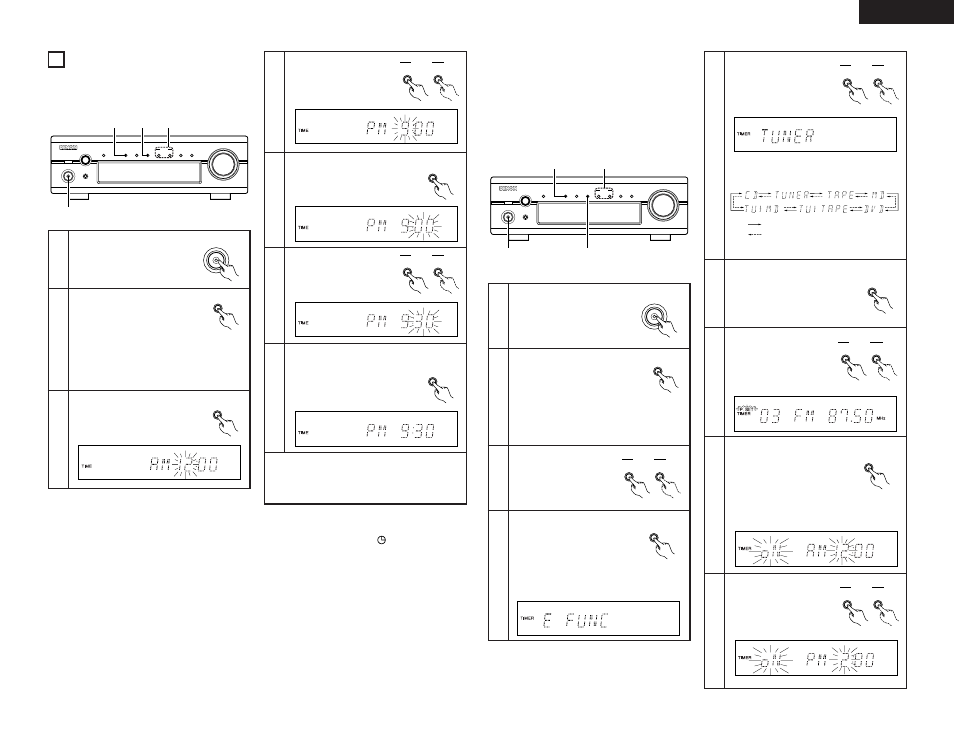
(1) Setting the Current Time (12-hour display)
Example: Setting the current time to 9:30 p.m.
1
Turn on the power.
2
Press the TIMER button for at least
3 seconds.
• “TIME” flashes on the display.
✽
If the time is already set,
“EVERYDAY” is displayed.
Press one of the TUNING buttons
to display “TIME”, then perform
step 3.
7
Press the MEMORY/SET button
at the sound of the chime of a
time service, etc.
• “30” stops flashing, remaining
lit, and the current time is
displayed.
✽
The number changes continuously when one of the
tuning buttons (TUNING UP or DOWN) is pressed.
✽
If the time is already set when step 2, 3 is performed,
both the hours and minutes positions flash.
MEMORY
/ SET
PHONES
SYSTEM
VOLUME
ON / STANDBY
AM-FM STEREO RECEIVER DRA-F101
SOURCE
DIRECT
BAND
UP
DOWN
TUNING
MEMORY
/ SET
FUNCTION
TIMER
TONE
DISPLAY
2
3,5,7 4,6
1
SYSTEM
ON / STANDBY
TIMER
5
Press the MEMORY/SET button.
• “9” stops flashing, remaining lit,
and the minutes position starts
flashing.
MEMORY
/ SET
Use the TUNING buttons to
input the minutes (30).
• “30” flashes in the
minutes position.
6
UP
DOWN
TUNING
3
Press the MEMORY/SET button.
• The hours position flashes.
MEMORY
/ SET
Use the TUNING buttons
to input the hours (PM 9).
• “9” flashes in the hours
position.
4
UP
DOWN
TUNING
(2) Before Setting the Timer
2
Be sure to set the current time. If the current time is not set, the timer standby indicator (“
”) will not light and the
timer will not function.
2
Be sure to preset the station before setting the timer. (Refer to “Presetting AM and FM stations” on page 14.)
2
The DRA-F101 is equipped with two types of timers: the everyday time which turns the power on and off at the
same times every day, and the once timer that turns the power on and off only once.
2
Do not change the timer standby mode after the timer is activated (after the timer on time is reached). The timer may
not operate properly.
2
It is not possible to set the timer start and end times to the same time.
2
If the display or operation is not normal, unplug the power cord, then plug it back in while pressing the memory/set
button (MEMORY/SET). This restores the tuner to the initial default values. After doing this, reset the presettings,
current time and timer settings.
2
When setting the timer to operate the CD player do so with a disc loaded and the disc holder closed. The timer will
not operate properly if no disc is loaded or if the disc holder is open.
(3) Setting the Timer
2
The timer function lets you switch the power between
the on and standby modes automatically at the desired
times.
2
When connected in a system with the DCD-F101, the
timer can be used to play a CD.
Example: Using the everyday timer to listen to the
station stored at preset number 3 (FM 98.00 MHz)
from 2:35 p.m. to 2:56 p.m.
1
Turn on the power.
2
Press the TIMER button for at least
3 seconds.
• “EVERYDAY” is displayed.
TIMER
SYSTEM
ON / STANDBY
PHONES
SYSTEM
VOLUME
ON / STANDBY
AM-FM STEREO RECEIVER DRA-F101
SOURCE
DIRECT
BAND
UP
DOWN
TUNING
MEMORY
/ SET
FUNCTION
TIMER
TONE
DISPLAY
2
3, 5, 7, 9,11,13,15,17
1,18
4, 6, 8,10,12,14,16
✽
If the time is not set, “TIME” is displayed.
Perform steps 3 to 7 on page 15, then start
the timer setting over.
Press one of the TUNING
buttons to display
“EVERYDAY” or “ONCE”.
UP
DOWN
TUNING
3
4
Press the MEMORY/SET button.
• This sets the unit to the timer
setting mode’s function
setting mode.
MEMORY
/ SET
Example: When the everyday timer is
selected
5
Use the TUNING buttons
to switch the function to
“TUNER”.
UP
DOWN
TUNING
✽
The function switches as follows each time
the button is pressed:
: When the TUNING UP button is pressed.
: When the TUNING DOWN button is
pressed.
6
Press the MEMORY/SET button.
• “TUNER” is stored in the
memory as the timer function.
MEMORY
/ SET
Use the TUNING buttons
to set preset number 3.
UP
DOWN
TUNING
7
8
Press the MEMORY/SET
button.
• The preset station is stored in
the memory and the timer on
time setting mode is set.
“E” and “oN” appear
alternately in the display in the
steps 8 to 11.
MEMORY
/ SET
the hours position to “PM
2”.
9
UP
DOWN
TUNING