Lingenfelter L460160000 Lingenfelter RPM-003 RPM Activated Switch Instructions v1.5 User Manual
Page 4
Page 3 of 17
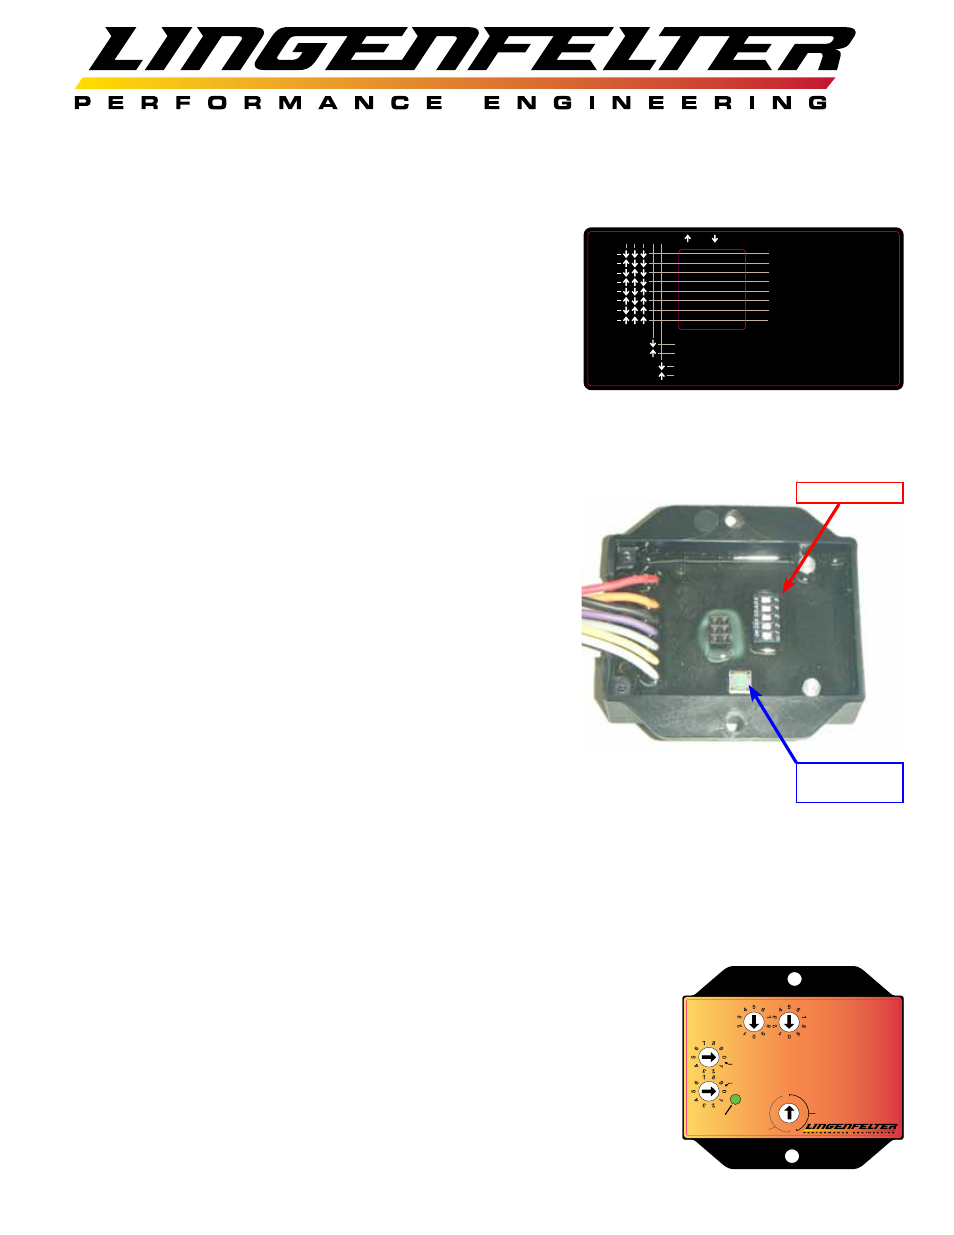
Settings inside the rear cover of the RPM-003:
• Five two position DIP switches (The location of these switches are shown in
Figure 2.)
• DIP switches #1-3 select desired RPM hysteresis (The hysteresis DIP
switch settings are shown in Figure 1.)
• The RPM-003 features RPM hysteresis settings of 0, 50, 100, 150,
200, 250, 300, and 350 RPM.
• When an RPM hysteresis is enabled, the RPM-003 will still switch
at the RPM set point (which is set by the RPM #1 and/or RPM #2
settings), but the RPM-003 will not switch again until the set point
and the hysteresis is reached. (i.e. RPM-003 will switch at 4500
RPM but will not switch back until engine speed falls below 4300
RPM due to a 200 RPM hysteresis).
• It is recommended to use at least a small amount of hysteresis as it
is possible for the RPM-003 to continually switch the outputs on
and off if the RPM is held at the user-defined RPM switch point
with no hysteresis.
• DIP switch #4 toggles analog input ON or OFF (fixed at 90% trip point
with 2% hysteresis)
• This option can be used to activate the outputs on the RPM-003
based on a 0-5 volt analog input signal from the following vehicle
sensors:
• Throttle Position Sensor (TPS)
• Clutch Pedal Position (CPP) sensor
• Accelerator Pedal Position (APP) sensor
• Manifold Absolute Pressure (MAP) sensor
• Or any other rising or falling 0-5 volt signal
• When this option is enabled, the outputs will not activate until
both the RPM set point and the analog input trip point have been
reached.
• This function can be used in nitrous applications to prevent nitrous
oxide from being released prematurely (before BOTH the RPM set
point and analog input trip point has been reached)
• Dip switch #5 toggles the built in tachometer pull-up resistor ON or OFF
• This option is normally used when connecting to the engine speed signal output from the ECM through a
circuit that does not have a pull-up resistor installed. On vehicles that already have this signal connected to
another system or module, a pull-up resistor is most likely already present in the circuit. You DO NOT want
to have multiple pull-up resistors in the circuit. Vehicles that have a pull-up resistor in the instrument cluster
(such as C5 and C6 Corvettes) will require the RPM-003’s pull-up resistor feature to be disabled as it will
create too much resistance in the circuit. Vehicles that do not have a pull-up resistor in the instrument cluster
(such as 2010-2013 Camaro and 2007-2012 CK trucks) should have this feature enabled if you plan to connect
to the ECM signal source.
• ONLY use the tachometer pull-up setting when connected to a TACH signal.
Enabling this when connected a coil or injector may cause a check engine light
and/or a misfire to occur.
• One push button (The location of this button is shown in Figure 2.)
• Used to program the analog input voltage range when device is in programming mode
• In order for the device to enter programming mode, all four 10 position switches must
be set to zero and the 16 position switch must be set to 0.5, low range (arrow pointing
straight up). See illustration on the right for switch positions.
1 2 3
ON
OFF
0
1
2
3
4
5
6
7
RPM HYSTERESIS
0 RPM - HYSTERESIS OFF
50 RPM
100 RPM
150 RPM
200 RPM
250 RPM
300 RPM
350 RPM
4 5
SWITCH #4
SWITCH #5
ANALOG INPUT OFF
ANALOG INPUT ON
TACH INPUT PULL-UP RESISTOR OFF
TACH INPUT PULL-UP RESISTOR ON
DIP Switches
Programming
Button
Figure 1: DIP switch settings label
(also found on the backside of the
RPM-003 back cover).
Figure 2: Location of components
inside the RPM-003’s back cover.
Power
RPM-003
RPM Window Switch
Ground - Black
Normally On - Gray
Normally Off - Yellow
with Analog Input
RPM #1 x1000
RPM #1 x 100
+12V Switched Power - Red
RPM #1
RPM #2 x1000
RPM #2 x100
RPM #2
Analog Input Signal - Purple
+12V Output Norm Off - Orange
Tach Input Signal - White
.5
1
2
3
4
5
1.5
2.5
.5 1
1.5
2
2.5
3
4
5
High Range
+10,000 Off Rpm
Low Range