The iv arm, Setup, Iv arm with skin – Laerdal SimMan Essential Bleeding User Manual
Page 19: Iv arm without skin, The iv arm pad, Filling and priming the iv system
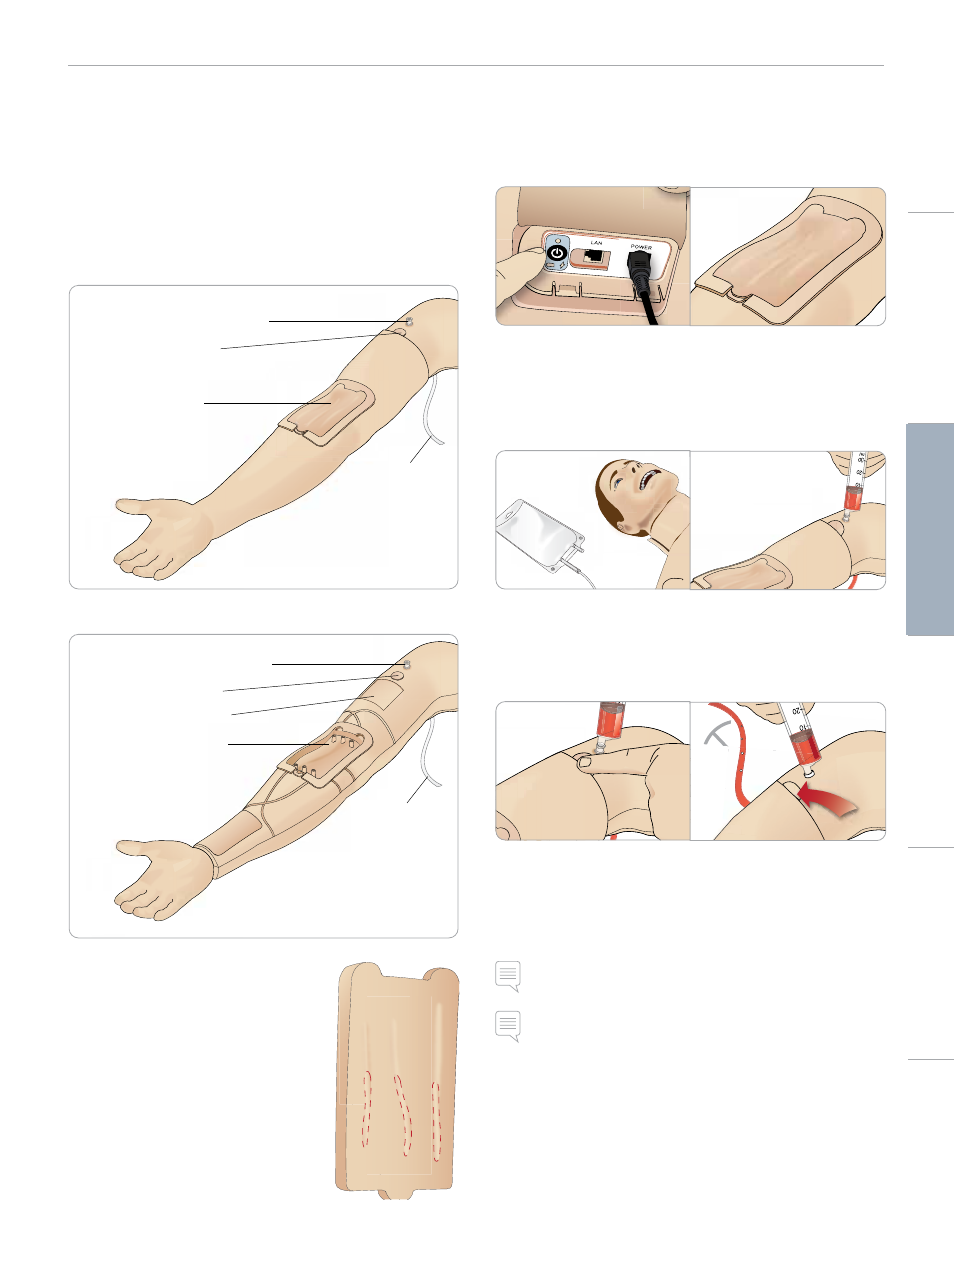
19
SETUP
The IV Arm
Follow these instructions when using the IV Arm for SimMan
Essential Bleeding.
The Patient Simulator must be switched ON when performing the
following.
IV Arm with Skin
Filling and Priming port
Priming switch
IV Arm Pad
Drain tube
IV Arm without Skin
Filling and Priming port
Priming switch
Tourniquet area
IV Arm chassis
Drain tube
The IV Arm Pad
The IV Arm Pads have been tested and
proven capable of multiple IV catheter
insertions/retractions.
To maximize the life of the IV pad we
suggest that you insert the IV catheter in
the region highlighted on the pad.
Filling and Priming the IV System
1 Ensure that the IV Arm is connected to the Patient Simulator
and the Patient Simulator power is ON.
2 Ensure that the IV Arm Pad is fitted correctly.
3 Attach a collector bag to the drain tube of the IV Arm. The bag
should be placed on the bed beside the Patient Simulator or at
the same level, to allow fluid to drain into it.
4 Connect a blood filled syringe (min 40ml) with luer lock to the
Filling and Priming port.
5 Press the priming switch to open the system.
6 Slowly fill the system with simulated blood. Continue this
operation until there are no air bubbles coming out through the
drain tube. Release the priming switch.
7 Continue to slowly fill with no more than 16ml of blood or until
you feel resistance in the syringe.
8 Remove the syringe. The IV Arm is now ready for use.
Note: It is important that the arm is filled slowly to prevent
damage to the IV Arm Pad causing leaks.
Note: The IV Arm Pad is designed for use with a 18 GA 1.3 x
32mm 103ml/min Intravenous Catheter.
Cautions
and
W
arnings
Featur
es
Setup
Maintenance
Spar
e Par
ts
Tr
oubleshooting