Hanna Instruments HI 83200-01 User Manual
Page 49
96
97
OZONE
SPECIFICATIONS
Range
0.00 to 2.00 mg/L
Resolution
0.01 mg/L
Precision
±0.03 mg/L @ 1.00 mg/L
Typical EMC
±0.01 mg/L
Deviation
Light Source
Tungsten lamp with narrow band interference filter @ 525 nm
Method
Colorimetric DPD Method. The reaction between ozone and the DPD reagent causes a
pink tint in the sample.
REQUIRED REAGENTS
Code
Description
Quantity/test
HI 93757-0
DPD Powder Reagent
1 packet
HI 93703-52-0 Glycine Powder (Optional Reagent) 1 packet
REAGENT SETS
HI 93757-01
Reagents for 100 tests
HI 93757-03
Reagents for 300 tests
HI 93703-52
Glycine Powder, Optional Reagent for 100 tests
For other accessories see page 128.
IMPORTANT NOTE: Chlorine is a strong interferent for ozone determination. If the sample is suspected to
contain chlorine residues (free or total chlorine), please follow the alternative measurement procedure
described below:
• Perform the Standard Measurement Procedure and take note of the reading:
value A.
• On a fresh sample perform the Additional Measurement Procedure and take note of the reading:
value B.
• Subtract reading
B from reading A to obtain the ozone concentration in mg/L:
mg/L (O
3
) =
value A – value B.
STANDARD MEASUREMENT PROCEDURE
• Select the
Ozone method using the procedure described
in the
Method Selection section (see page 12).
• Fill the cuvette with 10 mL of unreacted sample, up to
the mark, and replace the cap.
• Place the cuvette into the holder and close the lid.
Ozone
10 mL
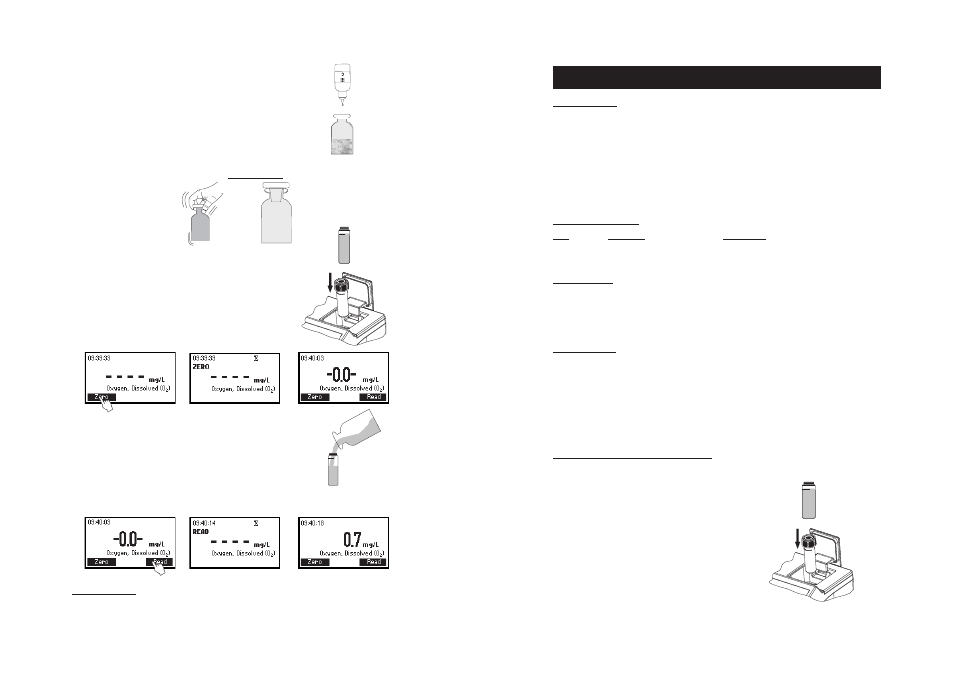
Dissolved Oxygen
• Let the sample stand and the flocculent agent will start to settle.
• After approximately 2 minutes, when the upper half of the bottle becomes
limpid, add 10 drops of HI 93732C-0.
• Replace the cap and invert the bottle until the settled flocculent dissolves completely. The sample is
ready for measurement when it is yellow and completely limpid.
• Fill the cuvette up to the mark with 10 mL of the unreacted
(original) sample, and replace the cap. This is the blank.
• Place the cuvette into the holder and close the lid.
• Press ZERO key. The display will show “-0.0-” when the
meter is zeroed and ready for measurement.
• Remove the cuvette.
• Fill another cuvette up to the mark with 10 mL of the reacted sample and
replace the cap.
• Reinsert the cuvette into the instrument.
• Press READ to start the reading. The instrument will display the results in mg/L of dissolved oxygen.
10 mL
x 10
INTERFERENCES
Interferences may be caused by reducing and oxidizing materials.