FeiYu Tech FY-31AP User Manual
Page 6
Guilin Feiyu Electronic Technology Co., Ltd
Guilin Feiyu Electronic Technology Co., Ltd http://www.feiyudz.cn E-mail: [email protected] Page 6
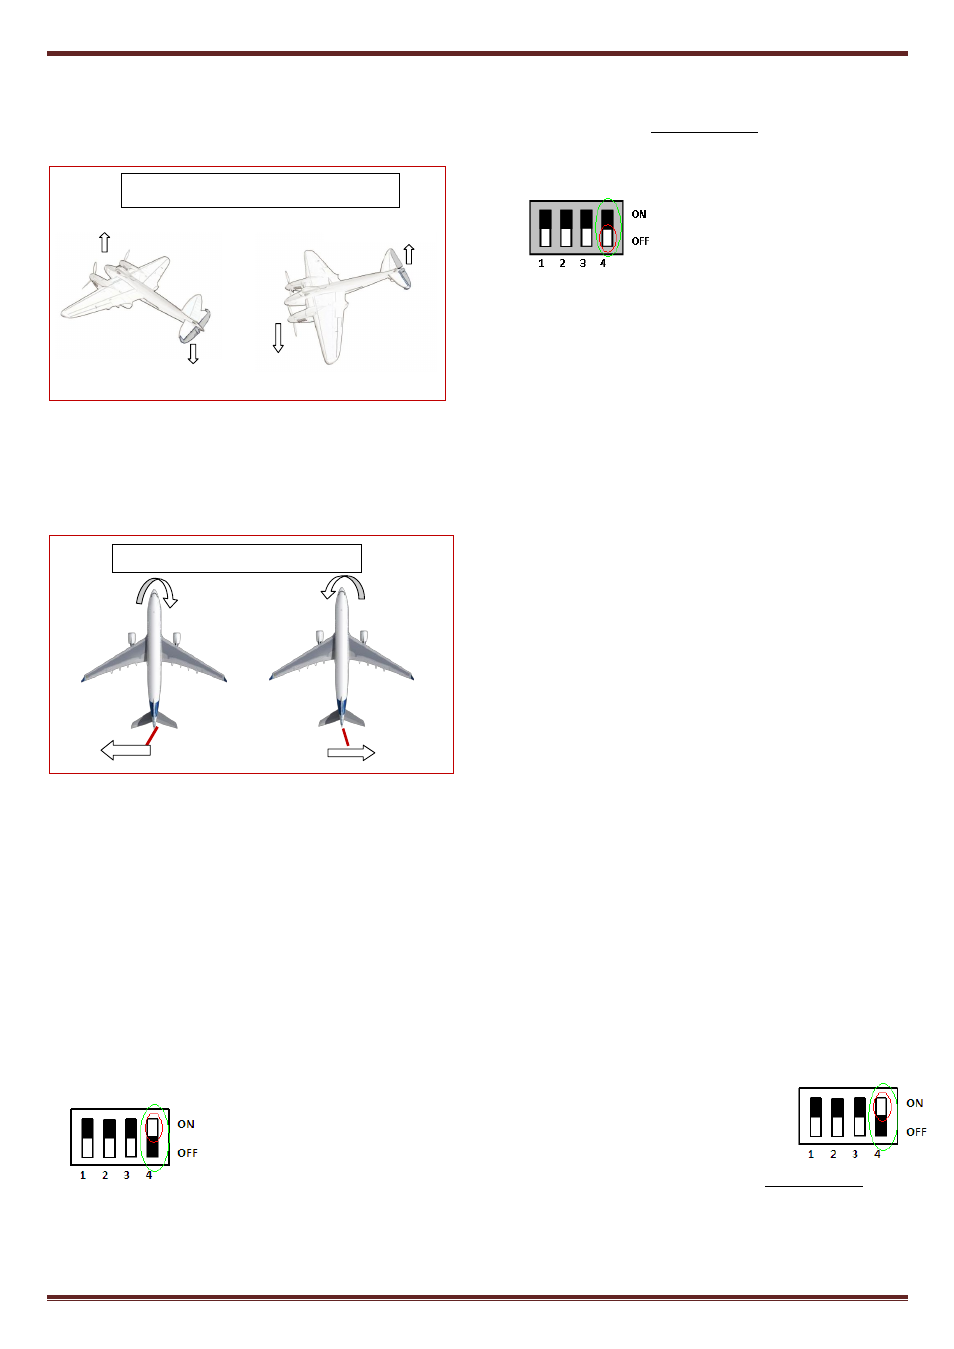
ELEVATOR - Pitch the plane nose up and down to see the following
elevator action:
Incline the plane NOSE UP. You should see the elevator move down.
And when you move the NOSE DOWN, the elevator should move up.
Move the Elevator knob to the opposite side (from Centre) if the
servo movement is incorrect.
RUDDER - Turn your plane clockwise or counter clockwise to see the
rudder movement below:
Move the Rudder knob to the opposite side (from Centre) if the servo
movement is incorrect.
Adjust Rudder gain according to your aircraft requirement (lowest
gain nearest to centre, highest gain further away from centre).
24. RECORDING YOUR AIRCRAFT NEUTRAL VALUE
1) The FY31AP can record your aircraft best stabilization attitude in its
memory. By recording this ‘Neutral Value’, the FY31AP can know
how best to control your aircraft for optimum stability.
2) You can do this procedure with the aircraft on the ground or in the
air.
3) Setting the Neutral Value on the ground is quick and easy and will
produce good stabilization results. However recording neutral value
‘on the fly’ will result in more accurate autonomous flight attitude
control.
Recording Neutral Value on the Ground
Step 1: Set up your aircraft and ensure correct FY31AP orientation,
position & leveling. Ensure the Mode 3 (auto stabilization) Elevator,
Aileron and Rudder movements are in the correct direction.
Step 2: Move Dip Switch No. 4 to ‘ON’ position.
Step 3: Place your aircraft on a table. Arrange the aircraft so that is
perfectly level. Position the aircraft exactly as you wish it to be during
auto stabilization flight (i.e. fuselage and wings perfectly level).
Step 4: ON your transmitter and zero all your trims. Power up the
FY31AP in Mode 1 (Manual Mode). Confirm there are no deflection
to the Aileron, Elevator and Rudder surfaces by adjusting your servo
links. Re-confirm that your aircraft is perfectly level. This is your
aircraft Neutral position.
Step 5: While in Step 4 leveled position, activate Mode 3 (Auto
Stabilization Mode) for at least 2 seconds. Since Dip Switch No. 4 is
ON, the FY31AP will now record the Neutral Point.
Step 6: After 2 seconds, move Dip Switch No. 4 back to OFF position.
The procedure is complete and the system is ready for flight.
Note: when the DIP Swith NO.4 is in the ON position,the FY-31AP will
record the neutral point for each time you switch the mode from Mode
1: Deactivated Mode to
Mode 2: Stabilized mode.
25. Checking the control surface & LED before fly
Before your fly please reconfirm correct control surface movement
direction both in RC control mode(Mode 1) and Stabilized
mode(Mode2).
Switch the SW1 and SW2, to observe if the blue LED flash in the
correct way in each mode.
Observe the Red LED to confirm if the GPS have locked, if yes, then
you can take off your plane.
26. Stabilized mode (Mode2)Test And Sensitivity Adjustment
At this stage, your aircraft should already have automated surface
control with the right direction when in Auto Stabilized Mode and
the Neutral Value is already recorded.
Now you need to fine tune your FY31AP stability gain via flight tests.
For the first flight it is recommended that the gains not be set too
high. To avoid excessive oscillation (flight overcorrection) put the
gyro gain at mid point.
Take off in Mode 1 (Manual Mode). After achieving safe height,
activate Mode 3 (Auto Stabilized).
Aileron Gain: If you see oscillation of the wings, this indicates the
Aileron gain is set too high. Switch back to Mode 1 and land the
airplane.
Reduce the sensitivity (move dial towards centre position) and fly
again. You should see improvement in wing attitude. Adjust until
you are satisfied with the level of wing stabilization.
Elevator & Rudder Gain: Too much Elevator gain will show the tail
moving up and down (nodding). Too much Rudder gain will show
tail wagging. Reduce gain until this flight over corrections
disappears.
Alternately, if you find the flight correction is not enough (too low
stability), you can increase gain accordingly.
27. Recording Neutral Value ‘On the Fly’
After the checking for the control surface, adjust the 3 knob switch to a
suitable position(advice to adjust for about half),then you can test the fly
now. The test for fly is in order to record the neutral value ‘on the fly’.
This can help you get more accurate autonomous flight attitude control.
It is best to carry out this procedure during minimal wind conditions.
Step 1: Set up your aircraft and ensure correct FY31AP orientation,
position & level. Ensure the Mode 3 (auto stabilization) Elevator, Aileron
and Rudder movements are in the correct direction.
Step 2: Move Dip Switch No. 4 to ‘ON’ position.
Step 3: ON your transmitter and zero all your trims.
Confirm there are no deflection to the Aileron,
Elevator and Rudder surfaces by adjusting your
servo links.
Step 4: Power ON the aircraft with the FY31AP in Manual Mode.
Step 5: Fly your aircraft to a safe height (still in Manual mode) and fly in
a Level and straight line.
Step 6: While in this Neutral Value, activate Mode 2 (Auto Stabilization
Mode) for at least 2 seconds. Since Dip Switch No. 4 is ON, the FY31AP
will now record your Neutral Value. After 2 seconds, switch back to
manual mode or keep in the Mode 3 (Auto Stabilization Mode)and land
Rudder moves
to the left
Rotate right
Rotate left
Rudder moves
to the right
Rudder Movement Auto Stabilization Mode
Elevator Movement In Auto Stabilization Mode
Elevator moves up
Nose Down
Elevator moves down
Nose Up