Offset elbow installation – DuraVent DuraTech 5-8 User Manual
Page 12
12
may be constructed with standard framing
and sheathed with sheetrock or plywood.
Important: Use Wall Straps every 8’ min to
maintain a minimum of 2” of air space between
the chimney and combustible materials.
OFFSET ELBOW INSTALLATION
Elbows are manufactured in 15° and 30°
angles measured from the vertical. In the
US, a 30° Elbow is the largest that can be
used in an offset. A 30° Elbow may not be
combined with a 15° Elbow to make a 45°
offset. Elbows inhibit draft, avoid their use
where possible. When Elbows are necessary
to avoid obstructions such as rafters, etc, use
no more than 2 pairs of Elbows in any one
chimney system.
1. Attach Elbows: Attach Elbow to Chimney
Section or other Elbow by twisting clockwise
until they lock firmly. Attach one Elbow to the
Chimney Section below, and align it for the
offset. Elbows for DuraTech have a swivel
feature that allow for 360º rotation at their base
for ease of installation. Refer to Table 3 to
determine the required offset length and attach
an appropriate length (or lengths) of Chimney
Section(s) above the Elbow. Important:
For each chimney pipe section in the offset
(between the elbows), there must be an Elbow
Strap, Tee Support, or similar support method
to support the weight of the pipe and to relieve
stress on the Elbows. Attach the second Elbow
above the Chimney Section to complete the
offset (Fig.17).
2. Secure Offset: Place the Elbow Strap’s
band around the angled portion of the top
Elbow, then tighten the nut and bolt until
the clamp is firm. There are both dedicated
diameter, and Universal components available,
Wrap the Elbow Strap end over an adjacent
joist or rafter and secure it with at least (2)
8-penny nails or (2) #8, 1-1/2 screws. Do not
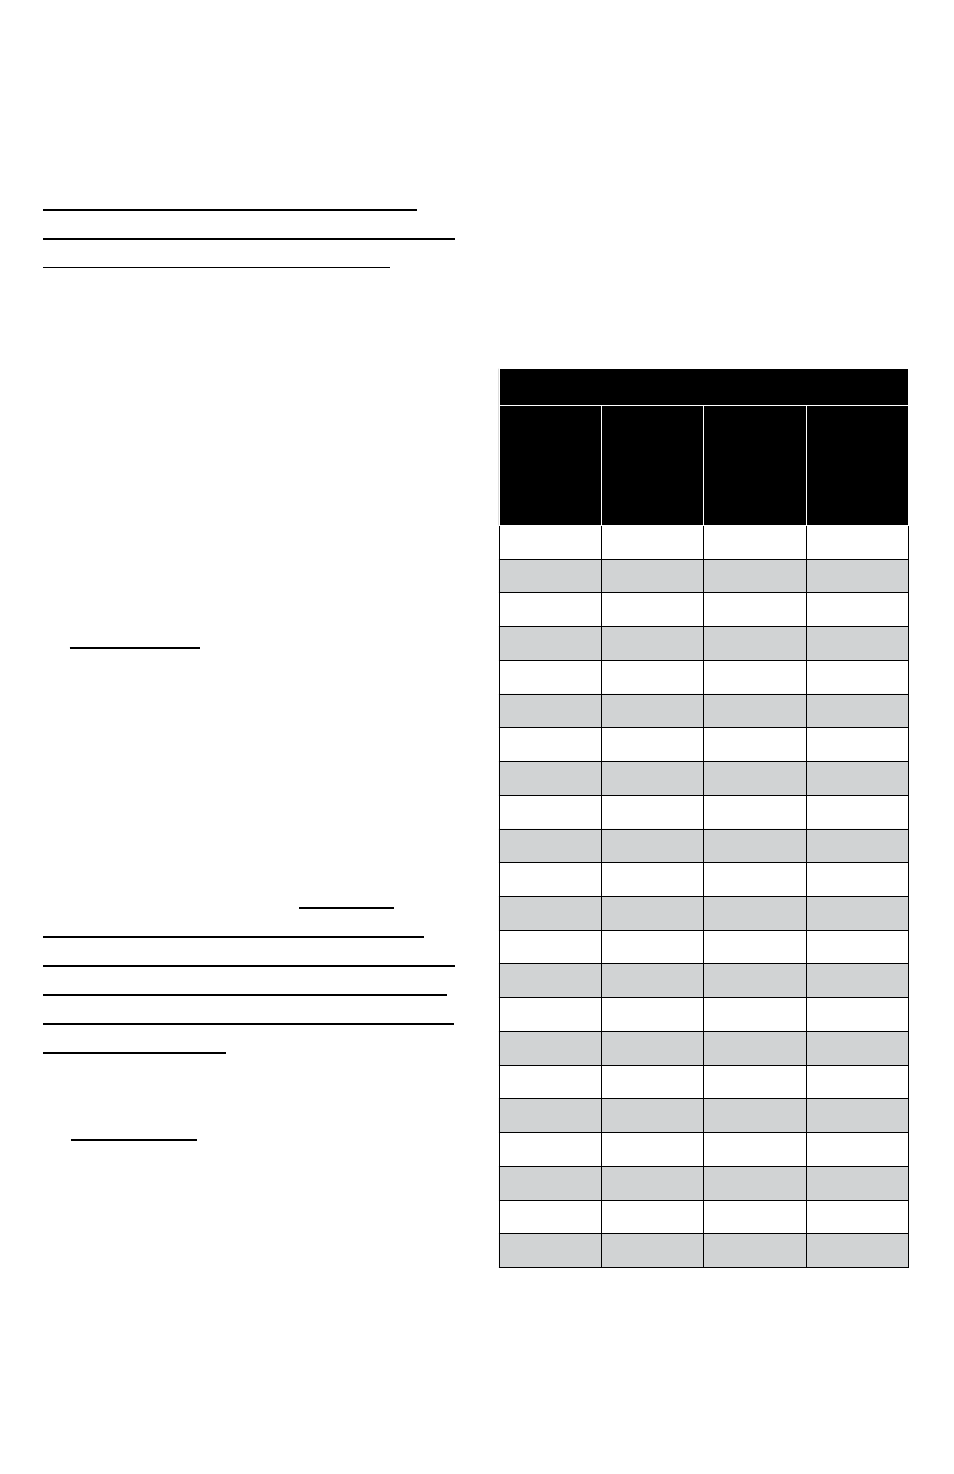
TABLE 3: Offset Chart
Elbow
Angle
from
Vertical
Chimney
Length
Between
Elbows
Offset
Inches
Rise
Inches
15”
0”
2”
16 ½”
15”
6”
3 ¼”
21 ¼”
15”
12”
4 ¾”
27
15”
18”
6 ¼”
32 ¾”
15”
24”
8”
38 ½”
15”
36”
11”
50 ¼”
15”
48”
14 ¼”
61 ¾”
15”
48” + 6”
15 ½”
66 ½”
15”
48” + 12”
17”
72 ¼”
15”
48” + 18”
18 ½”
78:
15”
48” + 24”
20”
83 ¾”
30”
0”
4”
15 ¾”
30”
6”
6 ¼”
30”
12”
9 ¼”
25 ¼”
30”
18”
12 ¼”
30 ¼”
30”
24”
15 ¼”
35 ½”
30”
36”
21 ¼”
46”
30”
48”
27 ¼”
56 ¼”
30”
48” + 6”
29 ¾”
60 ½”
30”
48” + 12”
32 ¾”
65 ¾”
30”
48” + 18”
35 ¾”
71”
30”
48” + 24”
38 ¾”
76”
add more Chimney Sections until the Elbows
are supported. Be sure that the chimney
remains vertical. If there is more than one
Chimney Section between the Elbows, install a
second Elbow Strap around the joint of the two
Chimney Sections (Fig.17).