Settings, Setting the dip switches – A&D Journal Printer AD-8118A User Manual
Page 14
Attention! The text in this document has been recognized automatically. To view the original document, you can use the "Original mode".
Settings
Setting the DIP Switches
The DIP switches control the conditions of printing. Open the cover on the
front panel (refer to “Front Panel,“ p. 6) and set the DIP switches. The DIP
switch options are as follows:
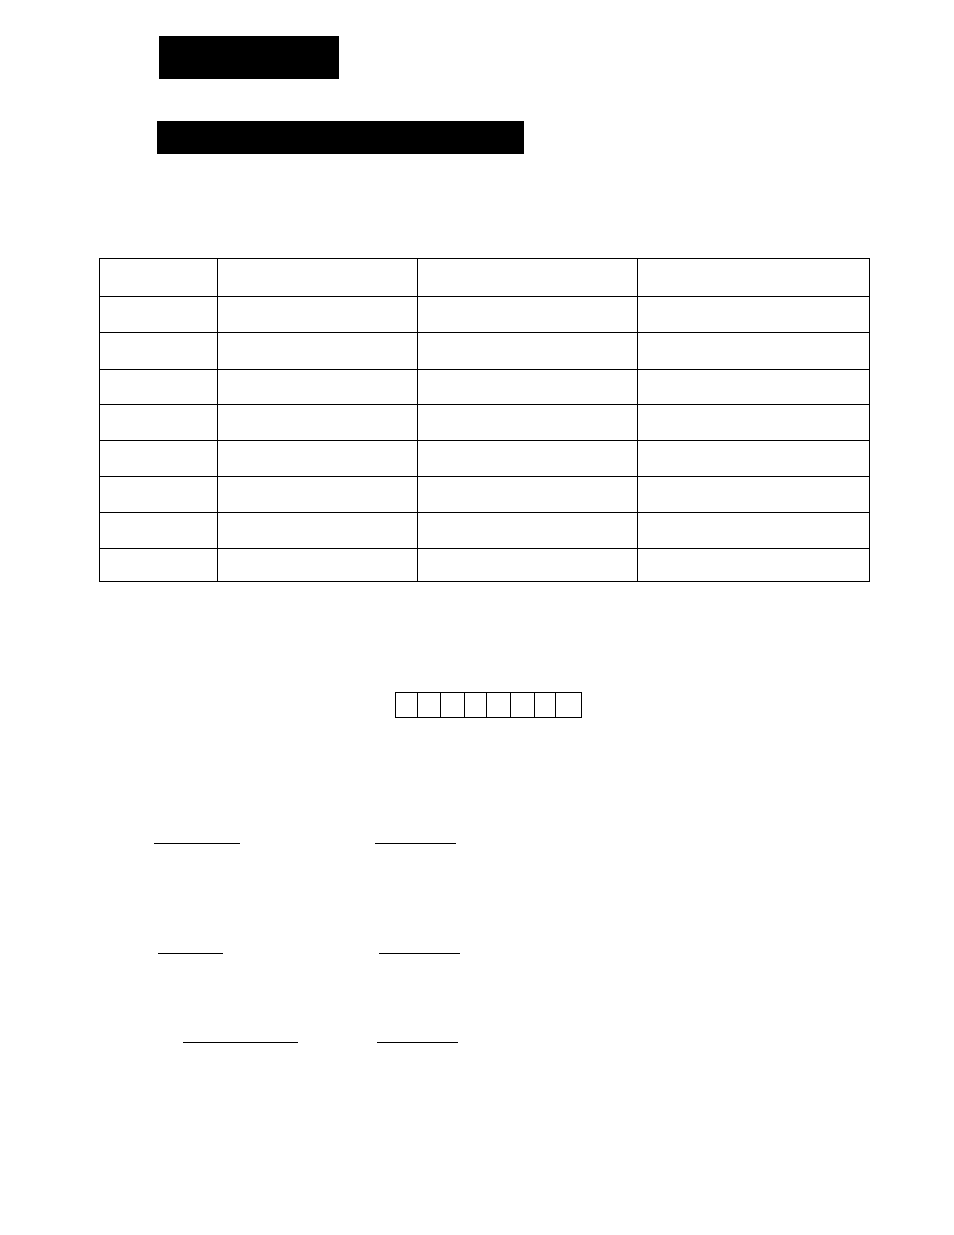
Switch No.
Contents
OFF
ON
1
Baud rate
2400bps
600bps
2
Data bit
7bit (even parity check)
8bit (no parity)
3
Printing mode
Dump print
Standard format
4
Printing form
Normal characters
Inverted characters
5*
Minus/unstabie
Accepted
Not accepteddata
6
Printing characters
Standard characters
Enlarged characters
7
Key input
Enabled
Disabled
8
Setting mode
Normal mode
Setting modechange
All switches are turned OFF without No.3 when shipped from our factory so
make changes according to your needs. Note that switch #5 is available only
in the standard format.
LSS
MSB
n
0 1 2
3 4 5 6
start M
data bit
parity bit stop bit
The DIP switch explanations are described beginning below:
Baud rate
Switch #1
Baud rate is the speed of transmitting data, it can be changed by the DIP
switch #1. Choose either a faster 2400bps or normal 600bps speed.
Choose 600bps to avoid errors caused by the expansion of the cable.
Data bit
Switch #2
Data bits are the bits used to transfer one character of data; 7 bits or 8
bits are available. Even parity is performed on 7bit data.
Printing mode
Switch #3
Dumb printing is simply having al! print formatting controlled by an
external device. All function keys and inputs are disabled except for the
FEED key.
owners-AD-8118A-v.3.a
Page 13