Figure 9, Setscrew, Bell crank – Ariens 924071 User Manual
Page 9: These lines must be parallel, Ahachment, Clutch, Engine, General, Storage, Tme mainteimaimce
Attention! The text in this document has been recognized automatically. To view the original document, you can use the "Original mode".
TME
MAINTEIMAIMCE
IT
3.
tion wheel to the hub are loosened. Remove the
five bolts, shift to "THIRD” position and discon-
r\ect the shift link. See Page 1 2 illustration.
Position a new friction wheel on the hub and
replace the five bolts. Tighten these bolts to 8-10
foot pounds with a torque wrench. Replace the
shift links. See Page 12 illustration.
4. Replace the bottom cover. Readjust the drive disc
as described in the "TRACTION CLUTCH AD
JUSTMENT" section on page 6.
DRIVE CHAIN ADJUSTMENT - FIGURE 9
If Sno-Thro is difficult to push because of tight or in
terfering drive chains, proceed as follows:
Stand unit up on blower housing and remove bot
tom cover.
1
.
2
.
Chain tension is adjusted by loosening the two
nuts on the reduction shaft. Adjust reduction
sprocket up or down in slot to obtain proper ten
sion (chain should be snug). Retighten both nuts.
Torque to 1 70-1 80 inch lbs.
ADJUST NUTS
REDUCTION SHAFT (ON MODELS!
924050 & 924073)
FIGURE 9
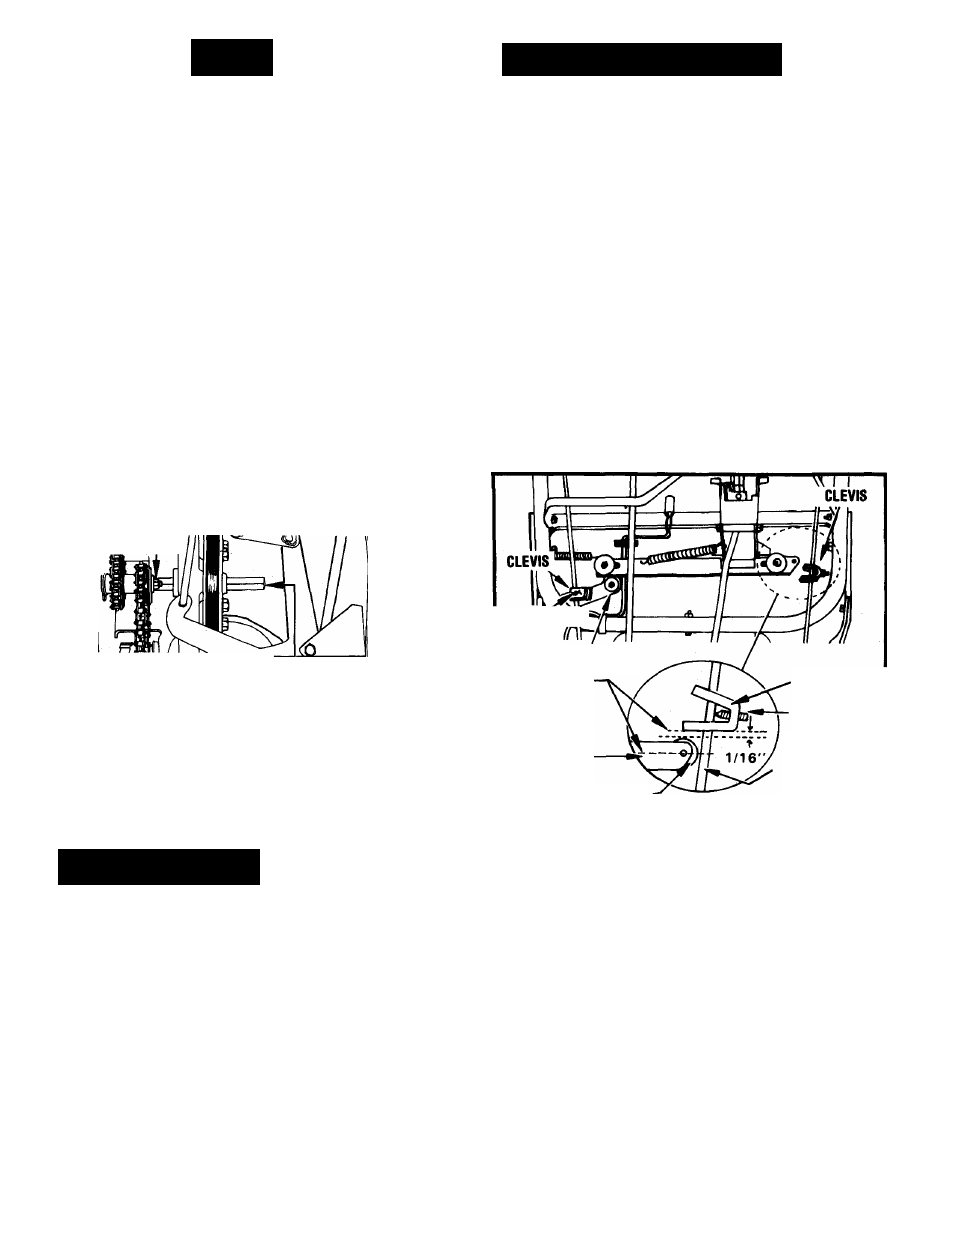
CLUTCH HANDLE INTERLOCK - FIGURE 10
NOTE: THIS FEATURE IS PROVIDED FOR YOUR CON
VENIENCE. THE ATTACHMENT CLUTCH MAY BE
STORAGE
ENGAGED ALONG WITH THE TRACTION CLUTCH
WHEN OPERATOR IS HOLDING DOWN THE TRAC
TION CLUTCH LEVER. IF THE OPERATION OF THIS
FEATURE DOES NOT FUNCTION AS DESCRIBED IN
"OPERATION" SECTION OF THIS MANUAL, THE
FOLLOWING PROCEDURE SHOULD BE PERFORMED.
1
.
2
.
3.
Check both clutches to be sure they operate freely
without binding.
Release Traction Clutch Lever ("UP" position).
Pull bell crank down until slider is at end of slot.
See Figure 10. Secure clevis to traction clutch rod
at this position with setscrew.
Engage both clutch levers ("DOWN" position).
Adjust clevis on attachment clutch rod to where it
clears roller in slider by 1/16" and the "TOE" of
the clevis is parallel to the slider.
Release clutch levers. Check latching of interlock
for proper operation.
SETSCREW
\\\
BELL CRANK
THESE LINES
MUST BE
PARALLEL
SLIDER -
ROLLER
CLEVIS
SETSCREW
AHACHMENT
CLUTCH
ROD
FIGURE 10
WARNING: NEVER STORE SNO-THRO IN AN ENCLOS
ED AREA WHERE FUEL FUMES MAY REACH AN OPEN
FLAME, SPARK, OR PILOT OF FURNACE, ETC. DRAIN
FUEL OUTDOORS, AWAY FROM OPEN FLAME, AND
USE ONLY AN APPROVED FUEL CONTAINER.
ENGINE
:efer to Engine Manufacturer's Instructions supplied
( (^vith this product.
GENERAL
Store Sno-Thro in a cool, dry place.
Inspect Sno-Thro for visible signs of wear, breakage or
damage. Order any parts required and make necessary
repairs to avoid delays when beginning use again. Your
Ariens dealer will be able to assist you.
Lubricate Sno-Thro as described in "LUBRICATION"
section of this manual.
Clean the Sno-Thro thoroughly. Touch up all unpainted
and exposed areas with paint to avoid rust.