Honeycomb stitch, Smocking, Straight featherstitch – SINGER 9124 User Manual
Page 19: Edging, Fastening the buttonhole attachment, Setting the length of buttonhole, Fh4i -if, One-step buttonholing
Attention! The text in this document has been recognized automatically. To view the original document, you can use the "Original mode".
HONEYCOMB STITCH
Use the Honeycomb Stitch for smocking, mending and sewing stretch fabrics.
SMOCKING
Smocking is decorative stitching across
evenly spaced gathers of fabric.
To Gather Fabric:
__________________
RECOMMENDED SETTINGS
Straight Stitch
Stitch Selection:
Stitch Width:
Stitch Length:
Foot:
Needle Plate:
II :l 8 I)
__ - - 0__
I r t 0 i * II
4
Special Purpose (J)
General Purpose (A)
• Sew rows of straight stitches, 1/4" apart,
across area to be smocked.
• Pull thread evenly, gathering fabric.
• Tie ends of every two rows of stitching
together to hold gathers in place.
• Baste a backing to wrong side of fabric.
To Smock Fabric:
RECOMMENDED SETTINGS
Stitch Selection:
Honeycomb Stitch
Stitch Width:
stitch Length:
3-1/2 to 4
Adjust balance, if necessary
Sew between rows of straight stitches.
Pull out straight stitches when completed.
STRAIGHT FEATHERSTITCH
With the Straight Featherstitch you can stitch and finish a seam in one step. It is also
ideal for edging and appliqu^ing.
EDGING
Add a delicate touch to your sewing while
finishing and reinforcing your edges.
• Sew seams in usual manner and press.
RECOMMENDED SETTINGS
Stitch Selection:
Straight
Featherstitch
Stitch Width:
'fH4i -iF
Stitch Length:
3-1/2 to 4
Foot;
Special Purpose (J)
Needle Plate:
General Purpose (A)
Adjust balance, if necessary
Place edge of garment, right side up,
under presser foot.
Bulk of garment should be to the left.
As you stitch, needle should go over
right edge of fabric, as shown.
SECTION 5
ONE-STEP BUTTONHOLING
• Your machine automatically makes a buttonhole to the size of your button in one,
easy step. You never need to move the fabric or reposition the needle.
Always make a practice buttonhole on a
sample of your fabric.
Be sure bobbin contains enough thread.
When making buttonholes on hard-to-
reach areas, convert machine bed to
free arm sewing.
Mark buttonhole position on fabric as
indicated in pattern.
RECOMMENDED SETTINGS
Stitch Selection:
Buttonhole Stitch
Stitch Width:
II •; 8 8
1 1 i|i i =
Stitch Length:
4
Foot: Buttonhole Attachment (L)
Needle Plate:
General Purpose (A)
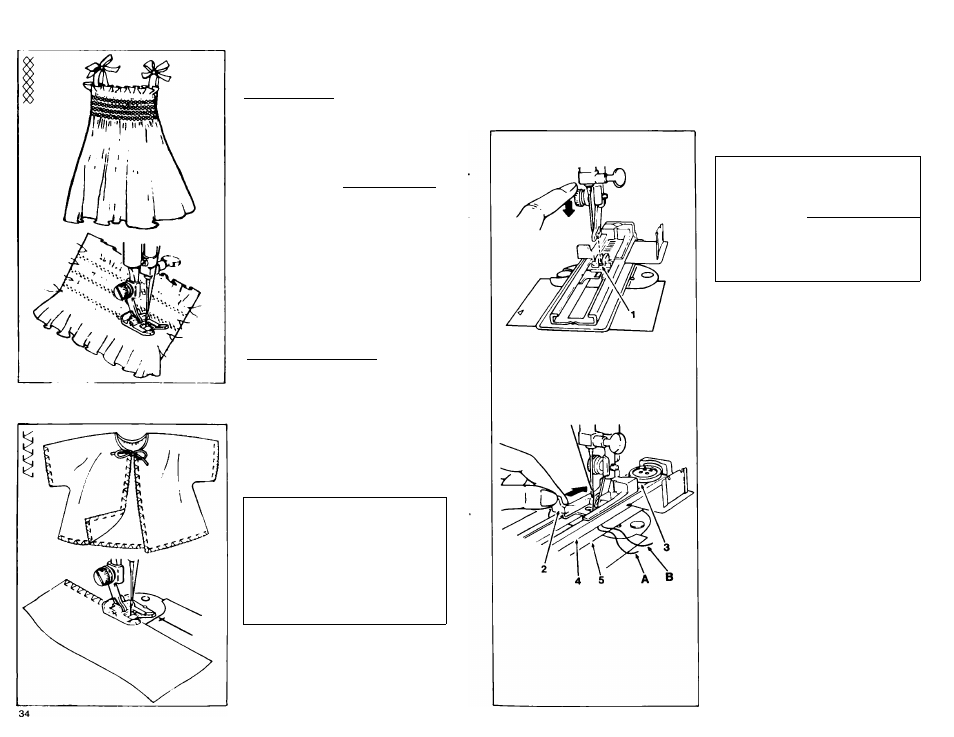
Fastening the Buttonhole Attachment
•
Remove presser foot from shank.
•
Place buttonhole attachment behind
shank and guide it forward.
• Center pin (1) in attachment under
shank, and lower presser foot lifter.
• Press presser foot screw down firmly
until shank snaps into place.
Setting the Length of Buttonhole
•
Open button clamp (2) and place but
ton on carrier (3).
• Slide clamp (2) back to hold button in
place.
• Raise foot lifter and draw needle thread
(A) and bobbin thread (B) between upper
(4) and lower (5) plates of button attach
ment, and to the back of machine.
35