How to check and adjust the drive brake, How to check and adjust the clutch, Maintenance – Sears 502.25502 User Manual
Page 21
Attention! The text in this document has been recognized automatically. To view the original document, you can use the "Original mode".
MAINTENANCE
1
2
3
4
5.
HOW TO CHECK AND ADJUST THE DRIVE
BRAKE
Before you adjust the brake, check the dutch adjustment See
the instructions on "How To Check And Adjust The Clutch "
Make sure the shift lever is in the NEUTRAL (N) position
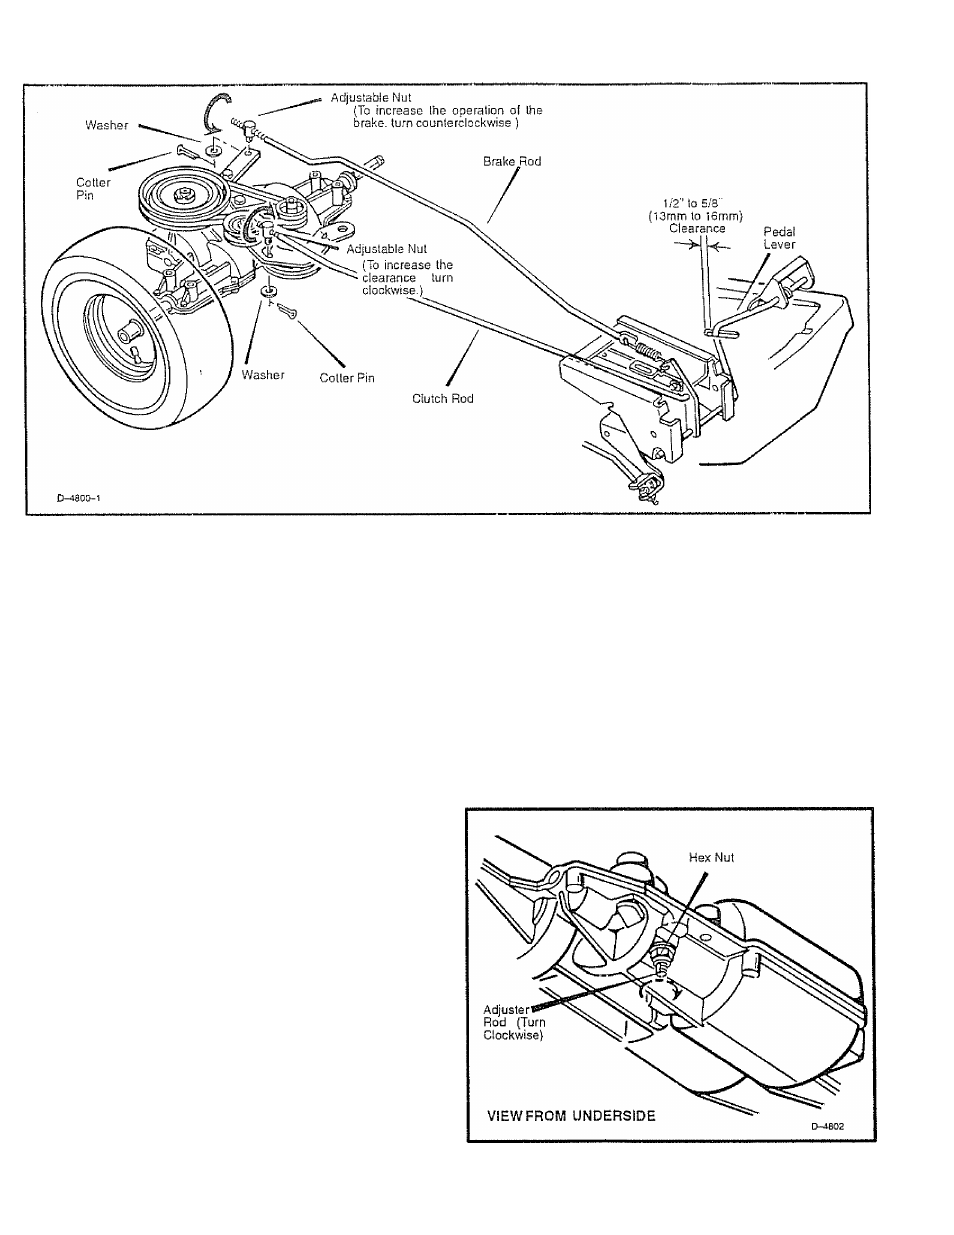
Disconnect the adjustable nut from the brake arm as shown
Carefully push the brake arm forward and hold in position.
With the brake arm forward, rotate the adjustable nut
counterclockwise on the brake rod until the adjustable nut is in
line with hole in the brake arm,
NOTE: If the adjustable nut will not fine up with the hole in
the brake arm, go to step 6. If the adjustable nut does line
up with the hole in the brake arm, go to step 12
Pull the brake arm to the rear of the unit.
The brake adjustment of the transaxle is located on the
underside of the transaxle or) the left side Use one wrench to
hold the adjuster rod while you loosen the hex nut
approximately 2 turns with another wrench
Turn the adjuster rod clockwise 1/2-turn Try to push the unit.
If the unit rolls, continue this step until you feel resistance from
the brake when you push the unit.
Turn the adjusterrodcounterclockwise one turn Then, holdthe
adjuster rod with one wrench while you tighten the hex nut with
another wrench..
Carefully push the brake arm forward and hold in position
With the brake arm forward, rotate the adjustable nut clockwise
on the brake rod until the adjustable nut is in line with the hole
in the brake arm.
Connect the adjustable nut to the brake arm with the washer
and cotter pin.
Apply the parking brake. Try to push the unit. If the rear wheels
do not turn, the brake is correctly adjusted, Release the parking
brake, Push the unit to see if the wheels will freely roll.
10
11
12
.
13
HOW TO CHECK AND ADJUST THE CLUTCH
If the unit will not move when the clutch is engaged or if the belt slips
when going uphill or when pulling a load, the motion drive belt is
loose Check the clearance between the rear of the pedal lever and
the back of the hole as shown If there is more or less than the
clearance shown in the illustration, adjust the pedal as follows:
1
Disconnect the adjustable nut from the idler bracket as shown
2
Turn the adjustable nut clockwise to increase the length of the
clutch rod There must be 1/2-to-5/8-inch clearance at the
back of the clutch/brake pedal as shown. This adjustment will
increase the clearance at the pedal.
3. Assemble the adjustable nut to the idler bracket Check the
clearance at the pedal
4 After making an adjustment to the pedal, check the brake rod
as described in the instructions, "How To Check And Adjust The
Drive Brake."
A
WARNING: If you cannot correctly adjust the drive brake,
take the unit to an Authorized Service Center.
F-92533
21