Operation – Sears 315.10924 User Manual
Page 6
Attention! The text in this document has been recognized automatically. To view the original document, you can use the "Original mode".
OPERATION
ikWARNING: 7-1/4 INCH BLADE IS THE MAXIMUM BLADE CAPACITY OF YOUR SAW. ALSO, NEVER USE
A BLADE HAVING A THICKNESS THAT WILL NOT ALLOW OUTER BLADE WASHER TO ENGAGE WITHs
FLAT ON SPINDLE. LARGER BLADES WILL COME IN CONTACT WITH THE BLADE GUARDS, WHILE
THICKER BLADES WILL PREVENT BLADE SCREW FROM SECURING BLADE ON SPINDLE. EITHER OF
THESE SITUATIONS COULD RESULT IN A SERIOUS ACCIDENT.
TO ASSEMBLE BLADE
1. UNPLUG YOUR SAW.
^WARNING: FAILURE TO UNPLUG YOUR SAW
COULD RESULT IN ACCIDENTAL STARTING
CAUSING SERIOUS INJURY.
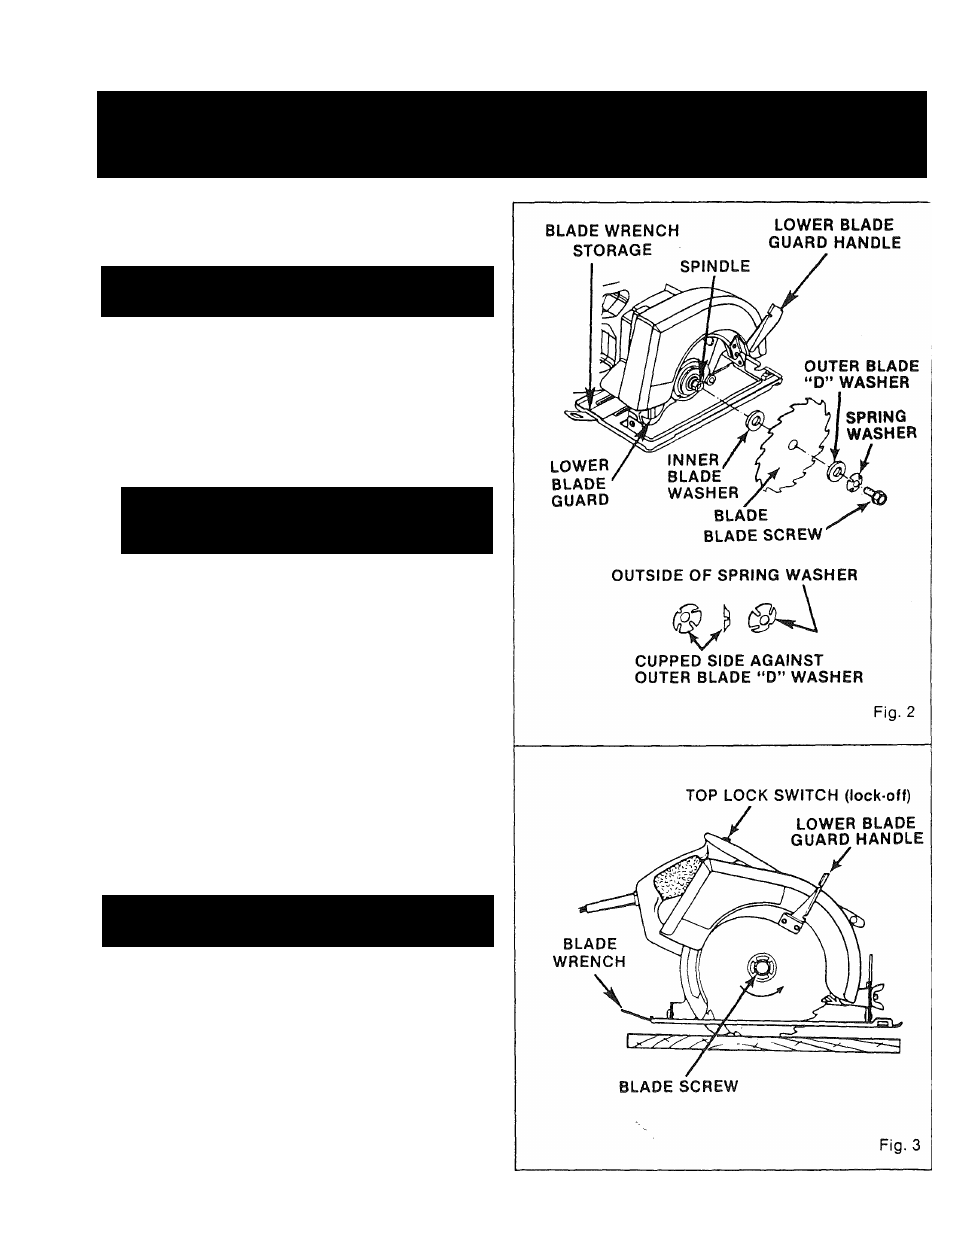
2. Remove blade wrench from storage area. See
Figure 2.
3. Position your saw on end of motor housing and
remove blade screw. NOTE: Turn blade screw
counterclockwise to remove.
4. Remove spring washer and “D” washer.
^WARNING: IF INNER BLADE WASHER IS
REMOVED WHEN ASSEMBLING BLADE, IT
MUST BE REPLACED BEFORE PLACING
BLADE ON SPINDLE. SEE FIGURE 2.
5. Fit saw blade inside blade guard and onto spindle.
NOTE: The saw teeth point upward at the front of
saw.
6
. Replace "D" washer and spring washer. NOTE:
“Cupped" side of spring washer goes against
outer blade “D" washer. See Figure 2.
7. Replace blade screw and tighten until spring
washer is flattened. NOTE: Turn blade screw
clockwise to tighten.
8
. Return blade wrench to storage area. NOTE:
Always place angled portion of blade wrench up
as shown in figure
2
.
-
TO REMOVE BLADE
1
. UNPLUG YOUR SAW.
^WARNING: FAILURE TO UNPLUG YOUR SAW
COULD RESULT IN ACCIDENTAL STARTING
CAUSING SERIOUS INJURY.
2. Remove blade wrench from storage area. See
Figure 2.
3. Place your saw on a piece of scrap wood as shown
in figure
3
with the blade teeth embedded in the
wood.
4. Turn blade screw counterclockwise and remove.
5
. Remove spring washer, “D” washer, and blade.
Before replacing blade, wipe a drop of oil onto
washers where they contact blade.
6
. Return blade wrench to storage area, NOTE:
Always place angled portion of blade wrench up
as shown in figure
2
.
Page 6