Maintenance (cont’d.) – Sears 315.10924 User Manual
Page 13
Attention! The text in this document has been recognized automatically. To view the original document, you can use the "Original mode".
MAINTENANCE (Cont’d.)
TO CLEAN SAWDUST FROM LOWER BLADE
GUARD
Periodically sawdust will accumulate behind the
lower blade guard causing it to be clogged. This
clogging could prevent guard from moving freely and
readily returning to the down position after use.
1. UNPLUG YOUR SAW.
^WARNING: FAILURE TO UNPLUG YOUR SAW
COULD RESULT IN ACCIDENTAL STARTING
CAUSING SERIOUS INJURY.
2. Remove saw blade from your saw. See “To
Remove Blade” instructions on page
6
. Also
remove inner blade washer.
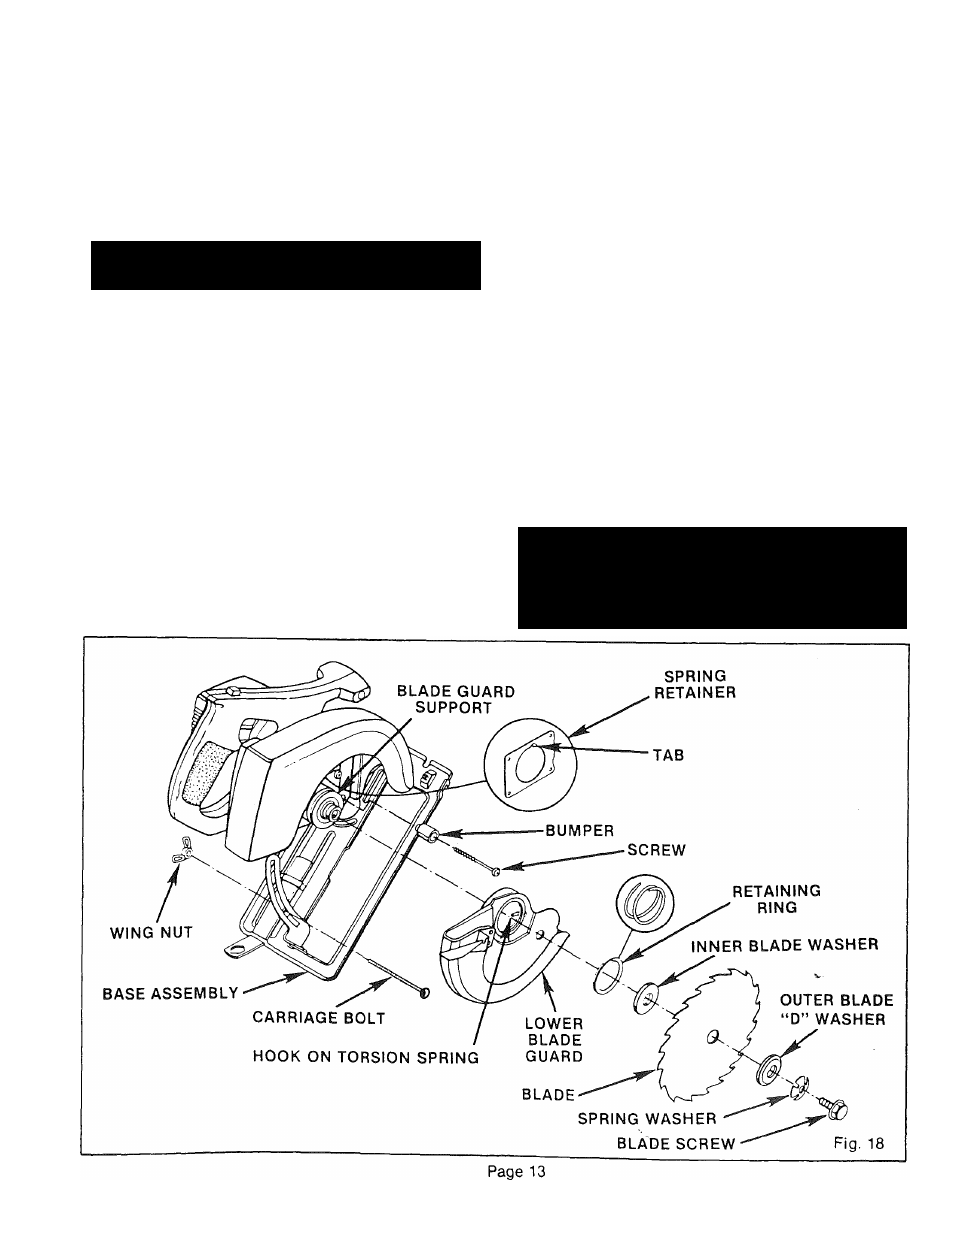
3. Remove pan head screw and bumper. See Figure
18.
4. Remove wing nut, lower depth of cut on base
assembly until carriage bolt can be removed, then
remove carriage bolt. Rotate base assembly until
it clears lower blade guard.
5. Using a 3/16” flat blade screwdriver or needle-
nose pliers, remove retaining ring from blade
guard
support.
ALWAYS
WEAR
SAFETY
GLASSES OR EYESHIELDS.
6
. Remove lower blade guard from your saw and
clean. Also clean blade guard support area. NOTE:
When cleaning use an air hose, clean soft cloth or
brush.
TO REASSEMBLE
See Figure 18.
1. Check torsion spring and make sure it has not
been bent or damaged. Replace if necessary.
2. Place lower blade guard in normal operating posi
tion and secure to blade guard support with retain
ing ring. NOTE: Retaining ring can easily be in
stalled by spreading it apart similar to a spring and
rolling around the groove on blade guard support.
See Figure 18.
3. Rotate lower blade guard approximately 1-1/2
turns clockwise until tension on torsion spring is
tight. NOTE: The hook on torsion spring must be
aligned with tab on spring retainer before tension
can be applied to spring. See Figure 18. If lower
blade guard does not become tight, the hook on
tension spring is not engaged with tab on blade
guard. Do not attempt to use your saw until lower
blade guard has the proper amount of tension.
4. Reposition base assembly, then replace carriage
bolt, wing ruit, bumper, and screw.
5. Reassemble saw blade. See “To Assemble Blade"
instructions on Page
6
.
ikWARNING: CHECK OPERATION OF LOWER
BLADE GUARD BEFORE REUSE TO SEE THAT IT
MOVES FREELY AND READILY RETURNS TO
THE DOWN POSITION. FAILURE TO DO SO
COULD RESULT IN AN ACCIDENT CAUSING
POSSIBLE SERIOUS INJURY.