Customer responsibilities, Lubrication, Engine oil recommendations – Sears 247.37638 User Manual
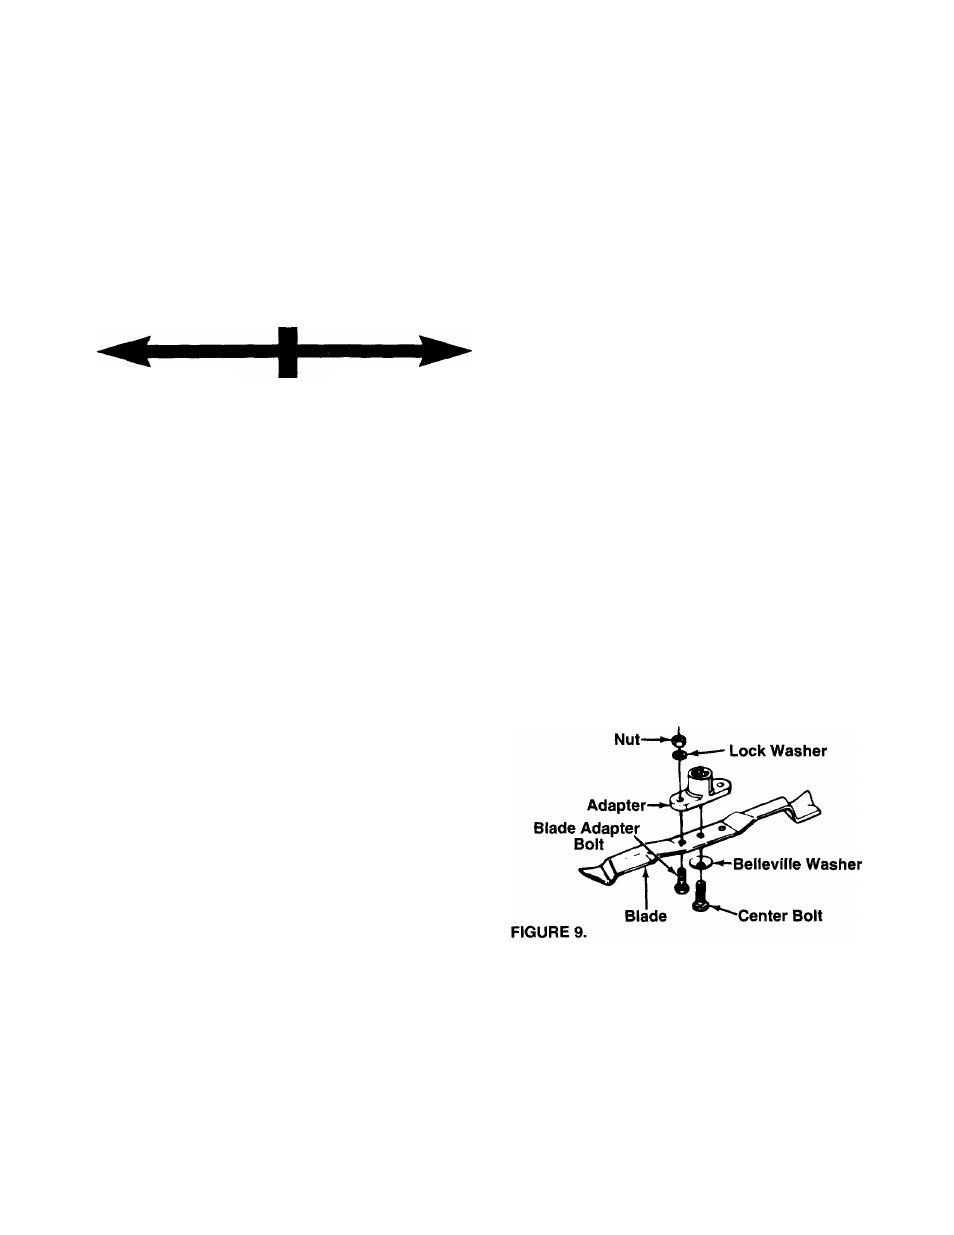
Page 9: Wheels, Wheel adjusters, Brake spring bracket, Transmission, Mower, Blade care, To remove blade (see figure 9)
Attention! The text in this document has been recognized automatically. To view the original document, you can use the "Original mode".
CUSTOMER RESPONSIBILITIES
LUBRICATION
ENGINE OIL RECOMMENDATIONS
A 27 ounce bottle of SAE 30 oil is included with your
new lawn mower.
Only use high quality detergent oil rated with API
service classification SF, SG or SH. Select the oil’s
viscosity grade according to your expected operating
temperature.
Colder
32“F
-► Warmer
5W30
SAE 30
NOTE: Although multi-viscosity oil (5E30, 10W30,
etc.) improves starting in cold weather, these multi
viscosity oils will result in increased oil consumption
when used above 32° F. Check your oil level more
frequently to avoid possible engine damage from run
ning low on oil.
WHEELS
DO NOT oil or grease the wheel bearings. Viscous
lubricants will attract dust and dirt that will shorten the
life of the self-lubricating wheel bearings. If you feel
the wheels must be lubricated, use only a dry, silicone
type lubricant sparingly.
WHEEL ADJUSTERS
For easy operation, lubricate the wheel adjusters at
least once a season with light oil.
BRAKE SPRING BRACKET
Spray a light oil lubricant on the brake spring bracket,
located on the right rear corner of the engine, at least
once a season.
TRANSMISSION
The transmission is pre-lubricated and sealed at the
factory. It does not require checking. If disassembled
for any reason, fill with 2 ounces of Alvania grease,
part number 737-0168.
MOWER
BLADE CARE
Your mower will work better with a sharp blade.
A
CAUTION: DISCONNECT SPARK PLUG
WIRE FROM SPARK PLUG AND PLACE
WIRE WHERE IT CANNOT COME IN CON
TACT WITH THE SPARK PLUG.
TO REMOVE BLADE (See Figure 9):
• Turn mower on its side. Make sure air filter and
carburetor are up.
• Use a block of wood between blade and mower
deck to prevent blade from turning when bolt is
removed. Protect your hands with gloves and/or
wrap blade with heavy cloth.
• Remove blade bolt by turning counterclockwise.
Use a 9/16" box or open-end wrench.
NOTE: A wave washer and two spacers may come
off the crankshaft when the blade is removed. When
reassembling, place spacers on the crankshaft first,
then the wave washer.
TO REPLACE BLADE (See Figure 9):
• Put blade adapter on engine crankshaft.
• Fit blade in adapter. Be sure trailing edge of blade
is up towards engine.
• Assemble bolts, washers, and nuts in the exact
order of removal.
• Use block of wood to hold blade and tighten bolt
clockwise. The recommended torque for the center
bolt is 450-600 in. lbs. The recommended torque
for the blade adapter bolts is 200-350 in.
Ibs.Torque wrenches are available at most Sears
stores and through the catalog.
IMPORTANT: THE BOLT USED TO SECURE THE
BLADE TO ENGINE IS SPECIALLY HEAT-TREATED.
DO NOT SUBSTITUTE (SEE REPAIR PARTS).
A
CAUTION: A LOOSE BLADE CAN BE
DANGEROUS AND MAY MAKE THE
ENGINE HARD TO START.
Use only a Sears authorized replacement blade to get
the best cutting results.
NOTE: We do not recommend sharpening the
blade—but if you do, be sure blade is balanced.
TO SHARPEN BLADE
• The blade can be sharpened with a file or on a
grinding wheel. Do not attempt to sharpen while on
the mower.
• Care should be taken to keep the blade balanced.
An unbalanced blade will cause excessive vibration
when running and eventual damage to mower and
engine.
11