Assembly, To remove mower from cartcn, How to set-up your lawn mov^er – Sears 247.37638 User Manual
Page 6: Assembly , 7
Attention! The text in this document has been recognized automatically. To view the original document, you can use the "Original mode".
ASSEMBLY
IMPORTANT: This unit is shipped WITHOUT
GASOLINE or OIL in the engine. Be certa n to ser
vice engine with gasoline and oil before (perating
your mower.
NOTE: Reference to right or ieft hand si( le of the
mower is observed from the operating po iition.
TO REMOVE MOWER FROM CARTCN
• Remove staples, break glue on top flaf s, or cut
tape at carton end and peel along top fla ) to open
carton.
• Remove loose parts included with unit (owner’s
manual, side discharge chute, grass catcher
bracket and bottle of oil).
• Cut along dotted lines and lay carton dowr flat.
• Remove packing material.
•
Roll or slide unit out of carton. Chec< carton
thoroughiy for ioose parts.
NOTE: Keep the grass catcher bracket ,n a safe
place. If you purchase the optional grass catcher,
mount the bracket on the right side of tne upper
handle as shown on page 18 of this manual,
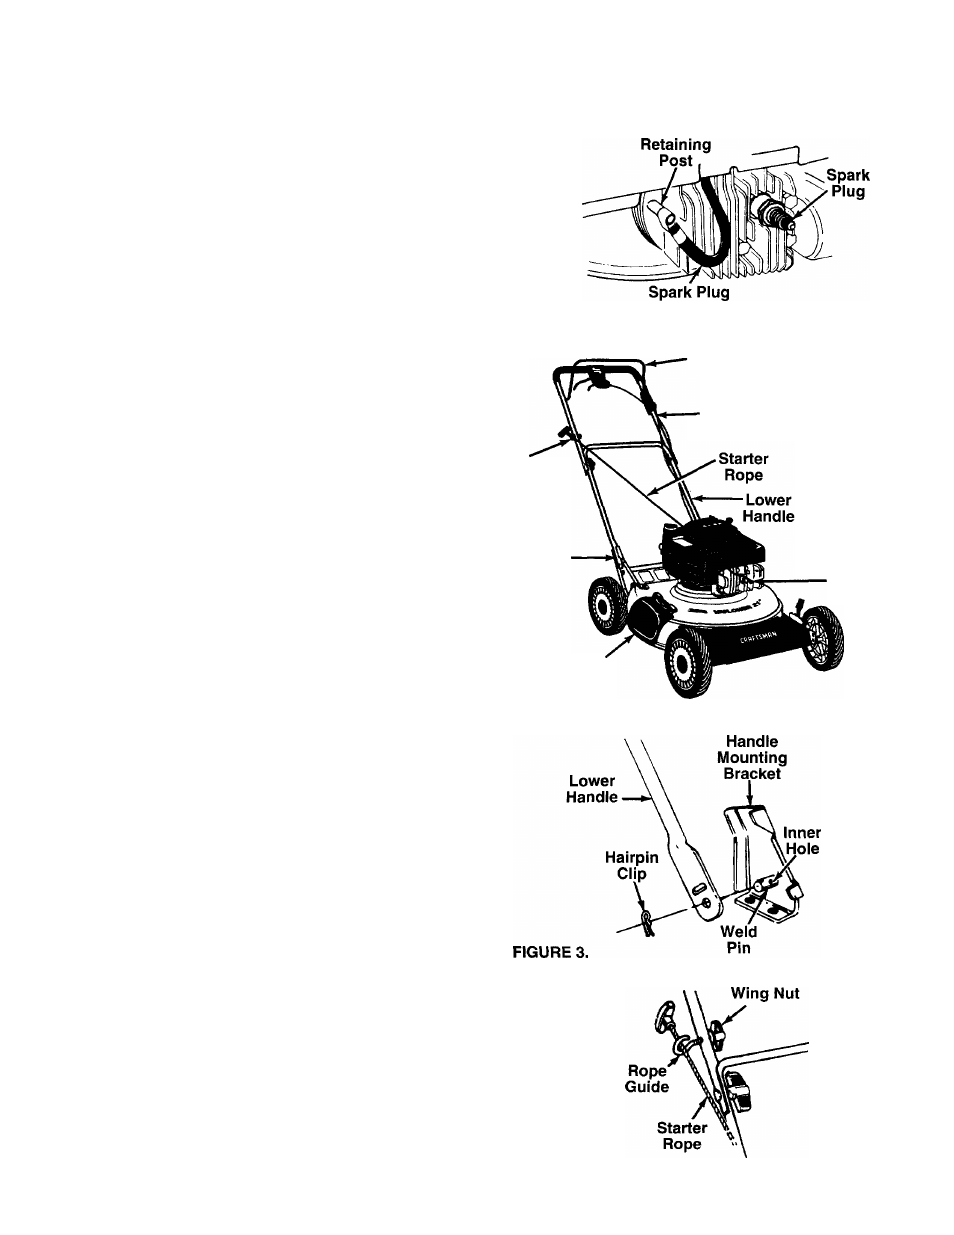
HOW TO SET-UP YOUR LAWN MOV^ER
• Disconnect the spark plug wire from the Sf
Ground the spark plug wire by attaching
retaining post until ready to operate you
See figures 1 and 2. (Spark plug wire is
figure 1 without the rubber boot for clarity.)
•
Remove any packing material which
between the upper and lower handles for
purposes.
• Pull up and back on the upper handle to
handle into the operating position. Make o
lower handle is seated securely into th
mounting brackets. Tighten the hand l<
each side of the handle (carriage bolts
seated properly into the handle).
NOTE: Your mower Is shipped with the hant
higher height position. If you wish to lower the
the handle, refer to the Adjustment Section at
Using a pair of pliers, remove hairpin clips
outer hole in weld pins on handle mounting
Place hairpin clips in the inner hole. See fig
The rope guide is attached to the righ
upper handle. Loosen the wing nut which
the rope guide. See figure 4.
With the spark plug wire disconnec
grounded, hold the blade control handle ac
upper handle, and pull the starter rope o
engine. Release the blade control handle,
starter rope into the rope guide. Tighten
nut.
FIGURE 1.
Wire
Biade Controi
‘Handie
Upper
Handie
Rope
Guide
ark plug,
it to the
■ mower,
shown in
may be
shipping
raise the
irtain the
j handle
nobs on
must be
lie in the
height of
his time.
from the
Drackets.
jre 3.
side of
secures
ed and
ainst the
jt of the
Slip the
:he wing
Handle
Mounting
Bracket
Spark Plug
Wire and
Boot
Muiching
Plug
FIGURE 2.
FIGURE 4.