Care & cleaning – Sears 790.93754 User Manual
Page 19
Attention! The text in this document has been recognized automatically. To view the original document, you can use the "Original mode".
Care & Cleaning
Su rface Elements and Drip Bowls
- Surface elements can be unplugged and removed to make cleaning the drip pans
easier. The surface elements dean themselves when they are turned on. Food spilled on a hot element will burn off. Food spilled
on a cool element may be cleaned with a damp cloth—any remaining soil will burn off the next time the element Is used.
iàCAUTION
Be sure the range is cool
before removing elements or drip bowls.
Be careful not to bend terminal ends
when replacing elements after cleaning.
Hold
Down
Clip
(If equipped)
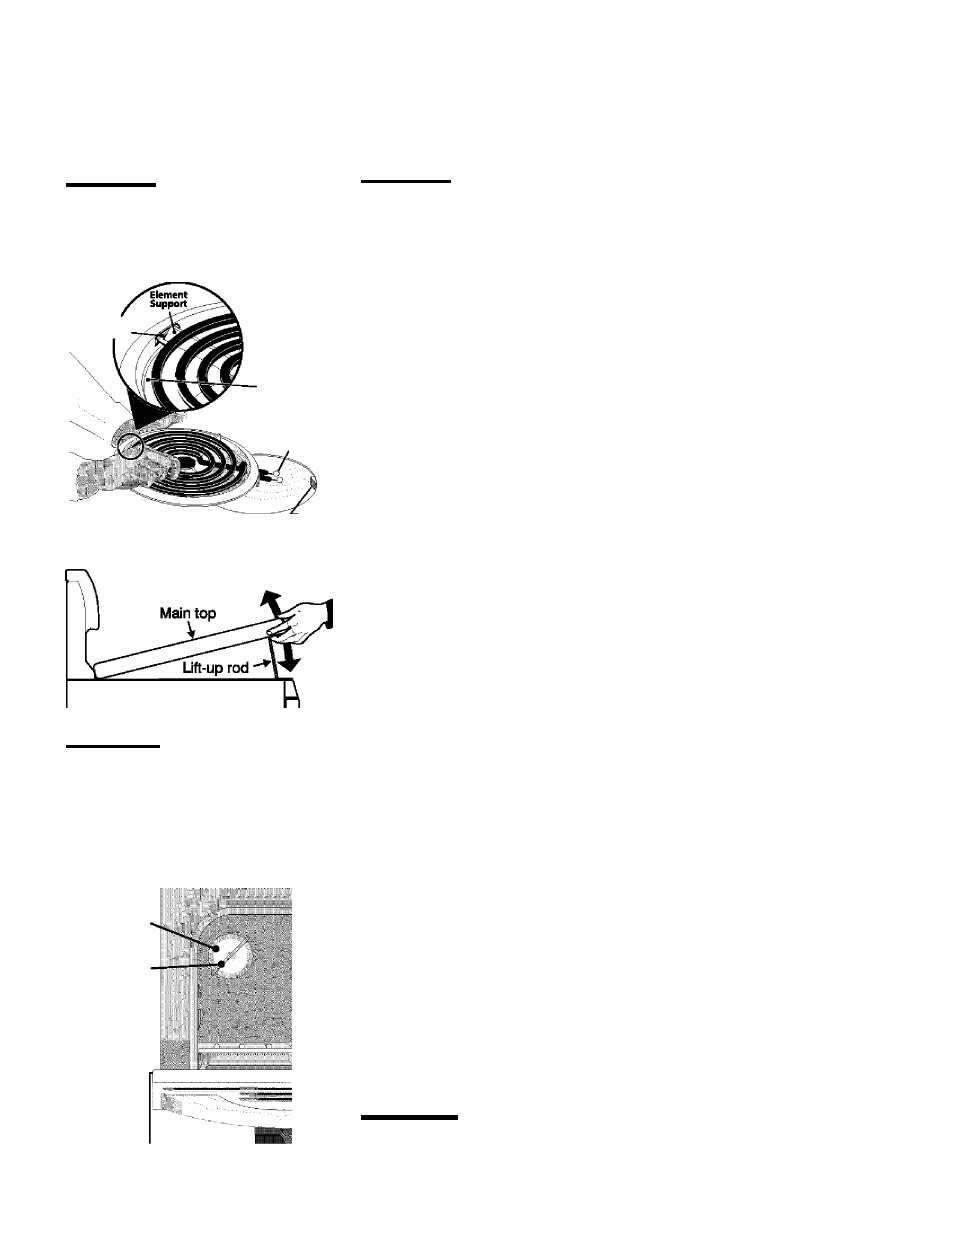
Allow Element
Support to rest
on drip pan
inside nm.
Terminal Erid
Itermlnal
Plug
ükCAUTION
When lowering the llft-up
range top, grasp the sides with finger-tips
only. Be careful not to pinch fingers. DO
NOT drop or bend the range top when
raising or lowering. This could damage
the surface.
Oven
Light
Wire
Holder
^CAUTION
Never immerse a surface element in water.
To Remove the Surface Elements and Drip Bowls
1. Lift the edge of the drip bowl across from the terminal end. Lift the surface
element and drip bowl together just enough to clear the cooktop.
2. While holding the drip bowl and surface element, gently pull the terminal end
out from the terminal plug. If equipped, DO NOT remove the hold down clip from
the drip bowl.
To Clean Drip Bowls
Wash in hot, soapy water or in the dishwasher. Rinse and dry while still warm. Hard
to remove, burned on soil can be removed by soaking the drip bowls for about 20
minutes in a lightly diluted liquid cleanser or a solution of ammonia and water (1/
2 cup ammonia to 1 gallon of water). A nylon scrubber may be used after soaking.
DO NOT use abrasive cleaners or steel wool, as they will scratch the surface.
Always rinse with clean water and polish dry with a soft cloth.
To Replace Drip Bowls and Surface Elements
1. Slide the terminal end on the element through the opening in the drip bowl.
2. Align the element support to rest on the rim inside the drip bowl. If your drip
bowl is equipped with a hold down clip, align the elementsupport opposite the
terminal end with the slot in the hold down clip, and snap into place.
3. After the element is positioned in the drip bowl, line up the terminal end with
the terminal plug as shown.
4. Hold the surface element and drip bowl together as level as possible and firmly
push the terminal end into the terminal plug. Make sure element terminal is
seated properly into terminal plug. Make sure the surface element is level to
reduce the hazard of pans sliding off the element.
To Raise the Top for Cleaning
1. Grasp the sides and lift from the front. Lift-up rods will support the top in a
raised position. Only lift the top far enough to allow the support rods to snap
into place.
2. Clean underneath using a clean cloth and hot, soapy water.
3. To lower the top, gently push back on each rod to release the notched support.
Hold the range top and slide the lift rods down into the range frame.
Changing the Oven Light
(some models)
On some models, the oven light automatically turns on when the door is opened.
Some models have a switch located on the control panel to turn on the light. The
oven light is located at the rear of the oven and is covered with a glass shield held
by a wire holder. The glass shield must be in place whenever the oven is in use.
To replace the oven light:
1. Turn electrical power off at the main source or unplug the range.
2. Press wire holder to one side to release the glass shield.
3. Replace bulb with a new 40 watt appliance bulb.
4. Replace glass shield over bulb and snap wire holder into place.
5. Turn power back on again at the main source {or plug the range back in).
6. The clock will then need to be reset. To reset, see Setting the Clock and
Minute Timer in this Use & Care Guide.
CAUTION
Be sure the range is unplugged and all parts are COOL before
replacing oven light. Wear a leather-faced glove for protection against possible
broken glass.
1 9