Fig. 5 — collector arrangements – Carrier 28QX User Manual
Page 9
Attention! The text in this document has been recognized automatically. To view the original document, you can use the "Original mode".
PRESSURE R£U£F mVE
ÎSI.VCOL SlfS^MS OWW '
EfOD.
RETliRN
UNE
SETORfi
i:
!•. ■
'i
1
~~ir
supply
„2^00
RETUSti
LSŒ
R£T«i»t
'
/
'/
/
'
/
/
NCfTE;
^KR■ RECWitttENOEO DUE TO OECREASED EPFICSR«
HOWEVER ROOP /WEA L«frAT50NS MAY liECESStTSTE
TUB ARRANSEMcRT.
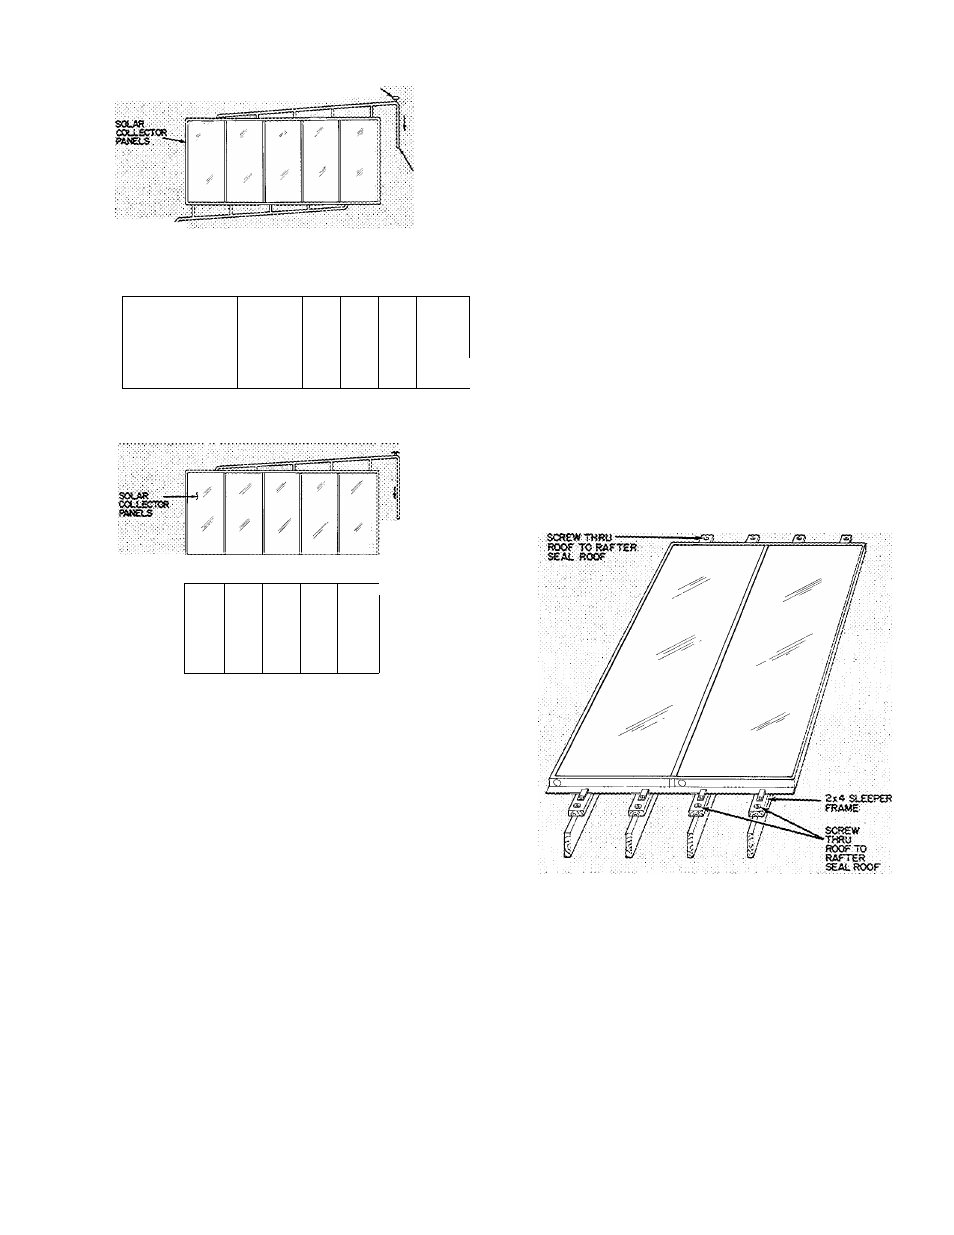
Fig. 5 — Collector Arrangements
dimensions. Complete the following steps to install
panels:
PLAN PHYSICAL POSITION OF PANELS - For
maximum heating capacity, face the collector
panels due south ± 5 degrees. The angle or slope of
the collectors above the horizontal plan is normally
the latitude of the installation 15 degrees. Any
deviation from specified mounting position can
result in reduced heating performance. Be sure not
to place collector panels in areas shaded by trees or
buildings during portions of the day when sig
nificant amounts of solar energy can be obtained.
PLAN THE COLLECTOR ARRANGEMENT AND
PIPING CIRCUITS - There are 2 collector mount
ing arrangements recommended for installation in a
specific space, and for correct piping circuits. See
Fig. 5. Butt collectors next to each other to
minimize heat losses. Slope horizontal piping
headers a minimum of 114-in.lft in vertical plane
for acceptable panel drainage. A slope of 3/8-in./ft
or 1/2-in./ft assures better panel drainage.
CAUTION:
For
proper
system
operation,
install eoilectors in recommended pattern arid
slope horizontal Ijeaders as specified, incorrect
instaliation can result in extensive system and
building damage.
Colleciors are made of ^ass. Use care in rigging
and handling. Do not use panels as primary roof
surface.
CONSTRUCT COLLECTOR SUPPORTS - Con
struct a framework to support the collectors based
on panel arrangement and circuiting pattern.
If the slope of the roof is the same as that
required for the collectors, construct a wooden
“sleeper frame.” Use 2-in. x 4-in. boards that lay
directly on the roof. Fig. 6. Construct frame so it
can be flashed and sealed. This prevents moisture
from accumulating behind the collector. Treat
sleepers with wood preservative and paint.
NOTES:
1 Treat framing with preservative
2
Flash framing to prevent entry of moisture in subfreezing cli
mates (See Fig 11 )
Fig. 6 — Typical Collector "Sleeper" Framing
If an upright mounting frame is required, use
2-in. X 4-in., 2-in. X 6-in. (or heavier) boards or
aluminum framing material. Construct and install
frame perfectly level to the horizontal plane.
Locate bottom frame members directly over roof
rafter. Anchor the frame to roof rafters with
screws. Seal anchor points thoroughly to prevent
water leakage. A typical mounting frame is shown
in Fig. 7. There should be no horizontal surfaces
within 3 ft of the framebase, so that drifting snow
cannot accumulate on collectors.