Winco Mfg. 8700 - Table with Face Cutout and Armrests User Manual
Page 2
Page 2 of 4
006055
Rev BB Date 06-06-12
JWC
4. Align the (2) Welded Leg Assemblies with holes in Table Frames. See picture for direction of angled legs.
Then, insert the (previously removed) (8) ¼-20 x 3” hex head bolts and leave them slightly loose to help fit the
Welded Cross Brace Assembly in next steps.
5. Assemble
Welded Cross Brace Assembly to Welded Leg Assemblies (see next NOTE) using (4) ¼-20 x 1-½”
carriage bolts and (4) ¼-20 nylon-locking nuts. (heads of screws should face table ends for a better appearance)
Apply lock nuts and tighten with a wrench.
NOTE: Welded Cross Brace Assembly is only welded on three sides at each end. Position the Welded
Cross Brace Assembly so that un-welded side is facing tabletop. (For a better appearance.)
6. Tighten all of the (8) Hex bolts that you left slightly loose in above steps, with a wrench. This will secure
the Welded Leg Assemblies to the Table Frames.
Table Components Installation
7. Position and install the Face Paper Holder to bottom of Upholstered Top using a Phillips-head screwdriver and
two (2) 1” drywall screws. Locate the holder on the opposite side of face slot from the Face Paper Cutter. (The
Face Paper Holder will be centered with face slot area.)
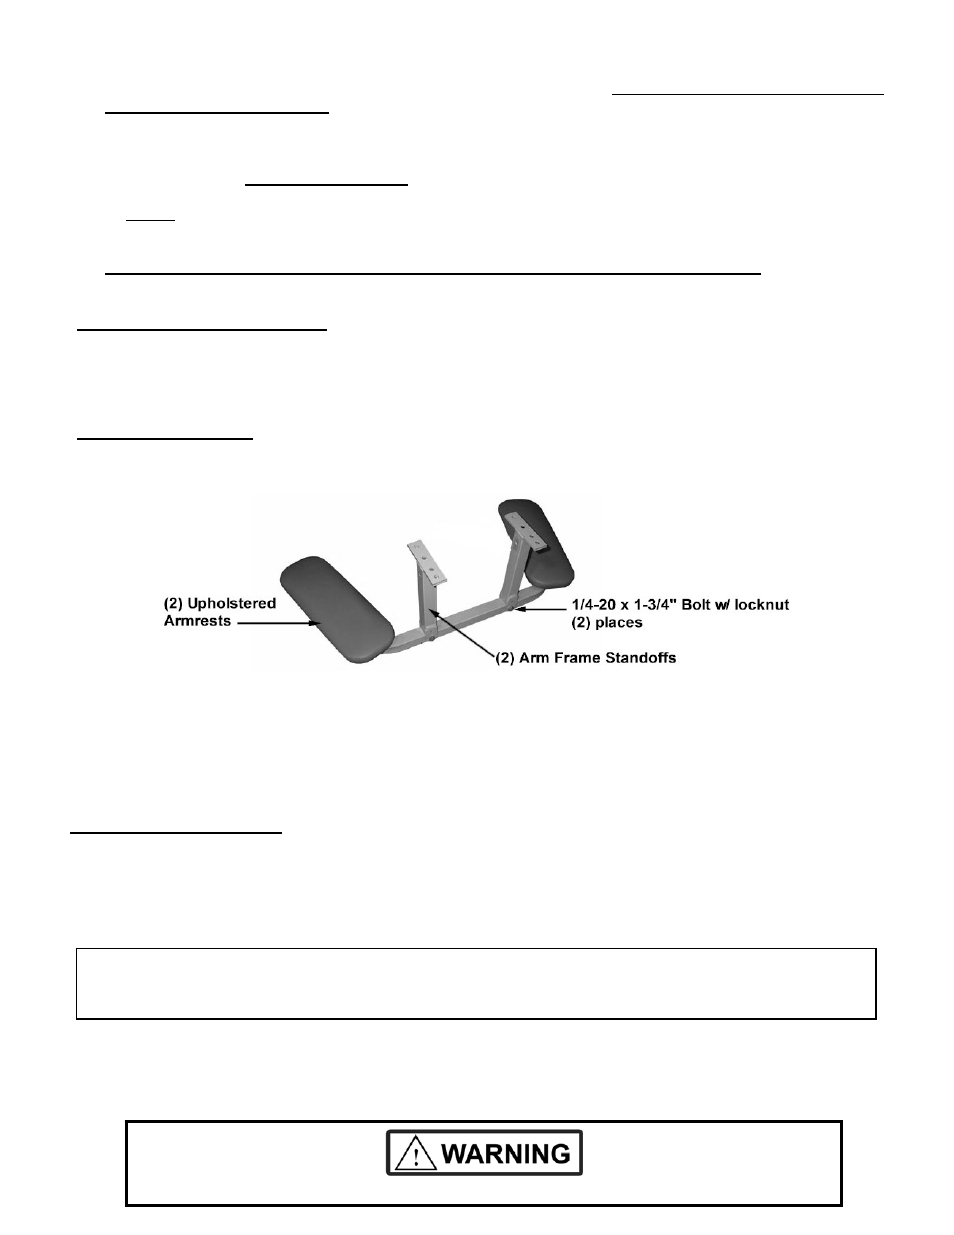
Arm Frame Assembly
8. Assemble the two Arm Frame Standoffs to the Arm Frame using (2) 7/16” wrenches and (2) ¼-20 x 1-¾” bolts
and locknuts. See picture below.
9. Install
the
complete
Arm Frame Support Assembly using a Phillips-head screwdriver and (4) ¼-20 x 1” Phillips-
head screws that are pre-installed in the threaded holes on table bottom. (see complete table assembly
picture)
10. Using at least two people, turn table upright.
11. If table is not level, loosen one or two Glide Feet (leveling feet) and adjust until table is level.
Optional Shelf Installation
12.
Double-sided tape has been installed on the of the Welded Cross Brace Assembly.
13.
Before removing paper on tape, “test fit” the shelf. Shelf should be centered on the Welded Cross Brace.
14.
Once you are certain of where you will position the shelf, peel off the paper to expose adhesive.
15. Carefully position shelf in place on adhesive.
Wrinkles in Vinyl – Storage and shipping can cause wrinkles of the vinyl on your Winco table. This is normal.
Please allow 1-2 weeks at room temperature (approx. 70 degrees) to allow for vinyl to expand back to original
appearance.
After peeling paper from adhesive tape:
Use damp sponge to moisten tape to allow shelf to be adjusted during install.
Once tape is dry shelf will stay in place.
Do not over tighten nuts and bolts. Periodically check all fasteners for tightness.