Pericolo danger gefahr peligro – Winco AR2 User Manual
Page 7
7
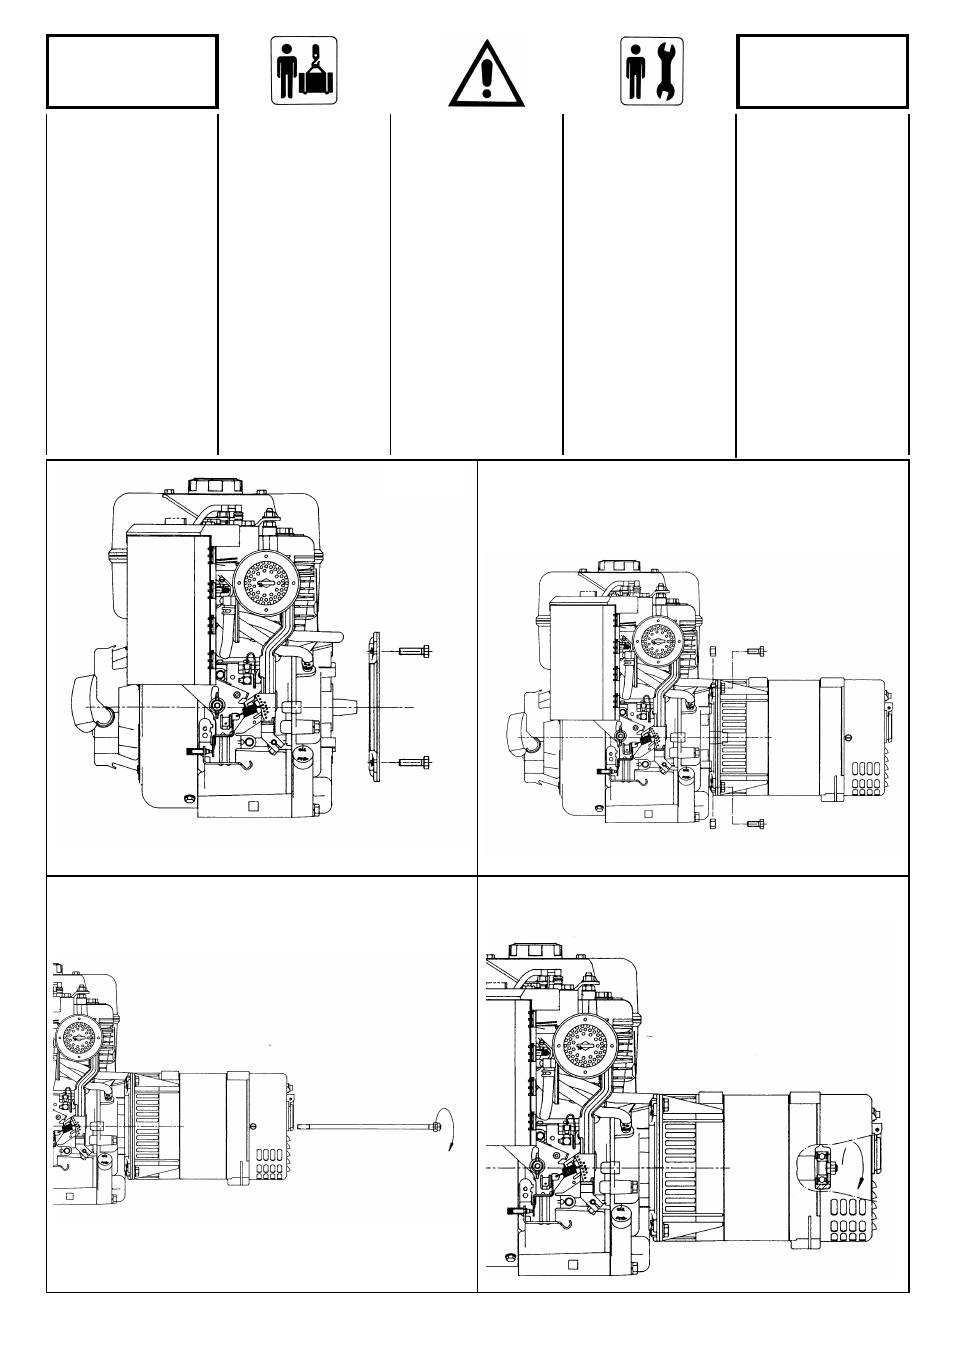
ACOPLAMIENTO
MECANICO
Montar la brida sobre el motor
sujetàndola con sus tornillos M8 y
aplicando un par de torque de
21±7% Nm (fig.1).
Fijar el cuerpo de la màquina a la
brida con los tornillos M8 y
aplicando un par de torque de
21±7% Nm (fig. 2).
Ajustar la tuerca M8 sobre el bulón
(fig. 3).
Insertar el bulón y atornillar el
mismo hasta blocarlo aplicando un
par de torque de 21±7% Nm, cerrar
el orificio de la tapa con el tapón
respectivo (fig. 4).
PERICOLO
DANGER
GEFAHR
PELIGRO
Fig. 1
Fig. 2
Fig. 3
Fig. 4
MECHANISCHER
ANSCHLUß
Den Flansch am Konstantmotor
mit den passenden Lebens-
dauern M8 einhängen, die eine
Klammer Auszackung von
21±7% Nm anwenden (abb. 1).
Die Körpermaschine auf dem
Flansch mit den passenden
Lebensdauern M8 reparieren,
die eine Klammer gleiche
Auszackung bis 21±7% Nm
anwenden (abb. 2).
Die ziehenden Würfel auf
Zentrale schrauben (abb. 3).
Die ziehende Zentrale einsetzen
und bis das Blocken des
Schraubbolzens mit einer Klam-
mer gleicher Auszackung bis
21±7% Nm schrauben; die
Bohrung auf der Schutzkappe
mit passendem Stopper
schließen (abb. 4).
ACCOUPLEMENT
MECANIQUE
Monter le flasque sur le moteur en
le fixant avec les vis prévus M8 en
appliquant un couple de serrage de
21±7% Nm (fig. 1 ).
Fixer le corps de la machine au
flasque avec les vis M8 en
appliquant un couple de serrage de
21±7% Nm (fig. 2).
Visser l’écrou M8 sur la tige centrale
(fig. 3).
Inverser la tige centrale et visser
jusqu’au blocage du boulon en
appliquant un couple de serrage de
21±7% Nm et fermer le trou du
couvercle avec le bouchon
approprié (fig. 4).
MECHANICAL
COUPLING
Couple flange to engine, fixing it
with the appropriate M8 screws
and applying a tightening torque
of 21±7% Nm (fig. 1).
Secure the alternator to the
flange with proper M8 screws
applying a tightening torque of
21±7% Nm (fig. 2).
Screw the M8 nut on to the stud
(fig. 3).
Insert the stud and screw it until
the bolt is locked applying a
tightening torque of 21±7% Nm;
plug the hole on the terminal box
lid with the proper cap (fig. 4).
ACCOPPIAMENTO
MECCANICO
Montare la flangia sul motore
fissandola con le apposite viti M8
applicando una coppia di ser-
raggio di 21±7% Nm (fig.1).
Fissare il corpo macchina sulla
flangia con le apposite viti M8
applicando una coppia di ser-
raggio pari a 21±7% Nm (fig. 2).
Avvitare il dado M8 sul tirante
centrale (fig. 3).
Inserire il tirante centrale ed
avvitare fino al bloccaggio del
bullone con una coppia di
serraggio pari a 21±7% Nm;
chiudere il foro sulla cuffia con
l’apposito tappo (fig. 4).