Step 1 – base assembly, Step 2 – hood mount bars, Step 3 – caulk – Twin City Modular Gravity Hood - MGI with Filters - IM-4720FSL User Manual
Page 2: Step 4 – filter rails
2
Twin City IM-4720FSL
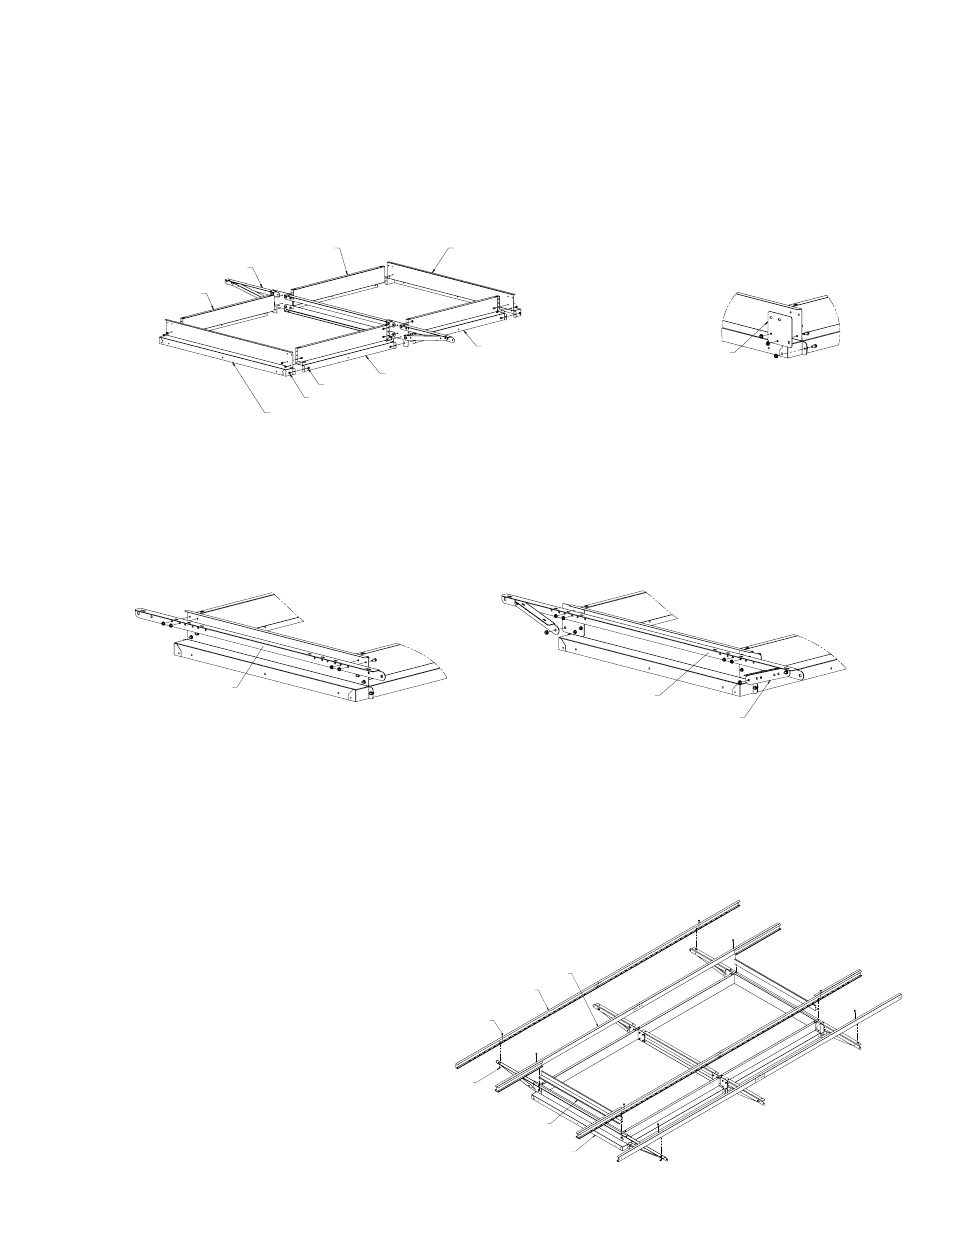
Step 1 – Base Assembly
Fasteners (Kit #1B and #1C) –
Note: There may be extra fasteners.
Lay out the
Curb Base Side, Hood Support Assembly and Curb Base End in approximate location to each other. See
Figure 2. Use (3) 1/4-20 fasteners for 5" base height and (4) 1/4-20 fasteners for 12" base height. Leave top two
holes open on the Base End.
Note: Hand tighten only until Step 3. Bolt together Curb Base Sides to Hood Support
Assembly with (8) 1/4-20 fasteners per Hood Support Assembly for 5" bases and (10) 1/4-20 fasteners for 12" bases.
On some hoods, a
Doubler Plate is required. See Detail A of Figure 2. For base assemblies with more than one
Hood Support Assemblies, orient top flanges away from center.
Curb Base End
Curb Base Side
Hex Nut
Screw
Hood Support Assembly
Curb Base Side
Curb Base Side
Curb Base Side
Curb Base End
Step 2 – Hood Mount Bars
Fasteners (Kit #1B and #1C)
Loosely assemble
Hood Mount Bars on both sides of the Base Ends using (4) 1/4-20 fasteners per side. On hoods
using a
Doubler Plate, mount Brace using 5/16-18 hardware. See Figure. 3b.
Step 3 – Caulk
Caulk inside corners of base assembly and tighten all fasteners. Install assembly onto roof curb before proceeding.
Ensure that assembly is properly anchored to roof curb.
Hood Mount Bar
Hood Mount Bar
Brace
* When Kit 1C provided.
Figure 2.
Figure 3a.
Figure 3b.
Step 4 – Filter Rails
Fasteners (Kit #6B) –
Note: There may be
extra fasteners.
Attach
Filter Channel, Type -A- to the
Hood Mount Bar using cap screws and
nuts (hand tight). Lay
Filter Channel,
Type -B- onto assembly and wedge Filter
Stop Plate between them and the Base
Assembly. Assemble with cap screws and
nuts (hand tight).
Screw, Flanged Head
Hex Nut, Flanged
Filter Rail, Type -A-
Base Assy
Filter Stop Plate
Filter Rail, Type -B-
Figure 4.
Doubler Plate
DETAIL A