Prep are the model for fl ying – Top Flite TOPA1000 User Manual
Page 8
Mount the Canop
y
❏
1.
Cut the canop
y to fit the fuselage
.The canop
y can
be held in place with epo
xy or small w
ood scre
ws
.
❏
2.
If y
ou w
ould lik
e to add a tailskid to y
o
ur Flite
Streak this can be done with a w
ood or sheet metal
scre
w or with a n
ylon tailskid.
The photo sho
ws a
Great Planes
Wing
Tip Skid (GPMQ4445).
PREP
ARE
THE MODEL FOR FL
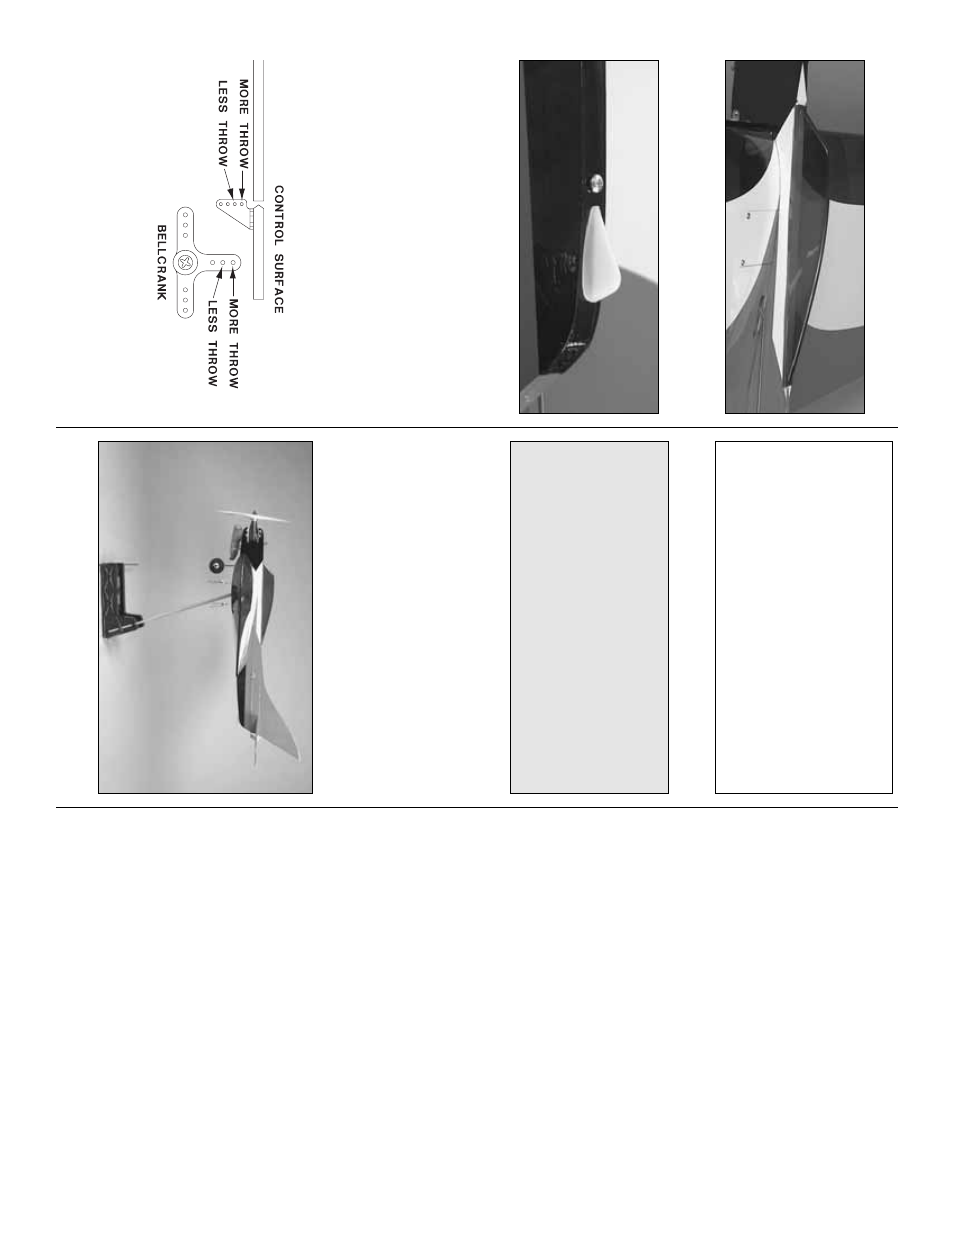
YING
Set the Contr
o
l
Thr
o
w
s
Use a Great Planes AccuThro
w (or a r
u
ler) to
accur
ately measure and set the control thro
w of the
ele
v
ator as indicated in the char
t that f
ollo
ws
.
To
increase
the control surf
ace thro
w
, mo
v
e
the
pushrod to a hole that is closer-in on the control hor
n
on the control surf
ace
, or mo
v
e
the pushrod to a hole
that is f
a
rther out on the bellcr
ank.
T
o
decrease the
control surf
ace thro
w
, do the opposite
.
Balance the Model (C.G.)
The C
.G.
(center of g
ra
vity) m
ust be chec
k
ed when
the model is ready to fly
.
All components should be
installed with the fuel tank empty
.
❏
1.
Use a f
e
lt-tip pen or narro
w str
ips of tape to
mar
k the balance point on the
bottom
of the wing
3-1/4”
[82.6mm] from the leading edge of the wing on
both sides of the fuselage
.
❏
2.
Lift the model, r
ight side up
, at the balance point
y
ou mar
k
ed on the bottom of the wing.
W
e
use the
Great Planes CG Machine™.
If the nose drops the
model is nose-hea
vy and y
ou m
ust add w
eight to the
tail.
If the tail drops
, the model is tail-hea
vy and y
o
u
m
ust add w
eight to the nose
.
❏
3.
If additional w
eight is required to balance the
model, use small pieces of Great Planes stic
k-on
w
eight (GPMQ4485).
Our prototype model required
one ounce of w
eight on the tail.
❏
4.
After placing w
eight on the model where
necessar
y, rechec
k the C
.G.
to confir
m that it is correct.
❏
5.
Attach the w
eight with scre
ws or glue securely
in place
.
Identify Y
our
Model
No matter if y
ou fly at an AMA sanctioned club site
or if y
ou fly some
where on y
our o
wn, y
ou should
alw
a
ys ha
v
e
y
our name
, address
, telephone n
umber
and AMA n
umber on or inside y
o
ur model.
It is
required
at all AMA club flying sites and AMA
sanctioned flying e
v
ents
.
Fill out one of the
identification tags on page 11 and place it on or
inside y
our model.
Gr
ound Inspection
Bef
ore y
ou fly y
ou should perf
o
rm
one last o
ver
all
inspection to mak
e
sure the model is tr
uly ready to fly
and that y
ou ha
ven’t o
ver
look
ed an
ything.
If y
ou are not
thoroughly f
amiliar with the oper
ation of control line
models
, ask an e
xper
ienced modeler to perf
or
m the
inspection.
Mak
e cer
tain the ele
vator is secure
, the
pushrod is connected, the ele
va
tor responds in the
correct direction and the C
.G.
is correct.
IMPOR
T
ANT
:
More than an
y other f
actor
, the
C.G.
(balance point) can ha
v
e
the
greatest
eff
ect
on ho
w the model flies
, and ma
y deter
mine
whether or not y
our first flight will be successful.
If
y
ou v
alue this model,
DO NO
T O
VERLOOK
THIS
IMPOR
T
ANT PR
OCEDURE.
A model that is not
proper
ly balanced will be unstab
le and possib
ly
unab
le to fly correctly
.
Set up the Flite Streak so it has the f
ollo
wing
contr
ol surface thr
o
w:
ELEV
A
T
OR:
3/8”
[10mm] up and do
wn
Set the ele
v
ator thro
w as close to this setting as
possib
le
.
If y
ou ha
v
e
too m
uch control thro
w the
model ma
y respond too quic
kly
.
If y
ou do not ha
v
e
enough thro
w
, y
ou ma
y not be ab
le to maneuv
er
the model or ha
v
e
enough control to land it.
- 8
-