Warning, Speaker mounting – Toa SP-420 User Manual
Page 2
WARNING
Install the bracket only in a
location that can structurally support the weight of the
bracket and the speaker as well (approximately 3.5 kg
in total). Doing otherwise may cause the speaker to fall
off, resulting in personal injury.
Printed in Indonesia
533-06-072-00
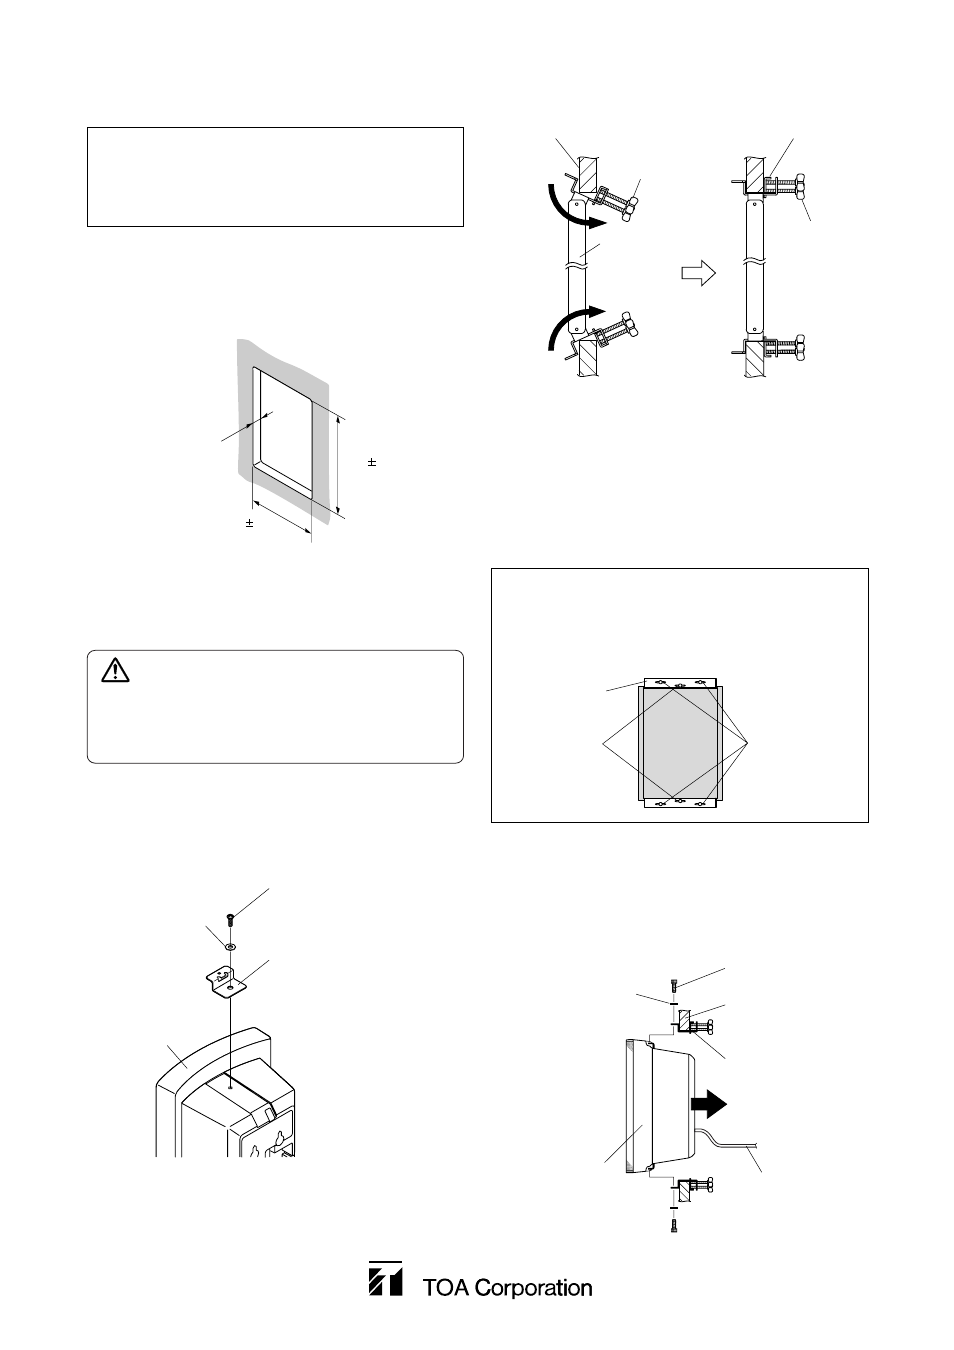
Step 1. Make a mounting hole in the wall or ceiling.
(The figure assumes that the speaker is installed
vertically.)
Step 3. Mount the bracket in the wall or ceiling.
Step 3-1. Fully loosen all butterfly bolts (6 pieces) and
rotate the bracket clamp in the arrow-indicated
direction so that the wall (ceiling) panel is placed
between the clamp frame and the set plate.
Step 3-2. Retighten the six butterfly bolts in the following
order to pinch the panel securely by means of
the set plate.
Note: Prepare an Allen wrench before beginning to
mount the speaker.
An Allen wrench (distance of 4 mm between sides
opposite to each other) is required for tightening Allen
screws (M5).
4. SPEAKER MOUNTING
Note
Each of 4 corners of the hole needs to be smaller
than 5 mm in radius. Exceeding this limit could
cause the bracket to contact the corner, and prevent
it from being mounted in the wall or ceiling.
5 – 24 mm
260 mm
3
175 mm
3
Step 2. Using the hardware supplied with the speaker,
attach the mounting clip to the speaker.
Machine screw
(standard accessory)
Plain washer
(standard accessory)
Mounting clip
(standard accessory)
Speaker
Take care about the correct clip
mounting orientation.
3
-1
3
-2
Mounting bracket
Wall or ceiling panel
Set plate
Butterfly bolt
Butterfly bolt
Butterfly bolt tightening order
(figure as viewed from the hidden side of the panel)
(1) Tighten butterfly bolt A (2 pieces).
(2) Tighten butterfly bolt B (4 pieces).
Mounting
bracket
Mounting
hole
Butterfly
bolt A
(2 pieces)
Butterfly
bolt B
(4 pieces)
Step 4. Connect the speaker cable.
Step 5. Push the speaker onto the bracket opening (in the
arrow-indicated direction), then fix it securely using
the hardware.
4
5
Wall or ceiling panel
Plain washer
(standard accessory)
Allen screw
(standard accessory)
Speaker cable
Mounting bracket
Speaker