Warning, Changing to 60° mode – Toa HY-60DW-WP User Manual
Page 2
URL: http://www.toa.jp/
133-01-00039-00
4. cHANgINg TO 60° MOde
Tighten the bolts securely, as instructed below.
Failure to follow instructions precisely could result in a falling speaker
and potential personal injury.
• Ensure that all bolts are securely inserted as far as their threads go,
then securely fasten each bolt with a nut.
• Tighten all the bolts with the designated tightening torque.
For tightening, use a Phillips screwdriver, or open- or box-end wrench.
WArNINg
Before changing angle modes, lay out a protective sheet, corrugated cardboard or other soft material on a flat surface,
and perform all work on the speaker with its front baffle facing downward. As the speaker assembly is quite heavy, it is
recommended that at least two persons be involved in the modification work. As an example, the HX-7 Series speaker
shown in the figure below is arranged in a direction that exposes the speaker’s left-side protection covers.
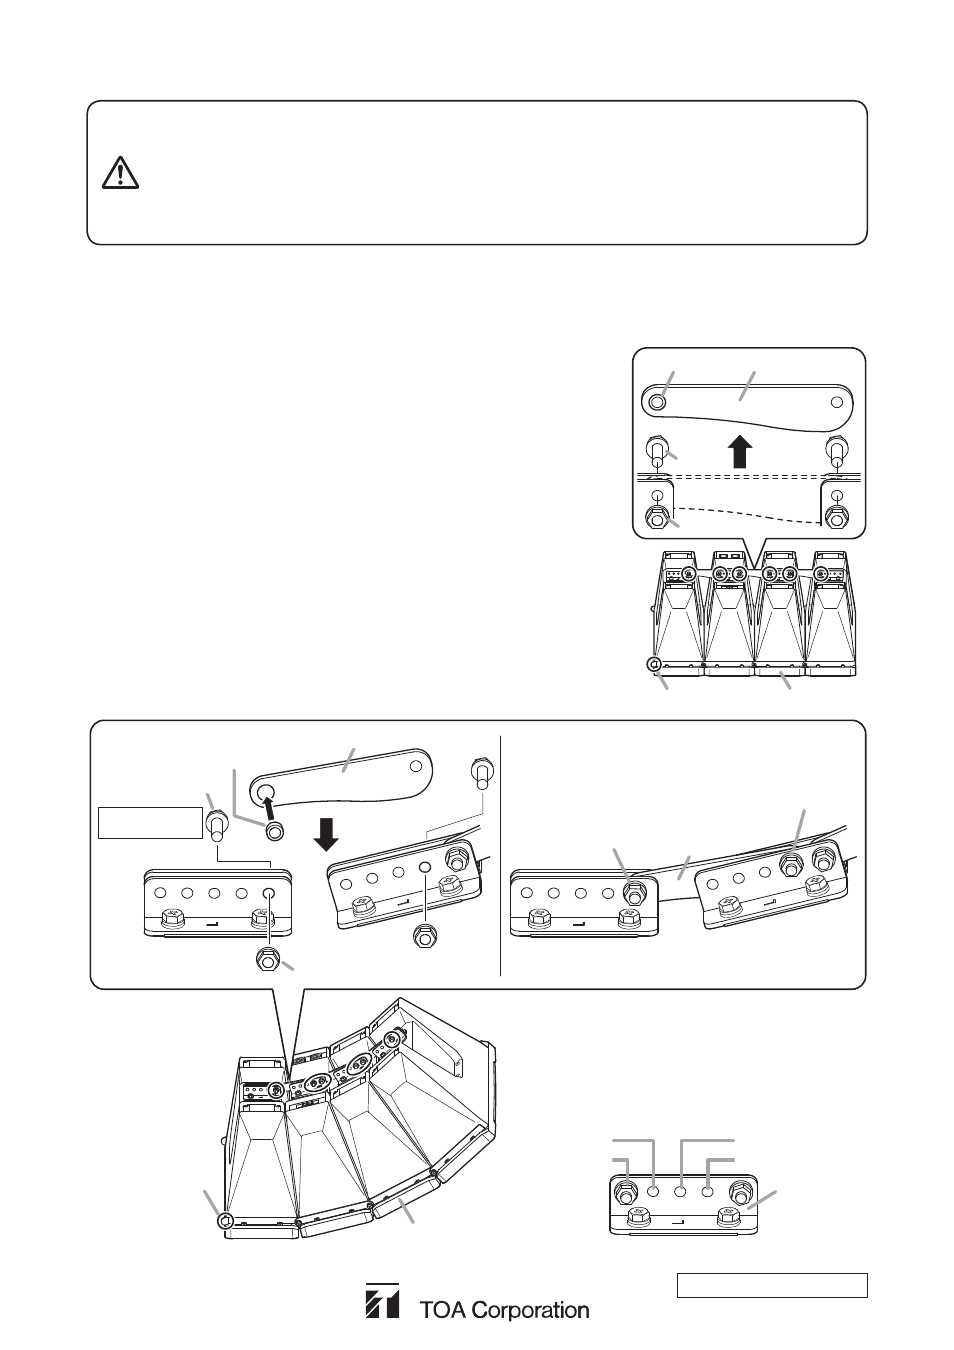
Step 1. Detach all rear angle bars from the speaker.
Remove the nuts and bolts from both ends of the rear angle bars. Also
carefully remove the spacer fitted into the larger hole in each angle bar.
Note
Take care not to lose the removed nuts, bolts and spacers, as they will be
used again in reassembly.
Step 2. Fit the spacers into the larger holes in these brackets, and attach each
bracket by inserting a bolt into the position where the rear angle bar was
mounted. Then fasten each bolt with a nut.
Note
This position will become the fulcrum for the angle adjustment. Be sure
to attach in the illustrated position. If attached in a different position, the
angle mode will not assume the specified mode.
Step 3. Align the other side of each bracket with the 60° mode position, then
insert a bolt and fasten the bolt with a nut.
Rear angle bar
Spacer
Bolt
Nut
Detach
Protection cover
HX-7 Series speaker
1
This bracket
This bracket
Nut removed in Step 1.
[Completed Assembly]
60° mode position
Protection cover
HX-7 Series speaker
2
3
Spacer removed
in Step 1.
Bolt removed
in Step 1.
Fulcrum for the angle
adjustment
Tightening torque:
3 N·m
Angle adjustment holes
Rear bracket
30° mode
15° mode
45° mode
60° mode
Tip
Note that the speaker can be set to 15°, 30°, or 45°
mode using these brackets. When selecting any
other than 60° mode, attach each bracket to the
hole corresponding to the desired directivity angle
mode, referring to the figure below: