Tie Down 75LP User Manual
Page 8
050506,b866
Instructions for Bleeding Tie Downs
Model 75LP Actuator
TIE DOWN ENGINEERING • 255 Villanova Drive SW • Atlanta, GA 30336
www.tiedown.com (404) 344-0000 Fax (404) 349-0401
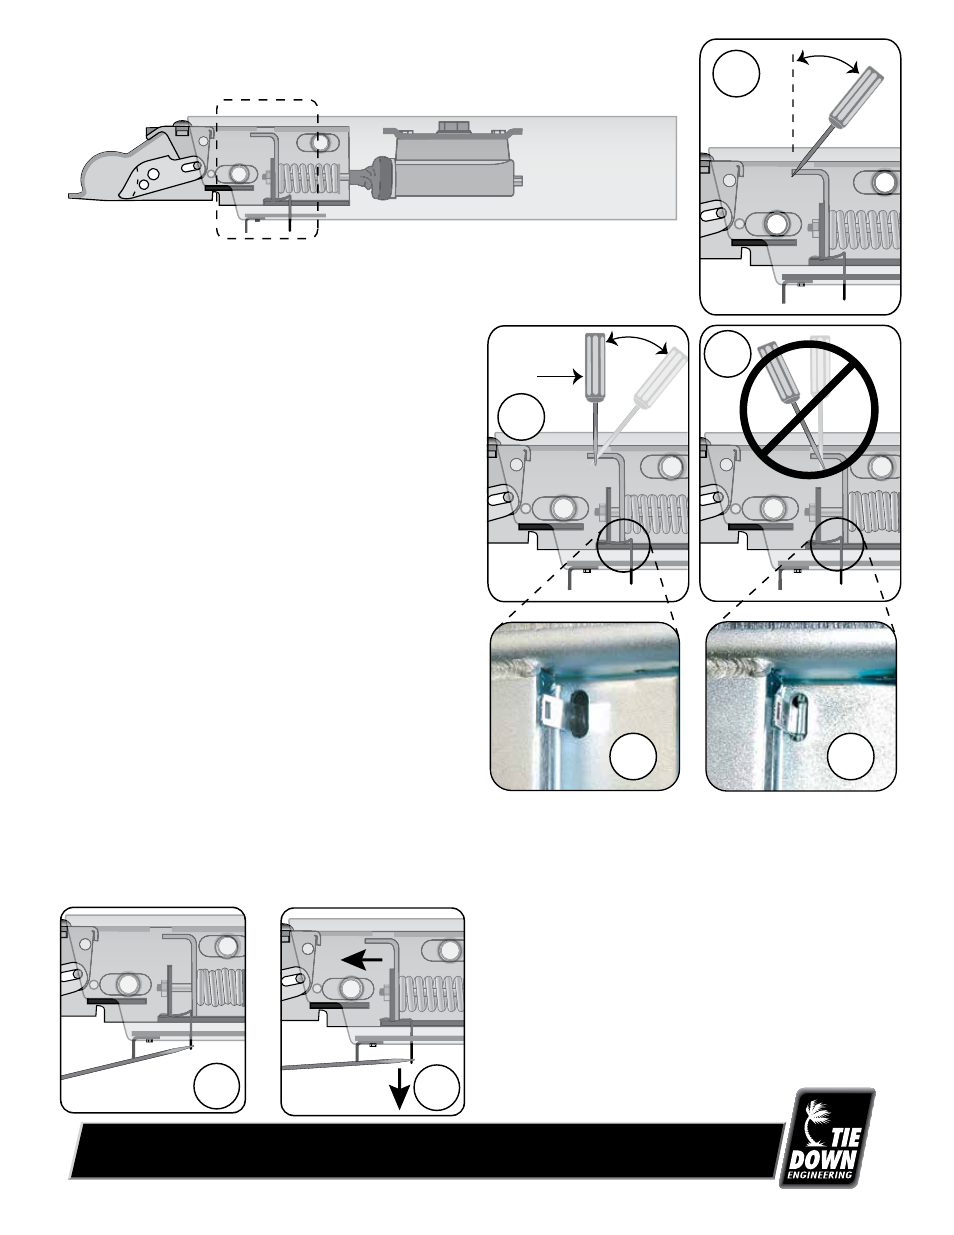
Underside Shown, looking up
"Emergency Brake Set"
Underside Shown, looking up
"OK"
STOP
Tie Down's actuators feature a shock dampener that uses
brake fluid from the master cylinder. The dampener must be
primed before bleeding or using trailer. To prime the
dampener, fill the master cylinder with DOT 3 brake Fluid.
Push the coupler into the housing and slowly pull out 3
times, then refill master cylinder.
To pump master cylinder, insert a flat tip screwdriver into the
round hole near the front of the actuator cover. (picture 1)
Screwdriver tip will fit into the slot provided in the emergency
brake bracket as shown. Push the screwdriver forward and
back to pump the master cylinder. (picture 2)
IMPORTANT: Never go past 90 degrees (screwdriver
straight up) when "pumping" the master cylinder (picture
3). Moving past 90 degrees will cause the emergency
brake bracket to "set", locking into place creating constant
pressure in the brake lines. If you find that the screwdriver
will not go in place as shown when starting to pump the
master cylinder, or you move the screwdriver past 90
degrees and feel it "snap into place", you must unlock the
emergency brake bracket as shown in pictures 4 and 5.
Pictures 4 & 5 show the underside of the actuator. If the oval
slot where the emergency brake release tab comes out is
"silver" (picture 5) and the release tab is pushed forward, this
indicates that the emergency stop bracket is "set" and must
be released before bleeding brakes or using the trailer. If the
oval hole is "dark" (picture 4) and the release tab is free to
move back, the emergency brake is ready to go, including
bleeding and using the trailer.
1
2
3
Emergency Brake Engaged
Emergency Brake Disengaged
To release the emergency brake bracket, (pictures 6
& 7) insert a brake adjustment tool (looks like a
bent screwdriver) or flat screw driver into the slot
on the release tab (on bottom side of actuator) and
pull down until a "click" noise is heard indicating the
bracket is released.
After bleeding, make sure the emergecy stop is
disengaged (figure 4 & 7).
4
5
6
7