Rs-232 interface, Rs-232 specifications, Rs-232 front panel configuration – Scientech 12000 Series User Manual
Page 14
14
RS-232 Interface:
Note: Scientech balances are DTE (computer) devices. If communicating to another DTE device (ie computer), a Scientech
RS-232 cable, PN10697, or normal null modem cable is required. If you are communicating to a DCE device
(printer), a serial cable is required. Scientech offers a serial cable, PN11367, for your convenience.
Your balance is equipped with a bi-directional RS-232 compatible interface. The interface is uni-directional (balance send only) when the
local control is set to ON. To enable the bi-directional interface, set the local control to OFF (see the RS-232 Front Panel Configuration
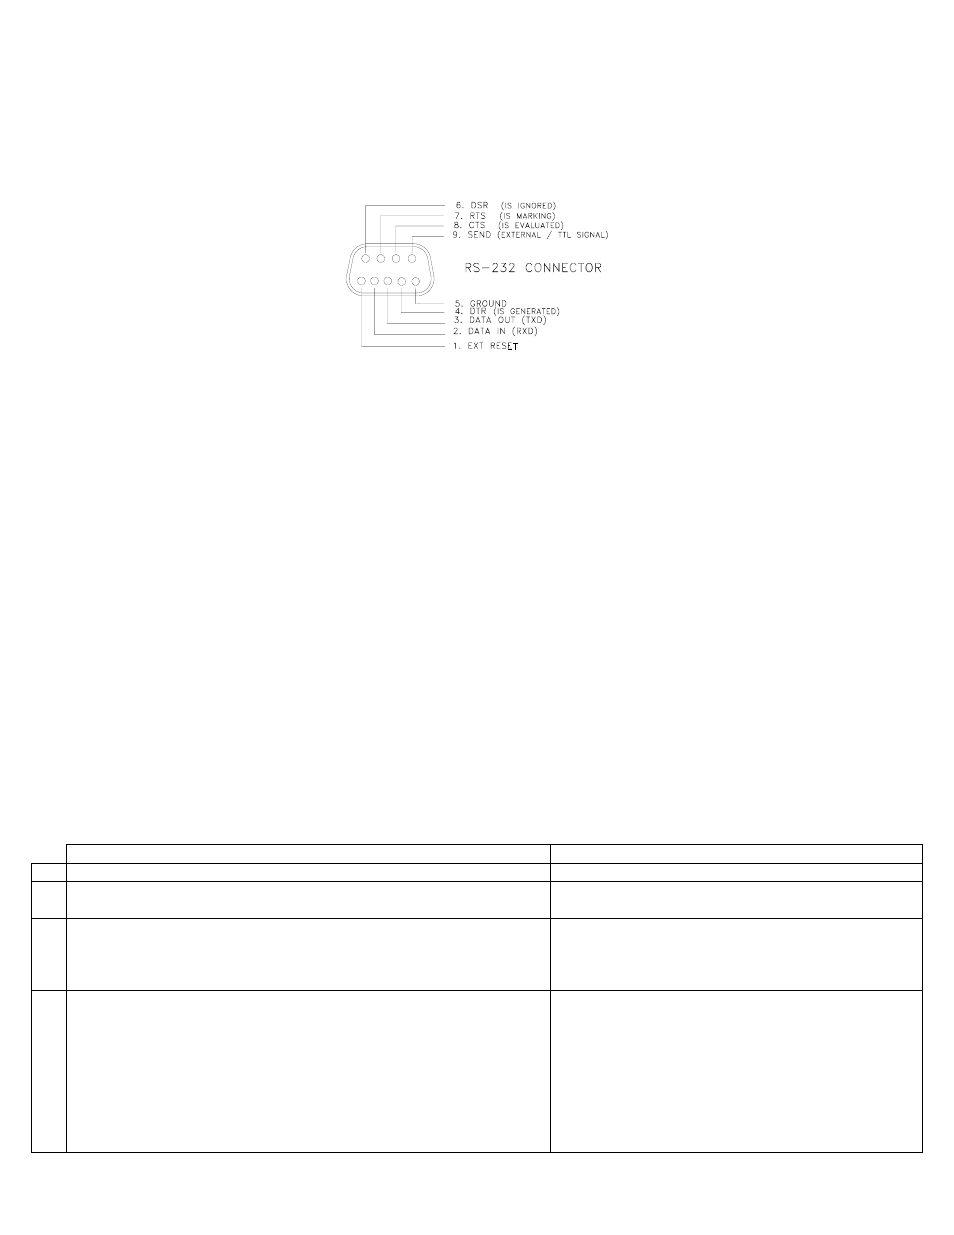
section). The RS-232 connector is a 9 pin D subminiature connector located on the balance rear panel. The pin out and pin descriptions
are shown in Figure 7.
Figure 7 Connector Pin Out
The balance will not output any information under any circumstances unless pin 8 (CTS) is held in an ON state (+3 to +15 VDC).
Interfaces not utilizing the CTS handshake may tie pin 8 to pin 7 or pin 8 to pin 4 to defeat it.
This interface does not strictly adhere to the official RS-232 standard. However, it emulates what has become commonplace in the
microcomputer industry.
RS-232 Specifications:
Type
EIA-RS-232C,
DTE
Method
Half-duplex,
Asynchronous
Transmission,
Bi-directional
Format
300, 600, 1200, 2400, 4800, 9600 and 19,200 baud rate selectable (default is 9600)
Code: ASCII
For parity Even or Odd: Data bit 7, Stop bit 1.
For
parity
none:
Data
bit
7,
Stop
bit
2.
Note: Parity none, Data bit 8, Stop bit 1 does function, but is not technically correct.
RS-232 Front Panel Configuration:
Before using the RS-232 feature of your balance, it is necessary to configure the interface properly for your application. The RS-232
Configuration Mode allows you to set baud rate, front panel control, software protocol, parity, auto send, continuous send, and display
blanking. The balance is configured with defaults at the factory. The default modes are shown in parenthesis below.
It is not necessary to follow the entire configuration procedure if only one parameter is to be changed. Follow Steps 1 and 2, then use
the MODE switch to select the parameter to be changed, skipping the others. Select the desired setting using the SEND switch, save
the setting using the ZERO switch, then turn the balance off and then on again with the ON/OFF switch.
To enter the RS-232 configuration mode via the front panel, proceed as follows:
User Action
Balance Response
1
Turn the balance off using the ON/OFF button.
Display blanks.
2 Hold the SEND button down while turning the balance on using the
ON/OFF button.
The current baud rate, br300, br600, br1200, br2400,
br4800, br9600, or br19,200 and OK are displayed.
3 BAUD
RATE
SELECTION
(9600 is default).
Press the SEND button until the desired baud rate is displayed. Then
press the ZERO button.
SAVEd OK is displayed followed by the chosen baud
rate and OK.
4 LOCAL CONTROL SELECTION (LC on is default). “LC on” means
that the front panel switches control the balance. To enable a computer to
control the balance, “LC oFF” must be selected.
Press the MODE button.
Press the SEND button to choose between on or off. Then press the
ZERO button.
The current front panel control setting, LC on or LC oFF
and OK are displayed.
SAVEd OK is displayed followed by the chosen setting
and OK.