Reznor B Option - Installation - Thermostat Bracket (Unit Mounted) Assembly (Option CM3) User Manual
Option cm3, unit-mounted thermostat bracket
Form I-OPT-TB, P/N 98354 R5, Page 1
Applies to: Models UDAP, UDAS, UDBP, UDBS, UEAS, F, B, VR
Option CM3, Unit-Mounted
Thermostat Bracket
Form I-OPT-TB (Version B)
Obsoletes Form I-OPT-TB (Version A)
This thermostat bracket option is designed for use in installations where it is desir-
able to have the controlling thermostat mounted on the heater rather than in a remote
location. The electrical box for mounting the thermostat extends down from a specially
designed bracket that attaches directly to the heater.
This kit does not include a thermostat. Use either a Reznor
®
thermostat option or a
field-supplied thermostat with snap-action contacts and a mounting base designed to
be attached to a 2 x 4 electrical box. Do not use a mercury bulb thermostat due to the
difficulty in leveling it and the possibility of vibration causing excessive unit cycling.
Description/
Application
Components
This option may be used on unit heater Models UDAP, UDAS, UDBP, UDBS, UEAS,
F, and B or on tubular radiant Model VR. Some instructions are specific to a Model;
follow the instructions for the model of heater being serviced.
1. ALL MODELS - Turn off the gas and the electric.
2. Assemble and Attach the Bracket - Select and follow illustrated instructions for
the applicable Model.
Installation
Instructions
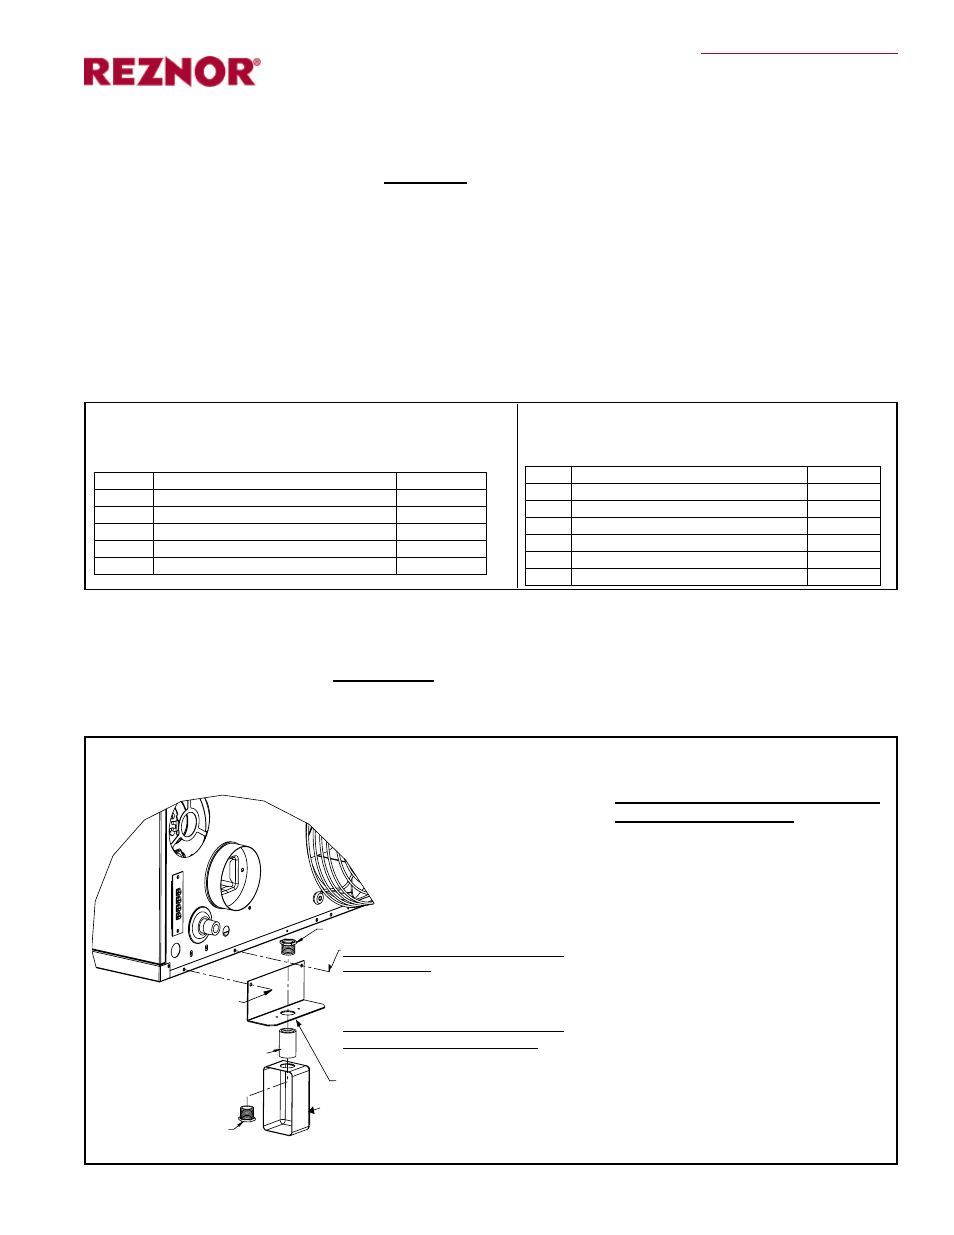
Chase Nipple, P/N 3618
Remove screw from
cabinet; re-insert
to attach bracket.
UDAP, UDAS, UDBP, and UDBS
Sizes 30-125 - Remove screw
from the cabinet. Re-insert the
screw attaching bracket. (Self-
drilling screw in kit is not used.)
UDAP, UDAS, UDBP, and UDBS
Sizes 150-400 and All UEAS -
Use the self-drilling screw in the kit.
Chase Nipple,
P/N 3618
2x4 Electrical Box, P/N 17782
Bracket, P/N 197072
Coupling, P/N 7447
Instructions - Models UDAP, UDAS,
UDBP, UDBS, and UEAS
1) Assemble the Bracket - Connect
the electrical box to the mounting
bracket using the coupling and the
nipples. (Use the parts provided;
do not increase the length of the
coupling.)
2) Attach the Assembled Bracket -
On the bottom back of the heater,
remove the last screw to the left. On
Sizes 30-125, also remove the next
screw to the right.
Position the bracket as illustrated.
Re-insert the screw on the left side.
On Sizes 30-125, also re-insert the
screw on the right side. On Sizes
150-400, use the self drilling screw
in the kit to attach the right side.
FIGURE 1 - Installing a Thermostat Bracket on a Model UDAP, UDAS, UDBP, UDBS, or UEAS Unit
Heater
Kit for Models UDAP, UDAS, UDBP, UDBS, and
UEAS
Thermostat bracket option package,
P/N 197077, includes:
Qty
Description
P/N
1
2 x 4 Electrical Box
17782
1
1/2" Coupling conduit connector
7447
2
1/2" Chase Nipples
3618
1
Bracket
197072
1
Screw (self drilling)
195249
Kit for Models F, B, and VR
Thermostat bracket option package,
P/N 98524,
includes:
Qty Description
P/N
1
2 x 4 Electrical Box
17782
1
1/2" Coupling conduit connector
7447
2
1/2" Chase Nipples
3618
1
Bracket
98353
2
Spacers, 1/4" x 7/16" long
98872
2
Screws, #8 x 1" long, Type B
121033
- F Option - Installation - Thermostat Bracket (Unit Mounted) Assembly (Option CM3) UEAS Option - Installation - Thermostat Bracket (Unit Mounted) Assembly (Option CM3) UDBS Option - Installation - Thermostat Bracket (Unit Mounted) Assembly (Option CM3) UDBP Option - Installation - Thermostat Bracket (Unit Mounted) Assembly (Option CM3) UDAS Option - Installation - Thermostat Bracket (Unit Mounted) Assembly (Option CM3) UDAP Option - Installation - Thermostat Bracket (Unit Mounted) Assembly (Option CM3) VR Option - Installation - Thermostat Bracket (Unit Mounted) Assembly (Option CM3)