Reznor XAWU Unit Installation Manual User Manual
Page 3
PAGE 3
a - Disconnect power.
b - Reverse any two field power leads to the ERV.
c - Reapply power.
5.
Verify that both blower motors are operating under
their full load AMP rating (FLA). The FLA can be found
on each motor and the unit nameplate
A - Re turn Damper Set tings
Manually adjust position of field installed dampers to
balance air flow.
B - Air Flow / Blower Speed Ad just ment
Blower speed selection is accomplished by changing the
sheave setting on both fresh air and exhaust air blowers.
To set ERV for the required air flow (CFM), the external
static pressure applied to the ERV (duct static) must be
known. See the CFM vs External Static Pressure chart for
the appropriate unit to determine the correct blower RPM
for the specified CFM and External Static Pressure.
After blower speed adjustments have been made. Ensure
that when the belt is replaced it is tensioned correctly. The
motor mounting plate can be adjusted to tension the belt. If
using a belt tension checker, adjust the span to the
appropriate setting and check the belt defection force. The
belt deflection force should be between 5-8 lbs or the
lowest tension at which the belt will not slip under peak load
conditions.
1.
Disconnect main power to unit before making
adjustment to economizer and/or ERV unit.
2.
Replace ERV control access cover.
3.
Set thermostat to normal operating position.
4.
Restore power to unit.
X - Main te nance
1.
All motors use prelubricated sealed bearings; no
further lubrication is necessary.
2.
Make visual inspection of motors, belts and wheel
rotating bearings during routine maintenance.
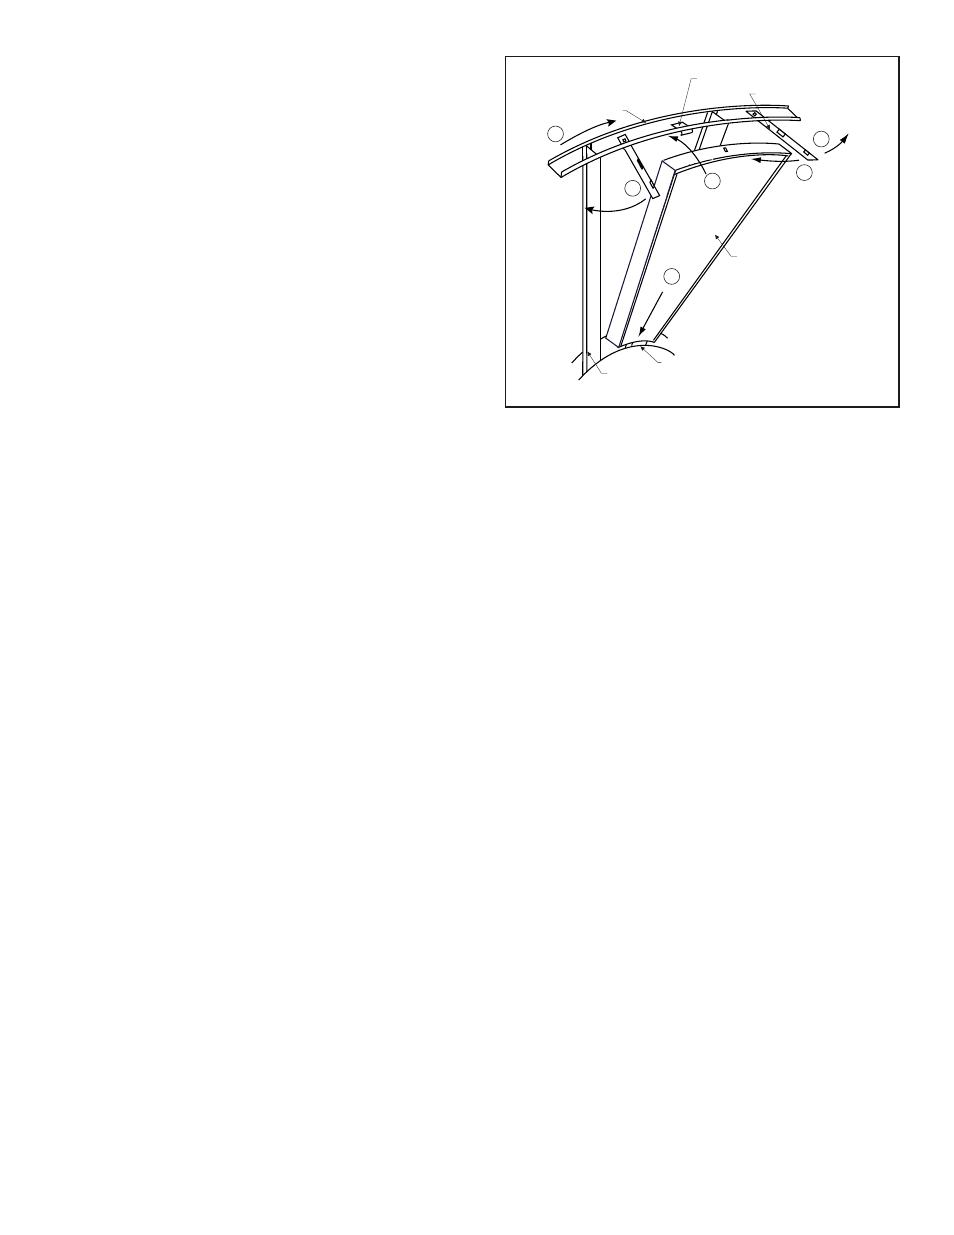
3.
Eight pie-shaped segments are seated on stops
between the segment retainer which pivots on the
wheel rim and is secured to the hub and rim of the
wheel. Annual inspection of the self cleaning wheel is
recommended. With power disconnected, remove
ERV access panels (rear) and unplug [J150 & P150]
(Refer to wiring diagram in this instruction
manual). Remove segment and wash with water
and/or mild detergent.
4.
To install wheel segments follow steps A through E .
See Figure 1. Reverse procedure for segment
removal.
a.
Unlock two segment retainers (one on each side of
the selected segment opening.
b.
With the embedded stiffener facing the motor side,
insert the nose of the segment between the hub
plates.
c.
Holding segment by the two outer corners, press
the segment towards the center of the wheel and
inwards against the spoke flanges. If hand
pressure does not fully seat the segment, insert
B
C
A
D
E
D
HUB
SEGMENT
FIGURE 1
SPOKE
SEGMENT RETAINER CATCH
WHEEL RIM
SEGMENT RETAINER
the flat tip of a screw driver between the wheel rim
and outer corners of the segment and apply
downward force while guiding the segment into
place.
d.
Close and latch each segment retainer under
segment retaining catch.
e.
Slowly rotate the wheel 180
o
. Install the second
segment opposite the first for counterbalance.
Rotate the two installed segments 90
o
to balance
the wheel while the third segment is installed.
Rotate the wheel 180
o
again to install the fourth
segment opposite the third. Repeat this sequence
with the remaining four segments.
XI - Pul ley Kit In stal la tion
The units are shipped from the factory at the low static
setting. Pulley kits are available for the medium and high
static settings. To install a pulley kit.
1.
Check content of pulley kit, if pulley kit contains:
a.
An adjustable sheave and a fixed pitch pulley then
remove belt and both motor and blower pulley
b.
An adjustable sheave then remove the motor
pulley.
c.
A fixed pitch pulley then remove the blower pulley.
2.
Replace pulley(s) with the pulley(s) from pulley kit.
Make sure each pulley is installed with a key. Tighten
the set screw on the pulley(s) to 100 in.lb.
3.
Install the belt that came with the pulley kit. Tension
belt as explained in the blower speed adjustment
section.
4.
Check the speed of the blower. Adjust the motor
sheave to increase or decrease the speed of the
blower. See blower adjustment section.