Basic uniwire operation, Setting up receptor to use uniwire, Uniwiremanualsupplement 5 museresearch,inc – Muse Research UniWire manual supplement User Manual
Page 5
UniWireManualSupplement
5
MuseResearch,Inc.
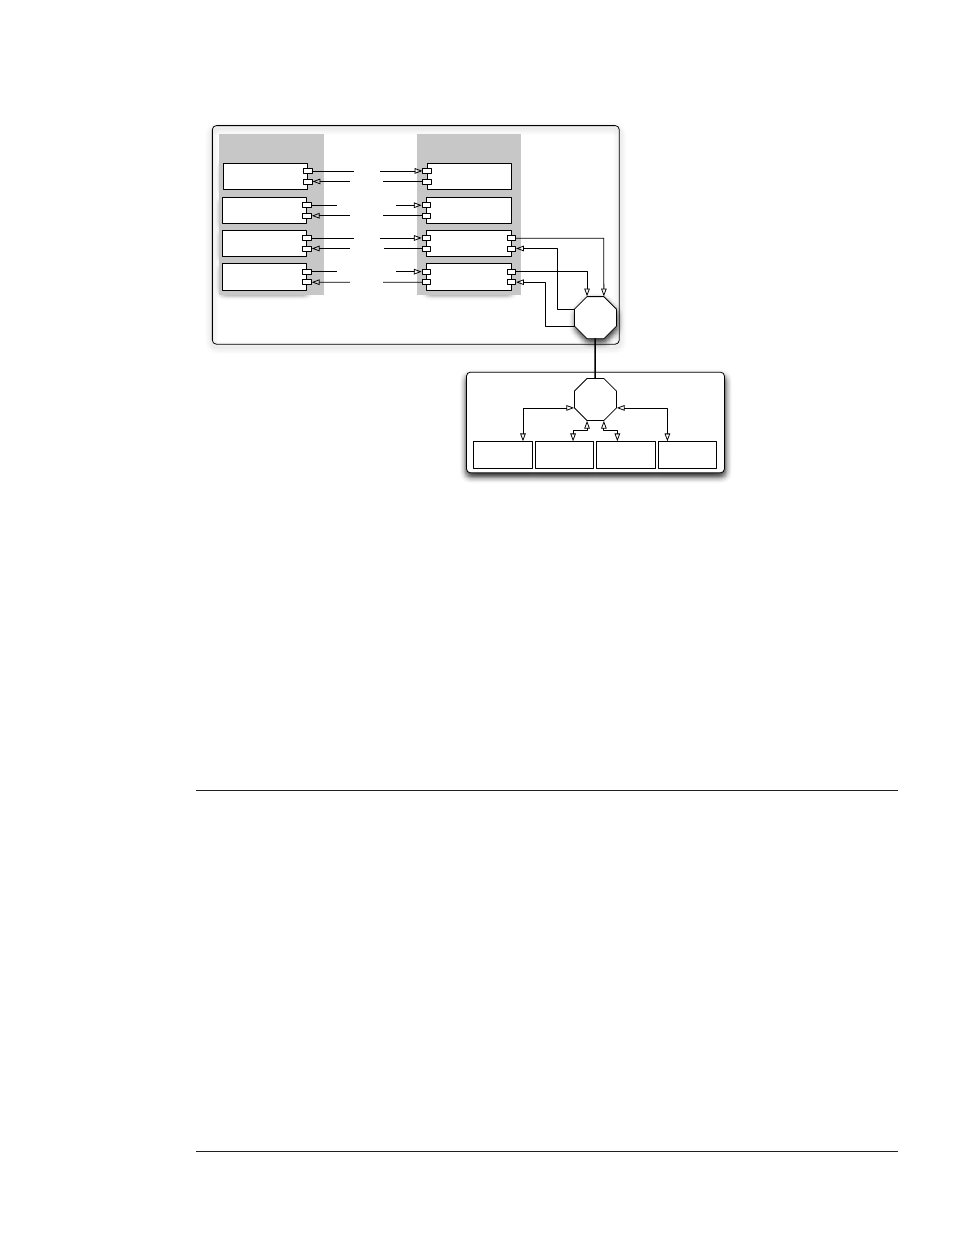
The following illustration shows just one way in which Receptor and UniWire might integrate with a laptop
running a sequencer, and how Receptor can greatly expand the processing capabilities of your computer beyond
the limits of its internal CPU.
Virtual Effect
Plugin
Audio Tracks (**)
MIDI + AUDIO
AUDIO
Virtual Synth
Plugin
MIDI Tracks (*)
MIDI
AUDIO
MIDI Tracks (***)
Audio Tracks (****)
MIDI
Virtual Synth
Plugin
Virtual Synth
Plugin
Virtual Effect
Plugin
Virtual Effect
Plugin
Ethernet
Port
Ethernet
Port
SEQUENCER
PLUGINS
LAPTOP
RECEPTOR
In a typical laptop, MIDI Tracks (*) and Audio Tracks (**)
send data to and from plugins stored on the laptop
(as shown in the above diagram).
But what happens if your laptop runs out of CPU?
Receptor and UniWire to the rescue!
Simply instantiate a UniWire plugin on additional
MIDI Tracks (***) and data from that track is sent to Receptor,
where it's processed and returned -- just as if the
plugin was running on your laptop.
Similarly, you can instantiate UniWire plugins on additional
Audio Tracks (****) and UniWire will use Receptor's plugins to
process those tracks.
Everything happens over Ethernet (no audio or midi cables are
required) and, thanks to the UniWire plugin, Receptor integrates
with your sequencer just as if it were built-in to your laptop.
UniWire Instrument
Plugin
AUDIO
UniWire FX
Plugin
MIDI + AUDIO
AUDIO
Basic UniWire Operation
At this point, you should have:
•
connected Receptor to your computer’s Ethernet port (or the Ethernet network connected to your computer)
•
updated Receptor to its latest system software
•
installed the UniWire plugins on your desktop computer.
If not, see the previous sections to learn how to connect your hardware and install your software.
Setting Up Receptor to Use UniWire
The following is a basic overview of how to set up and use UniWire with your host sequencer of choice. This
overview assumes the simplest and most basic UniWire operation — that is, you use only your host computer’s
audio and MIDI interfaces (not Receptor’s audio and MIDI I/O), and that you communicate with Receptor via
a UniWire plugin instantiated in your host sequencer. Other, advanced modes of operation are available and
are discussed later in this manual, along with detailed descriptions of all UniWire parameters contained in both
Receptor and in the UniWire plugins.
1
Your first step is to enable UniWire on Receptor.
To do this from Receptor’s graphical interface, click the SETUP tab and check the Enable UniWire option in the new
UNIWIRE section in Setup View.
To do this from Receptor’s front panel, press the SETUP button and rotate the top display knob until the top line shows
the “UniWire” option, then rotate the bottom knob to select Enabled.
Once UniWire is enabled, Receptor will sync to your host computer, meaning that Receptor’s Master Sample Rate and
Sample Buffer Size settings will be determined by UniWire. As such, these options will be disabled in Receptor’s Setup
view. In addition, the MIDI Tempo Source will be set automatically to “External-UniWire”, meaning any synchrosonic
effects (LFO’s, arpeggiators, etc) running on Receptor will be synchronized to your host computer over UniWire.