Muse Research Receptor TRIO/QU4TTRO manual v1.0 User Manual
Page 29
29
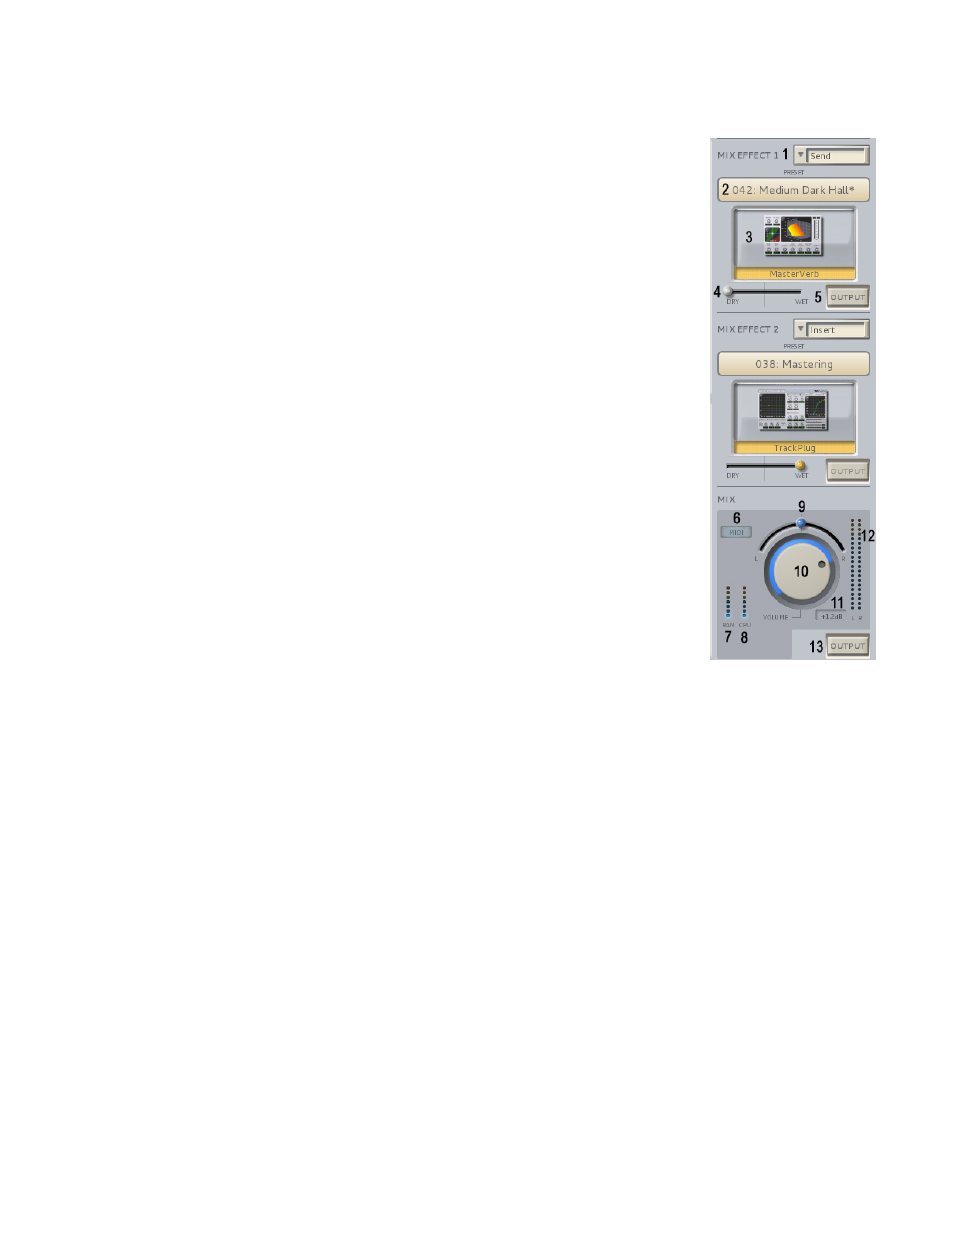
Exploring the GUI: The Mixer Section Controls
Now that you know how to select different synths, effects and their presets, it is time to craft the
overall sound using the MIX section.
The MIX section consists of two slots for additional effects, as well as the master
volume and pan controls. These slots operate just like the audio input slots;
simply drag the effect of interest into the slot to activate it, or select a preset by
clicking on the on the preset bar that says (Empty). Below is an explanation of
the various controls found in the Mixer section:
1. Insert / Send Mode switch: Changes effect configuration from INSERT
mode (all audio passes through effect) to SEND mode (effect amount
determined by Send Level settings on each channel.
2. Effect Preset selector: Opens up the preset selection window for that
particular slot. Opens into SoundFinder for effects with no effect selected, or if
an effect is already loaded, you have the choice of SoundFinder or the factory
presets of the loaded effect.
3. Effect Graphical Editor: Click on the icon of the effect and the GUI of the
effect itself will appear. You can then edit the effect's individual interface using
your mouse.
4. Insert Mode Wet / Dry control: In INSERT mode, all of the audio in the
system is routed THROUGH the selected effect. The WET/DRY control is enabled
only in INSERT mode and lets you adjust the overall amount of the effect. To
hear more of the effect, move the control more towards the "wet" side.
5. Channel Output Button: Opens the output assignment menu. This button
appears ONLY if the PreSonus AudioBox 1818 interface is attached, selected,
and the effect slot is in SEND mode. This allows you to send the effected signals
out a different output, or utilize this effect slot as a separate stereo output bus.
6. MIDI indicator: Indicates when MIDI information is being received by your RECEPTOR.
7. RAM indicator: Shows the relative amount of RAM that is being used by the system.
8. CPU indicator: Shows the overall CPU load on the system.
9. Pan Control: Adjusts the output between the left and right channels, or odd and even channel
numbers when the PreSonus AudioBox is connected.
10. Main Volume Control: Adjusts the overall output volume of your RECEPTOR
Note: this control is INDEPENDENT of the master volume control on the front panel, which
supersedes all other volume control settings in the system.
11. Output dB readout: Indicates the current volume control setting in dB.
12. Master Output Level Meters: Shows the master output volume level. Clipping will illuminate
the top segments and are reset by clicking on the top segment indicators..
13. Master Output Selector Button: Opens the master output channel assignment menu.
This button appears ONLY if the PreSonus AudioBox 1818 interface is attached, powered on, and
selected in SETUP. It allows you to send this channel's audio output directly out one of the channels
in the PreSonus audio interface.