Muse Research Receptor VIP manual v1.1 User Manual
Page 27
27
Exploring the GUI: The Mixer Section
Now that you know how to select different synths, effects and their presets, it is time to craft the
overall sound using the MIX section.
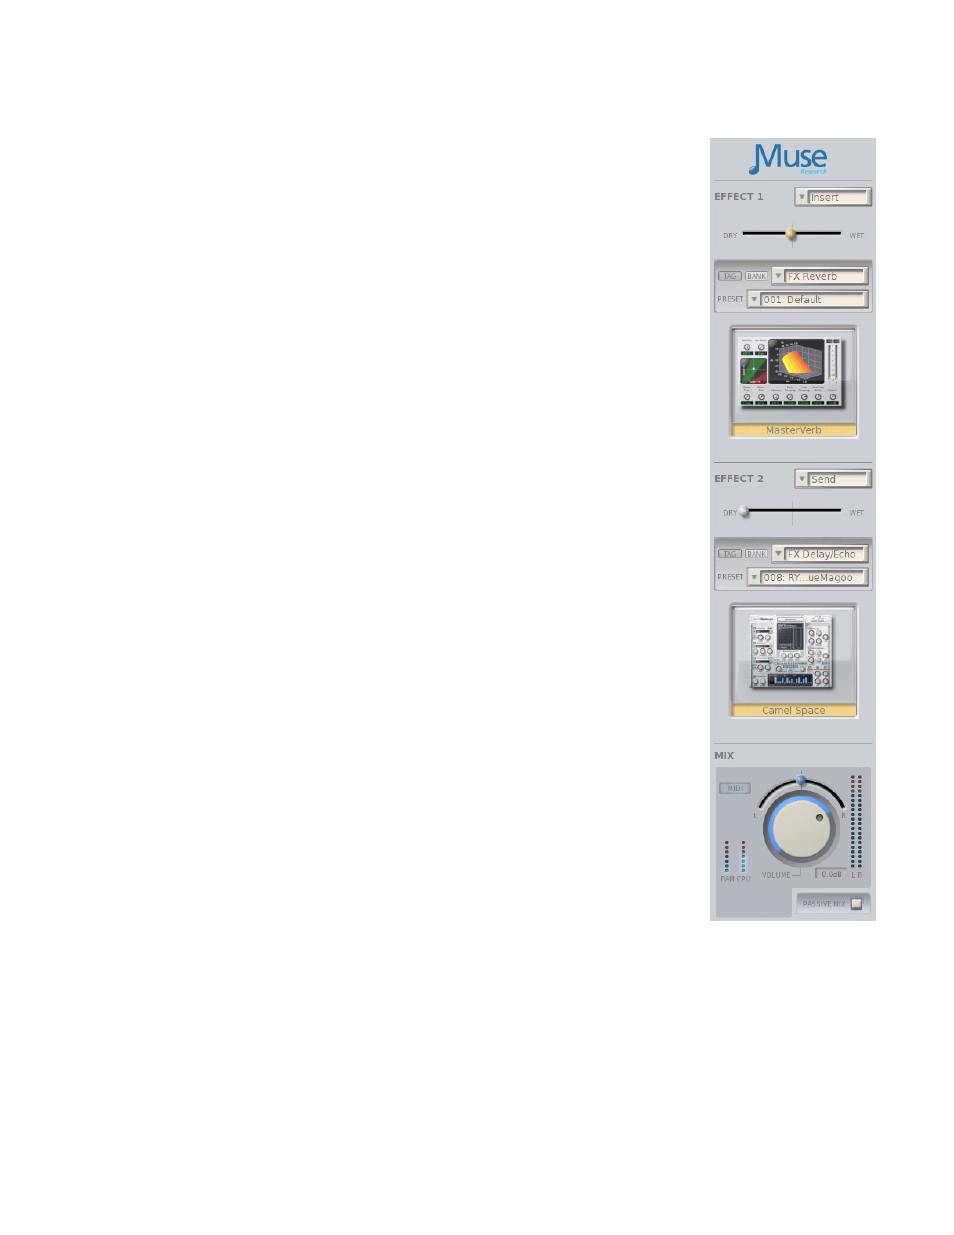
The MIX section consists of two slots for additional effects, as well as the master
volume and pan controls. These slots operate just like the audio input slots;
simply drag the effect of interest into the slot to activate it.
The effects slots are configurable either as an INSERT effect, or as a SEND
effect. There is a drop-down menu next to each effect slot that allows you to
select the mode you want.
INSERT EFFECT MODE: In INSERT mode, all of the audio coming from the
synths and audio inputs are routed THROUgH the effect you are running in the
MIX section. This means that all the signals are effected at the same time, which
is really useful if you want to add some reverb to your overall sound, or if you
want to insert a limiter to prevent the signal level from overloading the inputs of
your amp or PA system.
NOTE: In INSERT mode, 100% of the synths and audio input signals are going
through the effect you have inserted. As a result, there is a WET/DRY control
enabled in INSERT mode that lets you adjust the overall amount of the effect.
To hear more of the effect, move the control towards the WET side.
SEND EFFECT MODE: In SEND mode, the audio is sent to the effect much
like the Auxiliary send on an audio mixer. You can adjust the effect amount by
changing the "send" level each channel (or slot). This way, you can adjust the
amount of effect, if any, on a per channel basis.
Both the Effect 1 and Effect 2 slots have TAg and BANK buttons to select
presets, just like on the synths and audio effects. You can browse the presets
by selecting either TAgs or Banks and clicking on the drop down menu.
Main Mix Controls: At the bottom of the MIX section you'll find the MIX
controls, which consist of the main audio output volume and pan controls,
the main output meters, the CPU meter, the RAM meter, and the passive mix
control.
The main audio output volume and pan control work just like they do on the
channel slots. Click on the knob or pan button and move your mouse to change
the volume or left/right pan settings, respectively.
NOTE: The software volume controls are completely independent of the front
panel hardware volume control. For example, if the software volume controls
are at maximum, but the hardware volume control is all the way down, you will
not hear anything from the RECEPTOR VIP outputs!
Passive Mix Mode: When you are using the front panel inputs on RECEPTOR VIP, the rear panel
inputs are not available for processing. However, if you have an external audio device, such as an
MP3 Player, a keyboard with its own sounds, a drum machine, or some other audio device, it is
possible "passively" mix together the rear panel input signals with the sounds being processed or
generated inside the RECEPTOR VIP by selecting the PASSIVE MIX function.
When PASSIVE MIX is selected, the audio connected to inputs C and D will be mixed with the
signals being sent to the main outputs. Note that since these are "passive" inputs, there is no
processing or level control provided when in this mode. To adjust the relative mix between the
RECEPTOR VIP output and your passively mixed inputs, either 1) change the output level of your
external device, or 2) adjust the output volume of the RECEPTOR VIP to set the relative level
between the two.