Milwaukee Tool 6185-20 User Manual
Page 5
8
9
OPERATION
WARNING
To reduce the risk of injury,
wear safety goggles or glasses with side
shields. Unplug the tool before changing ac-
cessories or making adjustments.
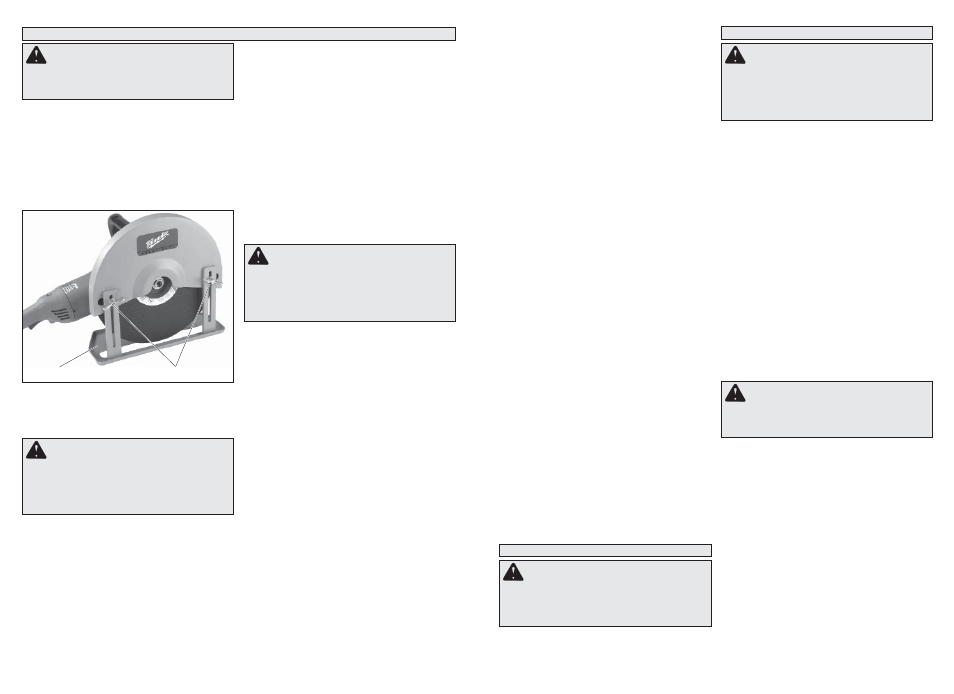
Adjusting the Depth of Cut
The shoe assembly can be moved to change the
depth of cut. Cut-off wheels wear down as they are
used and the depth of cut may need to be adjusted.
• Lower shoe assembly for shallower cuts.
• Raise shoe assembly for deeper cuts.
1. Unplug tool.
2. To change the depth of cut, loosen the wing nuts
on shoe assembly (counterclockwise).
3. Position the shoe assembly for the desired depth
(Fig. 4).
NOTE: Make repeated passes at depths of less
than 1/2" to achieve the desired depth. Cutting
at a depth of more than 1/2" can damage the
wheel.
4. Tighten the wing nuts securely (clockwise).
Wing nuts
Shoe assembly
Fig. 4
Starting and Stopping the Tool
The tool operates at no load speed of 4600 RPM.
1. Plug in tool.
2. To start the tool, pull the trigger.
3. To stop the tool, release the trigger.
Preventing Kickback
Kickback is the sudden reaction to a pinched wheel
which could cause a cut-off machine that is not
under control to lift up and out of the workpiece
towards the user. Take the precautions below to
help prevent kickback.
1. Maintain a fi rm grip and correct body posi-
tion. Position arms and body to control the
backward and upward reaction force of kickback.
Control the cut-off machine at all times.
Wheel Selection
Non-metallic Materials
When cutting non-metallic materials, use a silicone
carbide abrasive cut-off wheel of at least 1/8" thick-
ness which is rated with a maximum safe operating
speed at least 5400 RPM. READ SAFETY INFOR-
MATION SUPPLIED WITH CUT-OFF WHEEL.
Always wear proper safety equipment, including
a dust mask.
Metallic Materials
When cutting metals, use an aluminum oxide abra-
sive cut-off wheel of at least 1/8" thickness which
is rated with a maximum safe operating speed at
least 5400 RPM. READ SAFETY INFORMATION
SUPPLIED WITH CUT-OFF WHEEL. Protect ev-
eryone in the area from sparks.
Masonry Materials
When cutting masonry materials, use dry diamond
wheels or silicone carbide abrasive cut-off wheel
of at least 1/8" thickness which is rated with a
maximum safe operating speed at least 5400 RPM.
READ SAFETY INFORMATION SUPPLIED WITH
CUT-OFF WHEEL. Always wear proper safety
equipment, including a dust mask.
WARNING
The MILWAUKEE Hand-Held
Abrasive Cut-Off Machine is designed to cut
metal and non-metallic materials. To reduce
the risk of injury, DO NOT cut wood. DO NOT
attempt to install a toothed blade on the tool.
DO NOT use with liquids or in damp locations.
2. Set the depth of cut for no more than neces-
sary. The less wheel exposed, the less chance
of binding and kickback. Before cutting, be sure
shoe assembly is tight.
3. Always allow the wheel to come to a full stop
before removing the cut-off machine from the
workpiece. Never remove the cut-off machine
from a cut while the wheel is moving. If restart-
ing or correcting direction in mid-cut, allow the
wheel to coast to a stop, back the cut-off machine
up a few inches and center it in the kerf before
restarting.
4. Stay alert. Any distraction can cause twisting
or binding. Repetitive cuts may lull the user into
careless movements.
5. Do not force the tool. Forcing a cut-off machine
reduces control and cutting effi ciency.
If kickback should occur, continue to grip the cut-off
machine fi rmly and immediately release trigger.
WARNING
To reduce the risk of injury,
only use Type "1" abrasive and diamond cut-
ting wheels with at least 1/8" thickness which
is rated with a maximum safe operating speed
at least 5400 RPM. READ SAFETY INFORMA-
TION SUPPLIED WITH CUT-OFF WHEEL.
Making a Cut
1. Unplug tool. Select a cutting depth and adjust the
height of the shoe assembly as described in “Adjust-
ing the Depth of Cut”.
2. Plug the tool in and pull the trigger. Allow the
motor to reach full speed and then slowly lower
the wheel into the workpiece.
NOTE: Always start the cut gently pushing the
saw through the workpiece. Do not bang or bump
a wheel when starting or during a cut. Always
push the saw away from you
3. While cutting, keep the shoe fl at against the
workpiece and maintain a fi rm grip. Do not force
the cut-off machine through the work. Forcing a
cut-off machine can cause kickback.
Make repeated passes at depths of less than
1/2" to achieve the desired depth. Cutting at a
depth of more than 1/2" will damage the wheel.
Frequently clean dust from air vents and guards.
4. When the cut is fi nished, always allow the motor
to come to a complete stop. Never remove the
cut-off machine from a cut while the wheel is
moving.
5. If making a partial cut, restarting a cut or cor-
recting cut direction, allow the wheel to come to
a complete stop. To resume cutting, center the
wheel in the kerf (cutting slot), back the saw away
from cutting edge a few inches, pull the trigger
and re-enter the cut slowly.
NOTE: If the cut-off machine stalls, maintain a
fi rm grip and release the trigger immediately.
Correct the problem before continuing.
Overload Protector
To protect the motor from damage, the overload
protector automatically turns off the tool when the
motor is overloaded. The tool can become over-
loaded when cutting material that is too thick or cut-
ting materials too quickly. To prevent the overload
protector from activating, always follow the cutting
instructions under the "Operation" section. Do not
attempt to defeat or override the overload protector.
If the tool turns off automatically:
1. Release the trigger and unplug the tool.
2. Remove the wheel from the workpiece.
3. Allow the tool to rest for a miniumum of two
minutes.
4. Reset the overload protector by pushing in the
button.
5. Allow the tool to run under no load to ensure the
tool has properly cooled.
6. Resume the cut. When restarting a saw in the
workpiece, center the saw wheel in the kerf, or
cut, and check that the wheel is not engaged into
the material. If saw wheel is binding, it may walk
up or KICKBACK from the workpiece as the saw
is restarted.
ACCESSORIES
For a complete listing of accessories refer to your
MILWAUKEE Electric Tool catalog or go on-line
to www.milwaukeetool.com. To obtain a catalog,
contact your local distributor or a service center.
WARNING
To reduce the risk of injury,
always unplug the tool before attaching or
removing accessories. Use only specifi cally
recommended accessories. Others may be
hazardous.
WARNING
To reduce the risk of injury,
electric shock and damage to the tool, never
immerse your tool in liquid or allow a liquid
to fl ow inside the tool.
MAINTENANCE
WARNING
To reduce the risk of injury,
always unplug your tool before performing
any maintenance. Never disassemble the tool
or try to do any rewiring on the tool’s electrical
system. Contact a MILWAUKEE service facility
for ALL repairs.
Maintaining Tools
Keep your tool in good repair by adopting a regular
maintenance program. Before use, examine the
general condition of your tool. Inspect guards,
switches, tool cord set and extension cord for
damage. Check for loose screws, misalignment,
binding of moving parts, improper mounting, bro-
ken parts and any other condition that may affect
its safe operation. If abnormal noise or vibration
occurs, turn the tool off immediately and have the
problem corrected before further use. Do not use a
damaged tool. Tag damaged tools “DO NOT USE”
until repaired (see “Repairs”).
Under normal conditions, relubrication is not neces-
sary until the motor brushes need to be replaced.
After six months to one year, depending on use,
return your tool to the nearest MILWAUKEE service
facility for the following:
• Lubrication
• Brush inspection and replacement
• Mechanical inspection and cleaning (gears,
spindles, bearings, housing, etc.)
• Electrical inspection (switch, cord, armature,
etc.)
• Testing to assure proper mechanical and electrical
operation
Cleaning
Clean dust and debris from vents. Keep the tool
handles clean, dry and free of oil or grease. Use
only mild soap and a damp cloth to clean your tool
since certain cleaning agents and solvents are
harmful to plastics and other insulated parts. Some
of these include: gasoline, turpentine, lacquer thin-
ner, paint thinner, chlorinated cleaning solvents,
ammonia and household detergents containing
ammonia. Never use fl ammable or combustible
solvents around tools.
Repairs
If your tool is damaged, return the entire tool to the
nearest service center.