LR Baggs Dual Source User Manual
Page 2
Preamp installation: The preamp should be mounted on the back surface of
the guitar, with the pre-set controls on the unit accessible through the sound
hole (see figure 4 for correct placement). Just before you mount the preamp,
plug in the output jack, pickup, mic and ribbon cable for the Remote Control
to their receptacles on the circuit board.
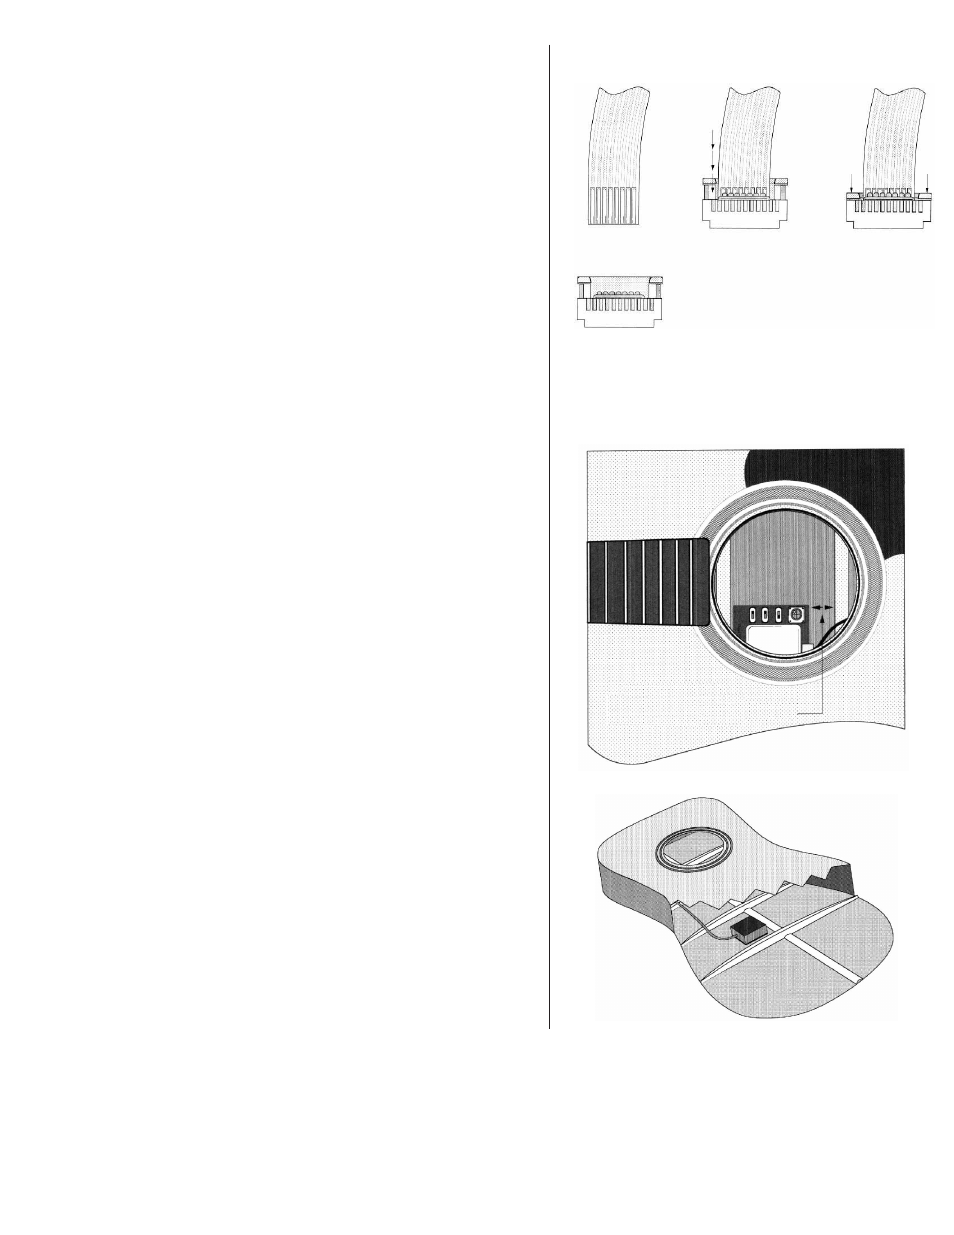
Note: It is vital that the ribbon cable be in the correct position when inserted
into the ZIF (zero insertion force) socket connector (see figure 3 for proper
alignment). Clean all dust and oil from the area inside the guitar where the
preamp will be mounted, remove the backing from the velcro and press the
unit into place. Be careful to leave enough space between the preamp and the
brace below the preamp for wires and connectors.
6. Battery bag: Stick the double-sided adhesive to an easily accessible spot
inside the guitar. The battery can then be changed by opening the flap on
the bag and pulling out the battery.
7. Remote Control installation: Adjust the two top screws and bottom screw
until the top and bottom plates are parallel with about a 1/8" gap. Be sure the
top plate drops freely over the LED before you tighten the screws. Do not push
or adjust the position of the LED. Push the plate over the edge of the
soundhole as far as it will go. The screws are padded and will provide the
proper position for the Remote when they touch the inside edge of the
soundhole. On a few guitars you might hit a brace, so either move the remote
to miss the brace or expand the screws to clamp over it.
Lightly tighten the two top plate screws, adjust the bottom screw if necessary
to make the two halves parallel, then tighten the top screws enough to hold
the remote securely in place.
Be sure the knobs rotate freely. If they bind against the top plate, back the top
screws off and increase the length of the bottom screw. This will raise the edge
of the top plate and free the knobs.
8. Mic placement: Depending on which mic you are using, the placement and
the method of locating the "sweet spot" will vary greatly. If you are using any
microphone other than the Dual Source mic, follow the manufacturer's
instructions for your mic.
For placement of the Dual Source mic:
A. Fashion a simple placement tool out of a wire coat hanger or 12- to 14-
gauge copper wire. The tool should be about 1 1/2' to 2' long and have a U
shape at one end for lightly gripping the small foam block that houses the
mic.
B. Attach the tool to the mic by wrapping it around the base of the foam block
and insert the mic into the inside of the instrument. Temporarily unplug the
pickup from the preamp so all you will hear is the mic. Now string the guitar.
C. Plug the guitar into a P.A. or similar sound source using a standard mono
cable. Set the stereo/mono switch located on the circuit board to mono. Turn
up the "vol" and the "mic" knobs on the Remote module, and gradually bring
the volume of the P.A. to a comfortable level. With the guitar on its back, strum
the open strings and move the mic around to the back side of the guitar with
the wire tool until the optimum spot is located in the guitar. The best location
for this mic is generally somewhere in the lower section of the guitar under or
behind the bridge (see figure 5 for recommended placement).
D. When you've found the optimum positioning, look inside the guitar,
carefully observe the position of the mic and unstring the guitar. The sweet
spot on some guitars is a small area, and a half inch in any direction can make
significant difference. Remove the mic from the wire tool and plug the pickup
back into the preamp. Before you place the mic in position, first clean the area
where it will be mounted so it is free of any dust or oil. Remove the backing
from the velcro and place the mic inside the guitar precisely on the sweet
spot. Be careful to place the mic in a way that won't kink or severely bend the
wire as it exits the foam block.
9. Finishing touches: Secure all wires with the clips provided, restring the
guitar.
10. Dual Source setup and testing: If this installation is employing the complete Dual Source System with the Ribbon Transducer and the Dual
Source mic, set the controls on the preamp to match the default settings shown on the preamp label.
11. Other pickups and microphones:
A. Set the mono/stereo switch to mono.
B. For the LB6 series of pickups, set the pickup high/low gain switch to low. Most other popular pickups on the market will work best in the low
fig. 3
Ribbon cable with
contacts facing you
unlocked
locked
p
re
ss
h
e
re
ZIF connector
front view
Slip the ribbon cable into the ZIF
connector with the silver contacts on the
cable and the front side of the side of the
connector facing you. The connector must
be in the unlocked position to insert the
cable. When the cable is firmly seated press
down on both sides of the locking clip to
secure the cable.
fig. 4: preamp placement
Leave enough space between the
preamp and the brace to the right
so that there's room for the
connection and wires
to plug in.
fig. 5