Char-Broil 463720110 User Manual
Page 17
ASSEMBLY
17
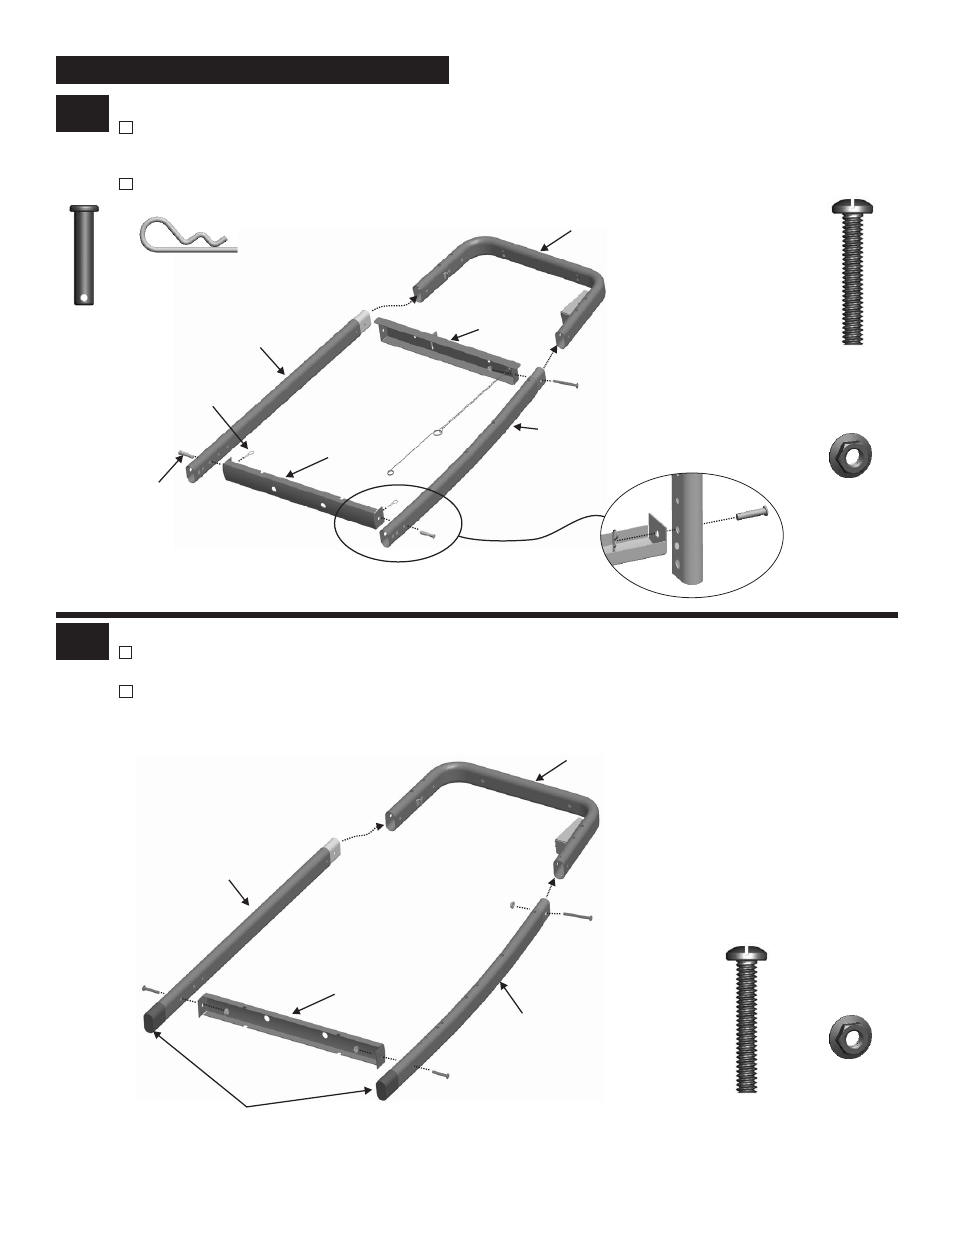
1
Left leg
Place upper leg as shown. NOTE: Left front and left back legs do not have leg extenders. In front, attach upper leg,
side brace and left front leg (curve) with #10-24x1-1/4’’ machine screw and #10-24 flange nut. In back, attached the left
back leg (straight) to upper leg.
Attach support bracket in the third hole from bottom of leg with two hinge pins and two hitch pins (A) .
Right leg
Place upper leg as shown. Attach upper leg and right front leg (curve) with #10-24x1-1/4’’ machine screws and #10-24
flange nuts. Then attach upper leg and right back leg (straight).
Attach support bracket with #10-24x1-1/4’’ machine screws and #10-24 flange nuts.
2
Hitch Pin
Qty.2
Hinge Pin
Qty.2
#10-24x1-1/4’’
Machine Screw
Qty.1
#10-24
Flange Nut
Qty. 1
#10-24x1-1/4’’
Machine Screw
Qty.3
#10-24
Flange Nut
Qty. 3
Left Front Leg
(Curve)
Support Bracket
Left Back Leg
(Straight)
Side Brace
Upper Leg
Right Front Leg
(Curve)
Right Back Leg
(Straight)
Support Bracket
Leg Extender
Upper Leg
Hinge Pin
Hitch Pin
A
- BIG EASY 4638213 (1 page)
- 463666512 (28 pages)
- INFRARED 8401504 (8 pages)
- 463741209 (32 pages)
- 463420509 (32 pages)
- Patio Caddie 06601295 (20 pages)
- 4984722 (1 page)
- 463257010 (32 pages)
- NATURAL GAS CONVERSION KIT 7116572 (24 pages)
- PATIO BISTRO 10601578-16 (8 pages)
- 4654870 (16 pages)
- 463232011 (32 pages)
- THE BIG EASY 4638263 (1 page)
- SILVER SMOKER 3201560 (16 pages)
- 463210510 (32 pages)
- RED 463250211 (28 pages)
- 463250511 (36 pages)
- AMERICAN GOURMET 10301580 (16 pages)
- 80015625 (28 pages)
- 466247310 (32 pages)
- 461111811 (12 pages)
- 463460708 (28 pages)
- PATIO BISTRO 11601579 (8 pages)
- 463230511 (32 pages)
- 4651330 (16 pages)
- 11301696 (20 pages)
- QUICKSET 463742704 (1 page)
- 463263111 (32 pages)
- COMMERICAL 463248708 (32 pages)
- BISTRO 10601578 (8 pages)
- 463272509 (28 pages)
- 463741008 (27 pages)
- 11601578 (8 pages)
- 463262911 (24 pages)
- GRILL2GO 11401587 (8 pages)
- 463247512 (28 pages)
- T-47D 463251012 (40 pages)
- 463270911 (28 pages)
- HEATWAVE 461262409 (28 pages)
- 463460711 (32 pages)
- 463621611 (28 pages)
- PATIO BISTRO 11601578 (8 pages)
- 463244012 (32 pages)
- 415.161209 (28 pages)
- 463222209 (36 pages)