Turn the vcr and the tv on, Ooking, S-video i – Philips TV DVD Combo User Manual
Page 60: Ilsbili
Attention! The text in this document has been recognized automatically. To view the original document, you can use the "Original mode".
H
ooking
up
the
TV
S-ViDEO I
nputs
7
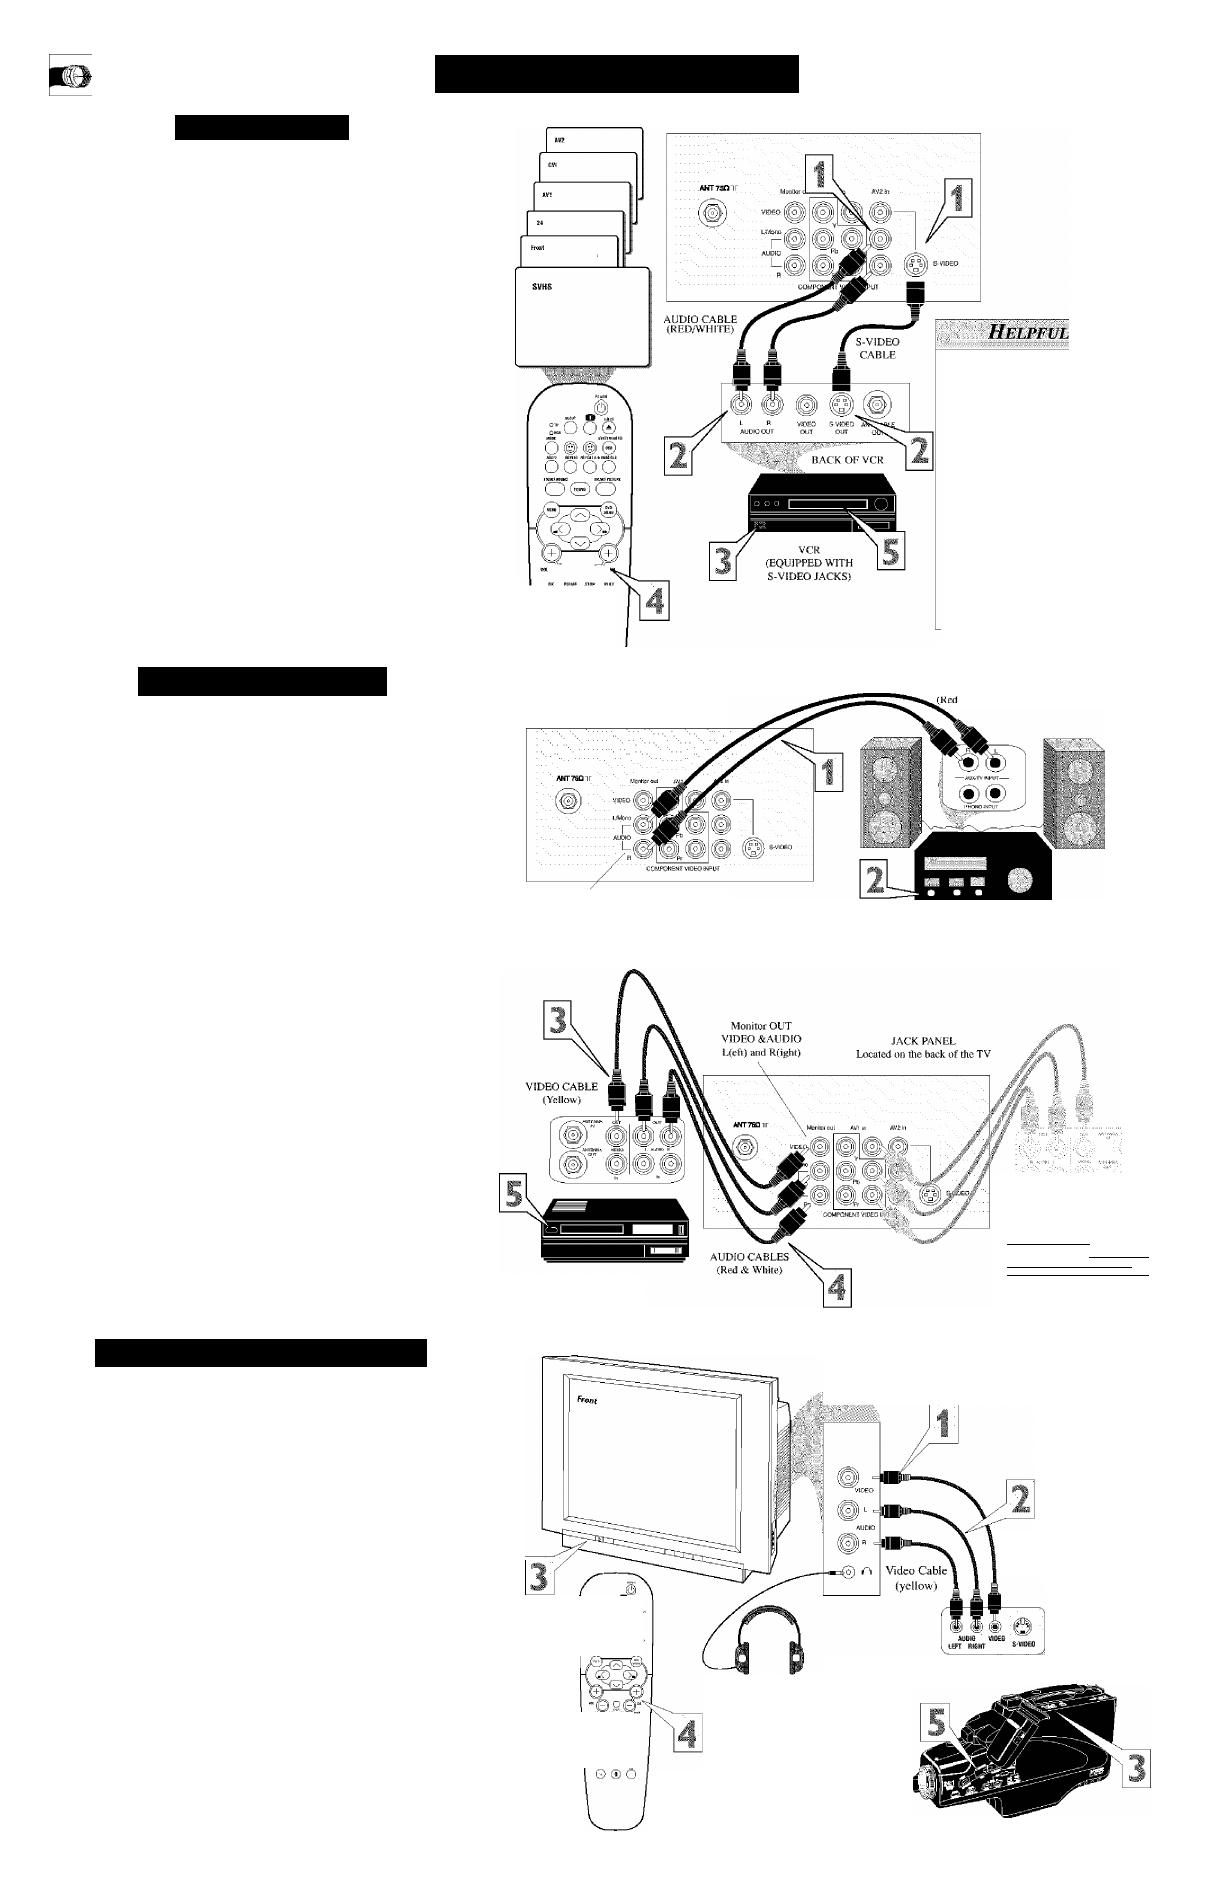
he S(uper)- Video connection on the rear of the TV can provide
you with better picture detail and clarity for the playback of
accessory sources than the normal antenna picture connections.
NOTE: The accessory device must have an S-VIDEO OUT(put)
jack in order for you to complete the connection on this page.
Connect one end of the S-VIDEO CABLE
to the S
VIDEO jack on the back of the TV. Then connect one end
the AUDIO (red and white) CABLES to the AV2 in
AUDIO L and R(left and right) jacks on the rear of the TV.
Connect other end of the S-VIDEO CABLE
to the S
VIDEO OUT jack on the back of the VCR. Then connect
the other ends of the AUDIO (red and white) CABLES to
the AUDIO (left and right) OUT jacks on the rear of the
VCR.
Turn the VCR and the TV ON.
Press the CH + or -- buttons
on the remote to scroll the
channels until SVHS appears in the upper left comer of the
TV screen.
Now your ready to place a prerecorded video tape in the
VCR and press the PLAY ^ button.
M
onitor
O
utputs
r
he Monitor (Audio/Video) out Jacks are great for recording
with a VCR or used to connect an external audio ,sy.item for
better sound reproduction.
For Audio System Connection:
■
Connect one end of the R(ight) and L(eft) AUDIO
(Monitor Out)
jacks on the TV to the R and L audio input
jacks on your amplifier or sound system. Set the audio sys
tem’s volume to a normal listening level.
Turn the TV and audio system ON.
You can now adjust
the sound level coming from the audio system with the
VOLUME (+) or (—) button on the TV or remote control.
For Second VCR Connection/Recorder:
NOTE:
Refer to page 9 for the proper hookup of the first VCR.
Follow the instructions on how to tune to the AV I channel to
view a pre-recorded tape.
The following steps allow you to connect a second VCR to
record the program while your watching it.
Connect one end of the yellow Video Cable
to the
Monitor out
VIDEO plug. Connect the other end to the
VIDEO IN plug on the second VCR,
Connect one end of the red and white Audio cable
from
i the Monitor out AUDIO L and R plugs on the TV to the
audio
IN plugs on the VCR.
Turn the Second VCR ON,
insert a black VMS tape and
it’s ready to record what’s being viewed on the TV screen.
OQ©
OK
?L..
® © © ©
® ® @
® ® ®
The S-VIDEO and VIDEO AV2
in(puts) are in parallel. The S
VIDEO input is dominant when in
use. If separate video signals are
connected to the S-VIDEO and
VIDEO AV2 in(puts), the signal
from the VIDEO AV2 in(put) will
not be usable.
Note:
The S-Video and Audio
cables needed for this connection
are not supplied with your TV.
Please contact your dealer or Philips
at 800-531-0039 for information
about purchasing the needed cables.
Audio System Connection
JACK PANEL
Located on the back of the TV
AUDIO CABLES
& While)
AVOUT
AUDIO L(efi) and R(ighi)
AUDIO SYSTEM
with AUDIO INPUTS
Second VCR Connection/Recorder
.■■ -...... -'j
V©:.:- ;
ilSBili
SECOND VCR
FIRST VCR (accessoiy device)
(Hookup from AVI on previous page.)
S
ide
A
udio
/V
ideo
I
nputs
A
udio and Video Side Inputs are available for a quick connec
tion of a VCR, to playback video from a camera or attach a
gaming device. Use the CH -i- or — buttons on the remote control
to tune these inputs.
■
Connect the video (yellow) cable
from the Video output
on the Camera (or accessory device) to the Video (yellow)
Input located on the Side of the TV.
For Stereo Devices;
Connect the audio cable (red and
, white) from the Audio Left and Right Outputs on the
Camera to a Stereo to Mono adapter. Then plug the single
end of the adapter to the Audio In (white) jack on the Side
of the television.
For Mono Devices:
Connect one end of the audio cable
from the Audio Out jack on the device to the Audio In
(white) jack on the Side of the television.
Turn the TV and the accessory device ON.
Press ihe CH -i- or - buttons
on the remote control to tune
> the TV to the side input jacks. “Front” will appear on the
TV screen.
Press the PLAY ^ button
on the accessory device to
view playback, or to access the accessory device (camera,
gaming unit, etc.).
::oo®
o © ® ©'
oo"oo
o©o
® ® ® ®
® ® ®
® ® ®
® ® ®
Pane! iocated
of TV
Audio Cabies
(red & white)
Optional
Headphones
Jack Panel
of Accessory Device
When headphones re used
the sound coming from the
TV speakeis will be mute.