Great Planes Christen Eagle ARF - GPMA1217 User Manual
Page 34
❏
2. “Clean up” the cockpit area by trimming the covering
over the edges of the sheeting around the cockpit opening.
The covering should end in the middle of the edge of the
sheeting. Use a covering iron to securely iron the covering
down along the edges.
❏
3. The cockpit may be painted with your color of choice,
but the first coat or two should be with white primer or white
or clear paint. After the first coat has dried, use 400-grit
sandpaper to lightly sand the cockpit and remove any raised
wood grain. Apply the final coat of paint. Flat black or gray is
recommended—using an airbrush to apply the final coat of
paint provides the best results, but using a paint brush is
suitable too. Note: If the cockpit is not first coated with white
or clear, the black or gray color coat may bleed through the
balsa and become visible under the white MonoKote outside
the model.
❏
4. Paint the pilot (not included) as desired. Though this
Eagle is 29% scale, any 1/4-scale or 30% scale pilot is
suitable. Acrylic modeling paint (available at craft stores) is
recommended for painting the pilot. It has a matte, realistic
finish and washes up with water.
❏
5. Cut out and paint the rear instrument panel. Flat black
spray paint is recommended. After the paint dries, apply the
forward and aft instrument panel decals. Hint: When
installing the instrument panel decals, first peel the backing
halfway off one side of the decal. Cut the backing vertically
in half. Now cut 1/4" from the piece of backing you just cut
from the decal. Carefully reposition the backing onto the
decal. This will leave a 1/4" strip of the back of the decal
exposed, but the rest of the decal will be protected by the
paper backing. Now place the decal on the instrument panel
and position as desired. This will be easy to do since most
of the decal is covered with the paper backing. Once the
decal is in position, rub your finger up and down the front,
sticking the 1/4" exposed area down. Now peel one side of
the backing off. Rub your finger over it to stick it down, then
peel off the other side.
❏
6. Glue the pilot and rear instrument panel into position.
In addition to gluing in the pilot, for the most security it
should also be fastened mechanically with #4 or #6 screws.
If the type of pilot you are using does not have a solid base,
make a base from 1/8" [3mm] plywood (not supplied) and
glue it inside the bottom of the pilot. Make a doubler for the
screws out of plywood for the other side of the cockpit floor
inside the fuselage. Drill the appropriate size holes for the
screws, then glue and screw the pilot to the cockpit floor.
Fabricate and install any other scale cockpit details desired.
❏
1. Use scissors to cut the canopy approximately 1/8"
[3mm] outside the molded-in cutlines. Now cut right on the
cutlines. Hint: The cutlines are more visible inside the canopy.
Curved-tip hobby scissors work best for cutting plastic.
❏
2. Use a bar sander with coarse sandpaper to true the
edges of the canopy. Use 320 or 400-grit sandpaper to
smooth the edges and remove any plastic fuzz.
3. Place the canopy on the fuselage and make sure it is
centered from side-to-side. Also make sure the front of the
canopy does not cover the built-in hardwood mounting
points for the cabanes. Tape the canopy into position.
❏
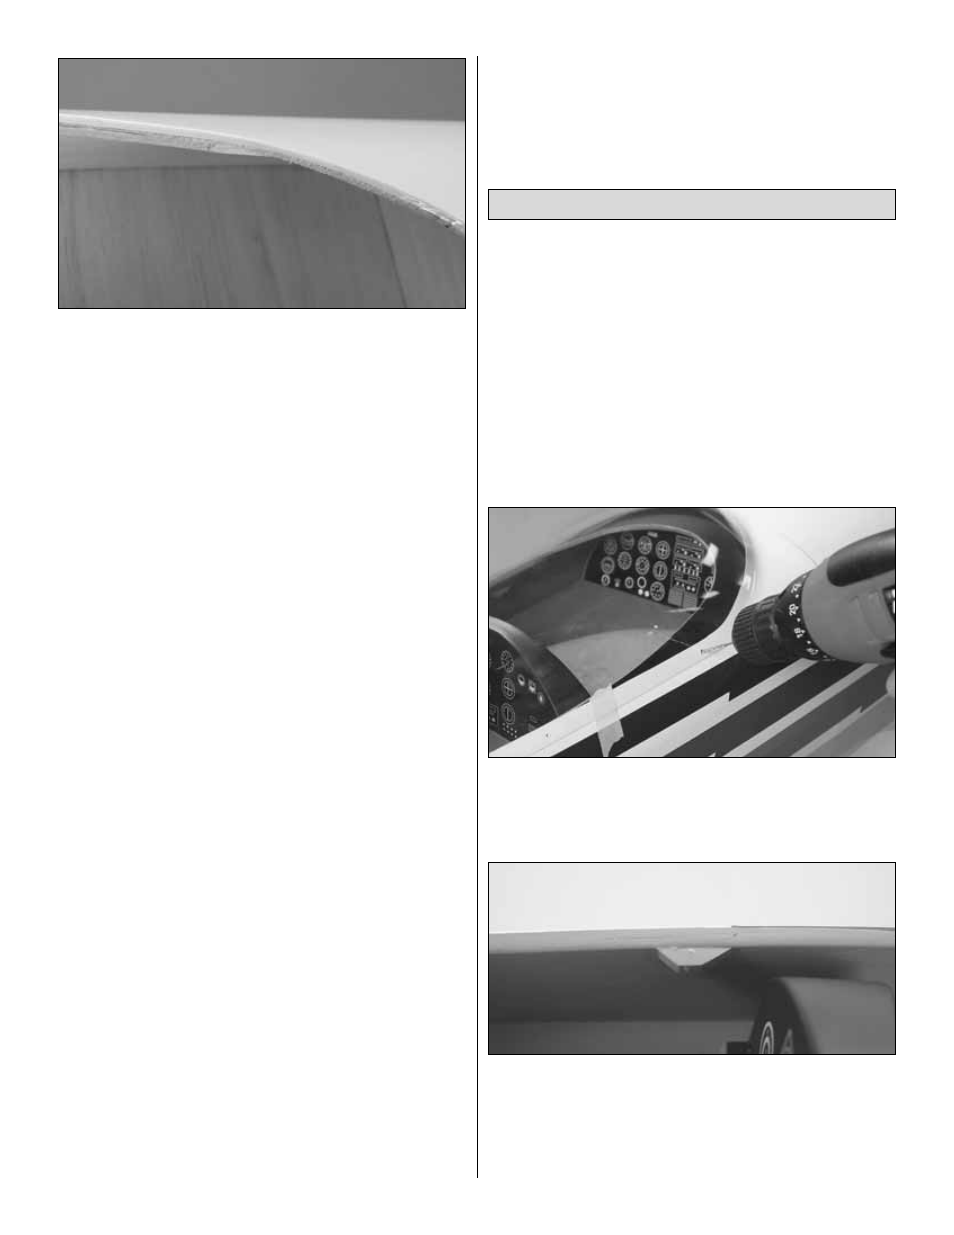
4. Drill four, evenly spaced 1/16" [1.6mm] holes through
both sides of the canopy and the fuselage. Remove the
canopy. Enlarge the holes in the canopy only with a 3/32"
[2.4mm] drill.
❏
5. Mount the canopy to the fuselage with eight #2 x 3/8"
[9.5mm] button-head screws. Remove the screws, harden
the holes in the sheeting with a drop of thin CA, allow to
harden, then remount the canopy. Optional: Glue small
pieces of balsa inside the cockpit to cover the threads of the
wood screws. Redrill holes for the canopy screws.
Mount the Canopy
34