Start, Centre, Choose a good flying site – Estes 4550 - Silver Cloud User Manual
Page 2
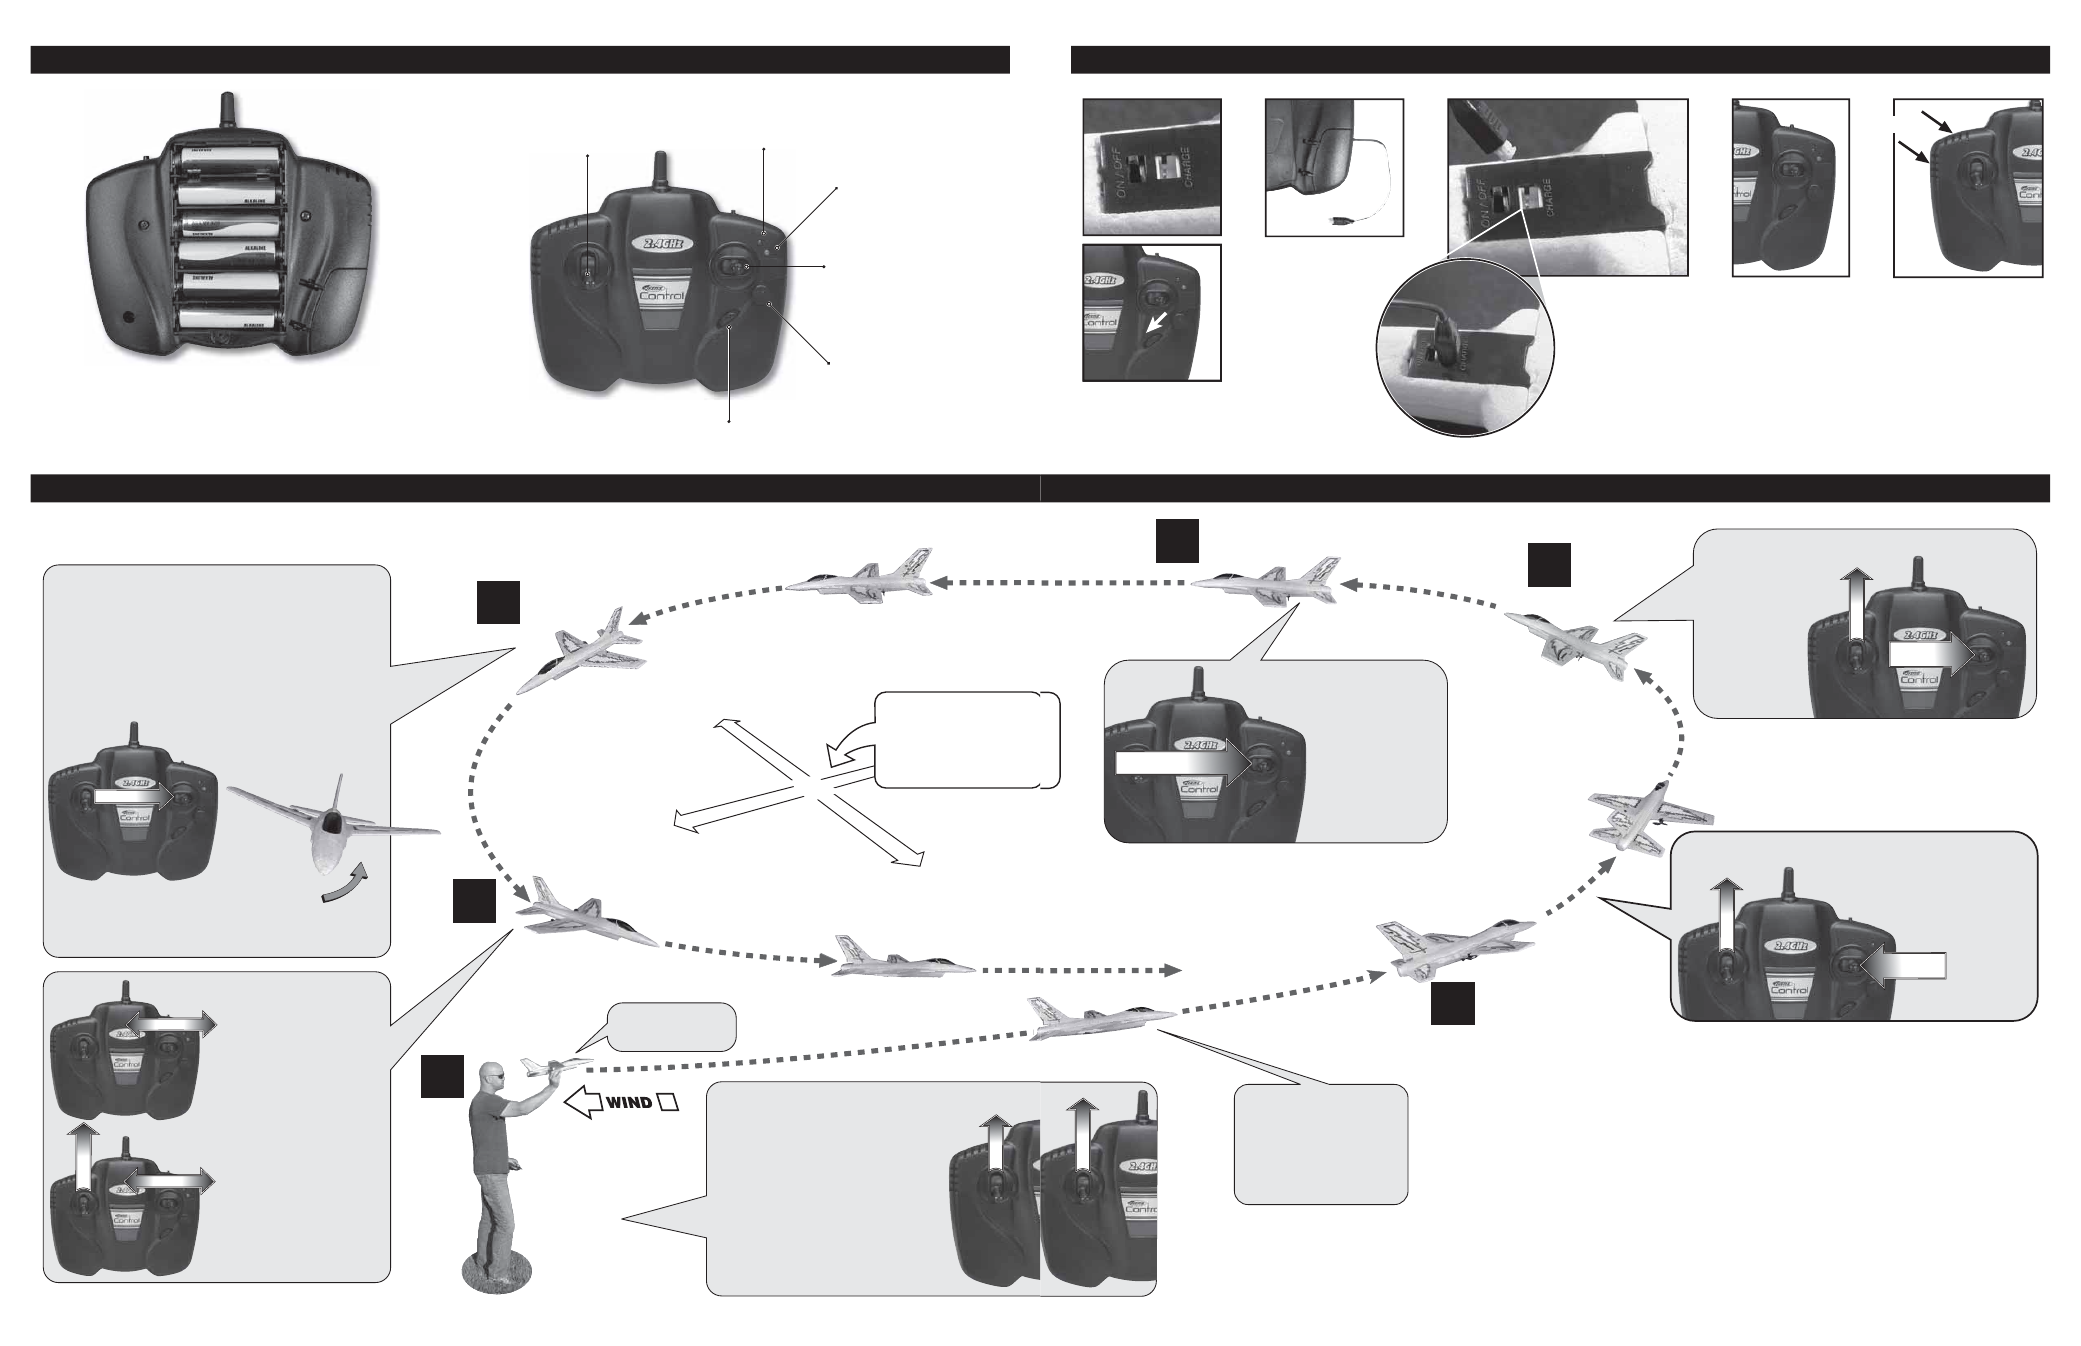
2
Controller with Built-in Charger
Power LED (red)
Charger LED (green)
Flight Direction Trim:
Adjusts the right and left
direction.
Direction Stick:
Tap (push and release) left
or right to steer.
Throttle Stick:
Push and hold up for full motor
power. Push halfway up for
cruising speed. Release to stop.
Remove screw and back cover. Insert 6 new “AA” alkaline batteries in the
correct polarity. Replace cover and screw. New batteries should be installed
after every fourth complete charge of the Star Strike.
Flying You
peed. Release to stop.
Switch “ON” for fl ying
Switch “OFF” for charging
TAP
START
100
YARDS (91 m)
100 YARDS (91 m)
Find a large open area.
You don’t want to fly
near people, streets,
houses, trees or power
lines.
1.
5.
6.
CHOOSE A GOOD FLYING SITE:
END LEFT TURN
Tap direction control stick right.
LEFT TURN PATH
Tap direction control stick left.
STEERING AN AIRCRAFT COMING TOWARD YOU
1. Imagine you’re in the cockpit. Turn and point the
controller antenna in the direction the aicraft is flying.
OR
2. While the aircraft’s wing is banked, tap the
direction control stick in the direction of the low wing
until it levels.
Hold aircraft under
the wing.
Release the throttle
control stick to begin
descent. Tap the
direction control stick
left or right to steer into
the wind and keep the
wings level.
Tap the throttle control
stick to keep the aircraft
on a gentle path to
touchdown.
TAP
TAP
TA
P
LANDING THE AIRCRAFT
1. Check wind speed and
direction.
2. Turn controller switch ‘ON’. The
red LED will illuminate.
3. Turn aircraft switch ‘ON’.
4. Check motor and turn controls.
5. Apply full power (throttle
control stick pushed up).
6. Toss aircraft straight and level
into the wind.
PUSH
5 mph [8km/h] or less
To stop turning, tap the direction control
stick in the low wing’s direction.
11
1. Mettre l’appareil et le
contrôleur à l’arrêt.
2. Ouvrir la porte de
charge du contrôleur.
Déployer le cordon
de charge.
3. Brancher le cordon de
charge sur l’appareil
(NE PAS FORCER
NI BRANCHER À
L’ENVERS). Le voyant
vert s’allume.
4. Charger jusqu’à
ce que le voyant
s’éteigne. Débrancher
le cordon et le ranger
dans le compartiment
de charge du
contrôleur.
REMARQUE : Pendant la
charge, de la chaleur se
dégage par les évents
du contrôleur. Ne jamais
couvrir ceux-ci.
Évents
Recharge de l’Appareil
Appareil
Virer en donnant des petits coups à
gauche sur le manche – des petits
coups répétés rapides provoquent
des virages serrés, ou des
petits coups répétés lents
provoquent des
virages larges.
Terminer les virages
en donnant des
petits coups à droite
sur le manche,
mettant les
ailes de niveau
pour voler droit.
DONNER DES
PETITS COUPS
DONNER DES
PETITS COUPS
TOUJOURS FAIRE VOLER AU-DESSUS DE
CHAMPS COUVERTS D'HERBE DOUCE !
NE PAS FAIRE VOLER AU-DESSUS D'AIRES
DE STATIONNEMENT OU DE RUES.
er
,
es.
2.
3.
4.
FIN DU VIRAGE À GAUCHE
Donner des petits coups à droite sur le manche.
COMMENCER UN
VIRAGE À GAUCHE
Donner des petits coups
à gauche sur le manche
de contrôle de direction.
Voler en ligne
droite en centrant
le manche de
contrôle de
direction. Donner
des petits coups à
gauche ou à droite
pour maintenir les
ailes de niveau.
Laisser l'appareil voler de
lui-même pendant 3 à 5
secondes pour gagner de
la vitesse et de l'altitude
avant d'effectuer le
premier virage.
Durée du vol : jusqu'à 10 minutes.
CENTRE
POUSSER
POUSSER
POUSSER