Attach centering rings (cont.), Prepare tail cone, Prepare nose cone and install nose weight – Estes 2188 – Canadian Arrow User Manual
Page 3: Install shock cord mount, Attach parachute and shock cord, 1/8” (3 mm)
NO
2.
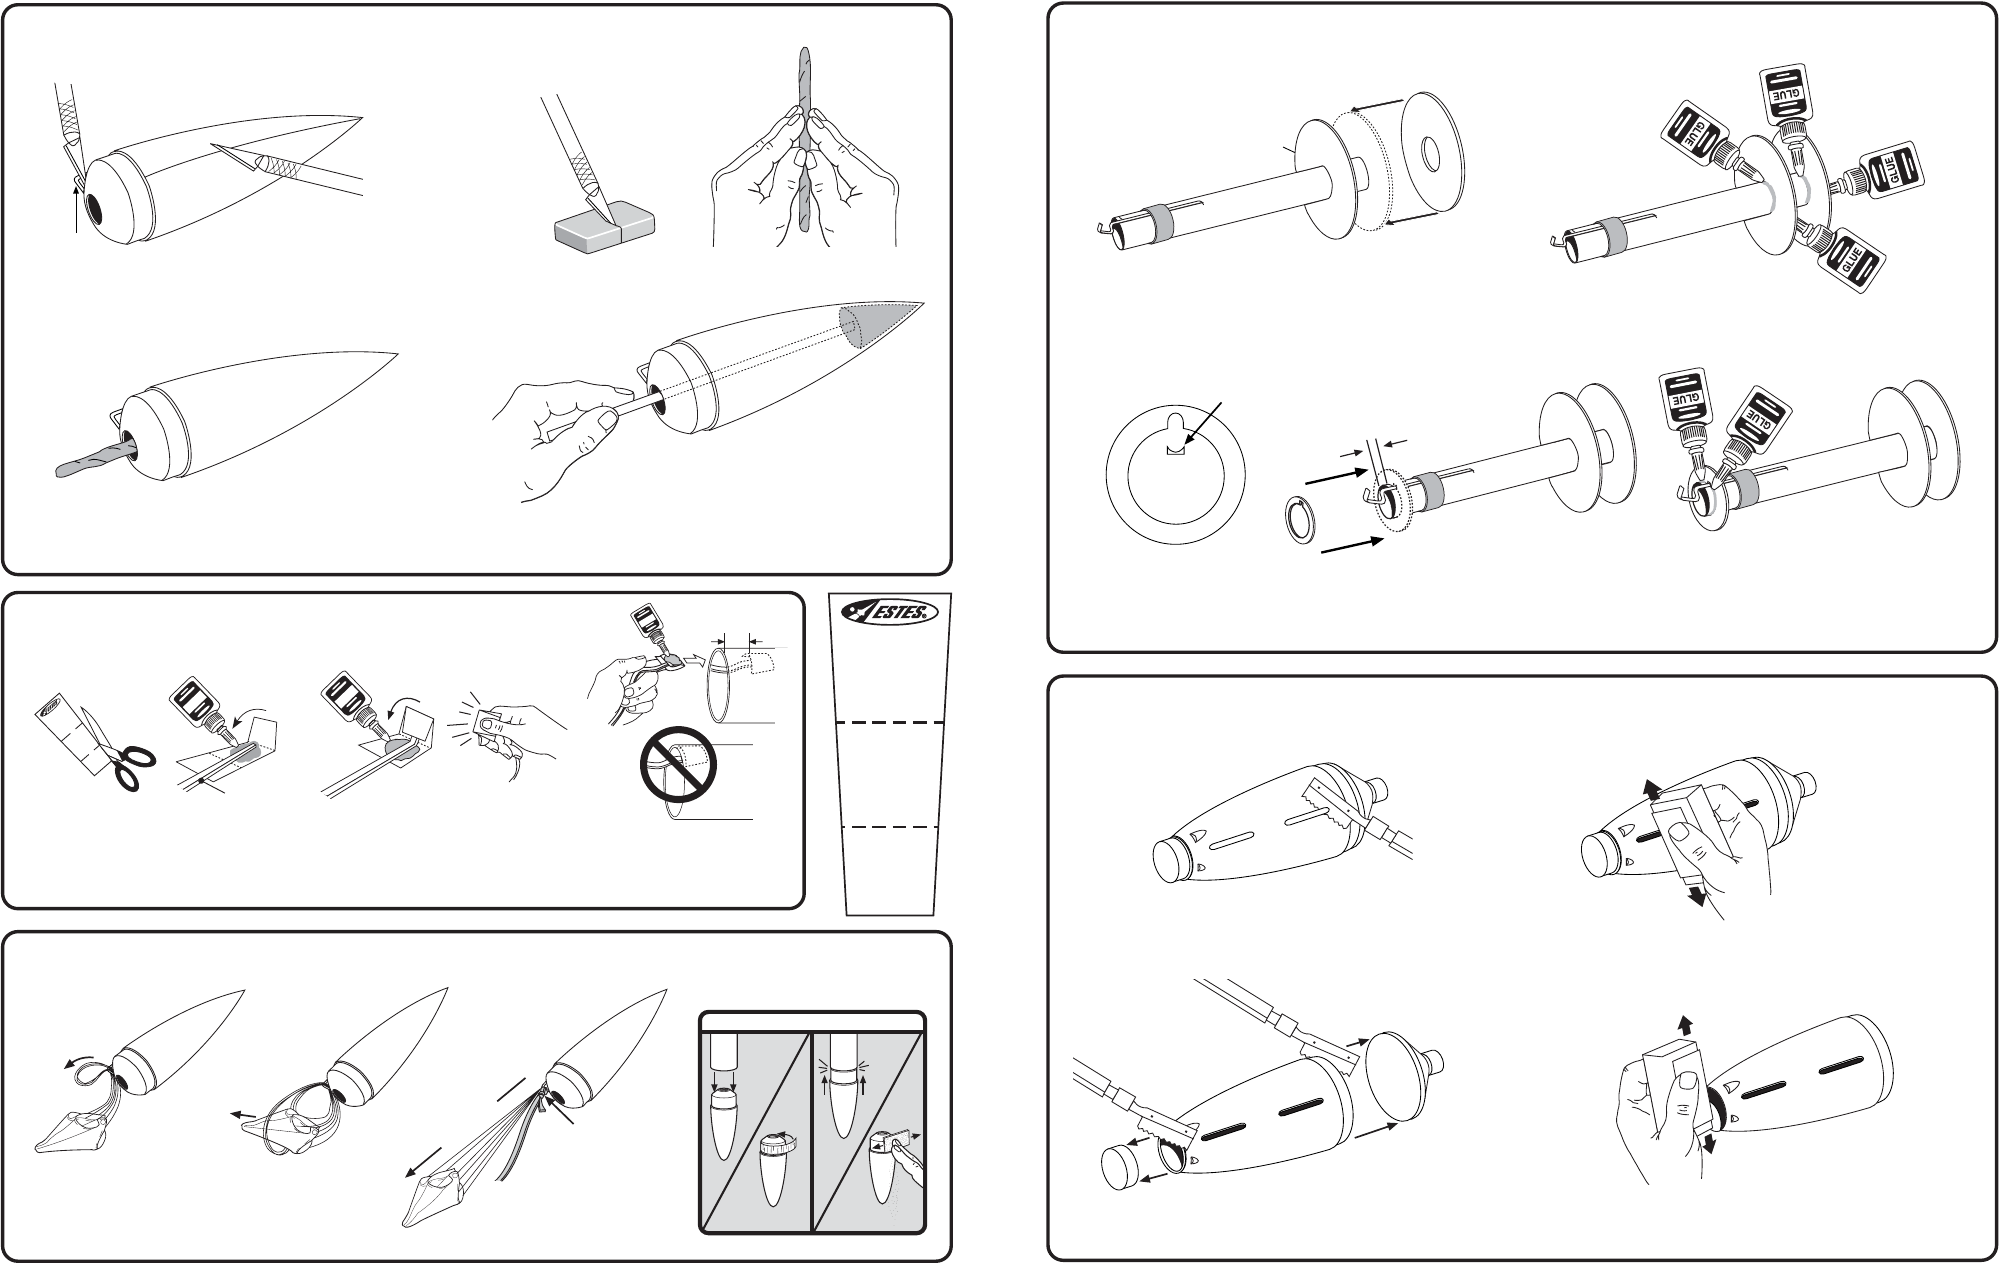
ATTACH CENTERING RINGS (CONT.)
C.
Slide one large Ring onto Tube, down to 5 7/8” (14.9 cm)
mark. Slide other large Ring onto end of tube.
D.
Apply glue fillets to both sides of each ring. Let dry completely.
E.
Trim out notch of small Ring
and discard.
F.
Slide notched Ring over Engine Hook 1/8”
(3 mm) from end of Engine Tube.
G.
Apply glue fillet to both sides of ring.
Let dry completely.
3.
PREPARE TAIL CONE
A.
Using a razor saw, carefully remove the nibs that cover
the slots for the Fins.
B.
Sand away excess plastic lip flush with surface.
C.
Using a razor saw, carefully cut off ends as shown
and discard.
D.
Sand excess plastic lip away with sanding block.
5 7/8”
(14.9 cm)
MARK
CAUTION: DO NOT
GET GLUE ON
ENGINE HOOK.
NOTCH
3
E.
Glue mount 1.5” (3.8 cm)
inside upper Body Tube.
Hold until glue sets. Let
dry.
A.
Using a modeling knife, remove excess flash
from Nose Cone and eyelet.
8.
PREPARE NOSE CONE AND INSTALL NOSE WEIGHT
EYELET
CAUTION: DO NOT
CUT OFF EYELET.
C.
Insert clay “snakes” into Nose Cone, one
at a time.
D.
Pack clay “snakes” tightly into tip of Nose Cone using a
scrap piece of balsa or a pencil. Use ALL of the clay.
HELPFUL HINT:
IF NOSE CONE/COUPLER FIT IS. . .
TOO
TIGHT
TOO
LOOSE
ADD
MASKING TAPE.
SAND FOR FIT.
A.
Cut out Shock
Cord Mount.
C.
Apply glue.
Fold forward.
D.
Squeeze tightly
and hold for
one minute
.
SH
O
C
K
C
O
R
D
M
O
U
N
T
SE
CTION
3
SECTION
2
SE
CTION
1
3
G
LU
E
A.
Pass shroud lines
through eyelet.
B.
Pass Parachute
through loop.
9.
INSTALL SHOCK CORD MOUNT
B.
Apply glue.
Fold forward.
SHOCK CORD
3
2
1
G
LU
E
10.
ATTACH PARACHUTE AND SHOCK CORD
C.
Tie Shock Cord to
Nose Cone using a
double knot.
DOUBLE KNOT
PULL TIGHT
6
SHOCK CORD
MOUNT
SECTION
3
SECTION
2
SECTION
1
1.5”
(3.8 cm)
GL
UE
1/8”
(3 mm)
B.
Cut clay in half and roll into two “snakes”.