Assembling engine mount, Inserting engine mount – Estes 2055 - Blu-97B User Manual
Page 2
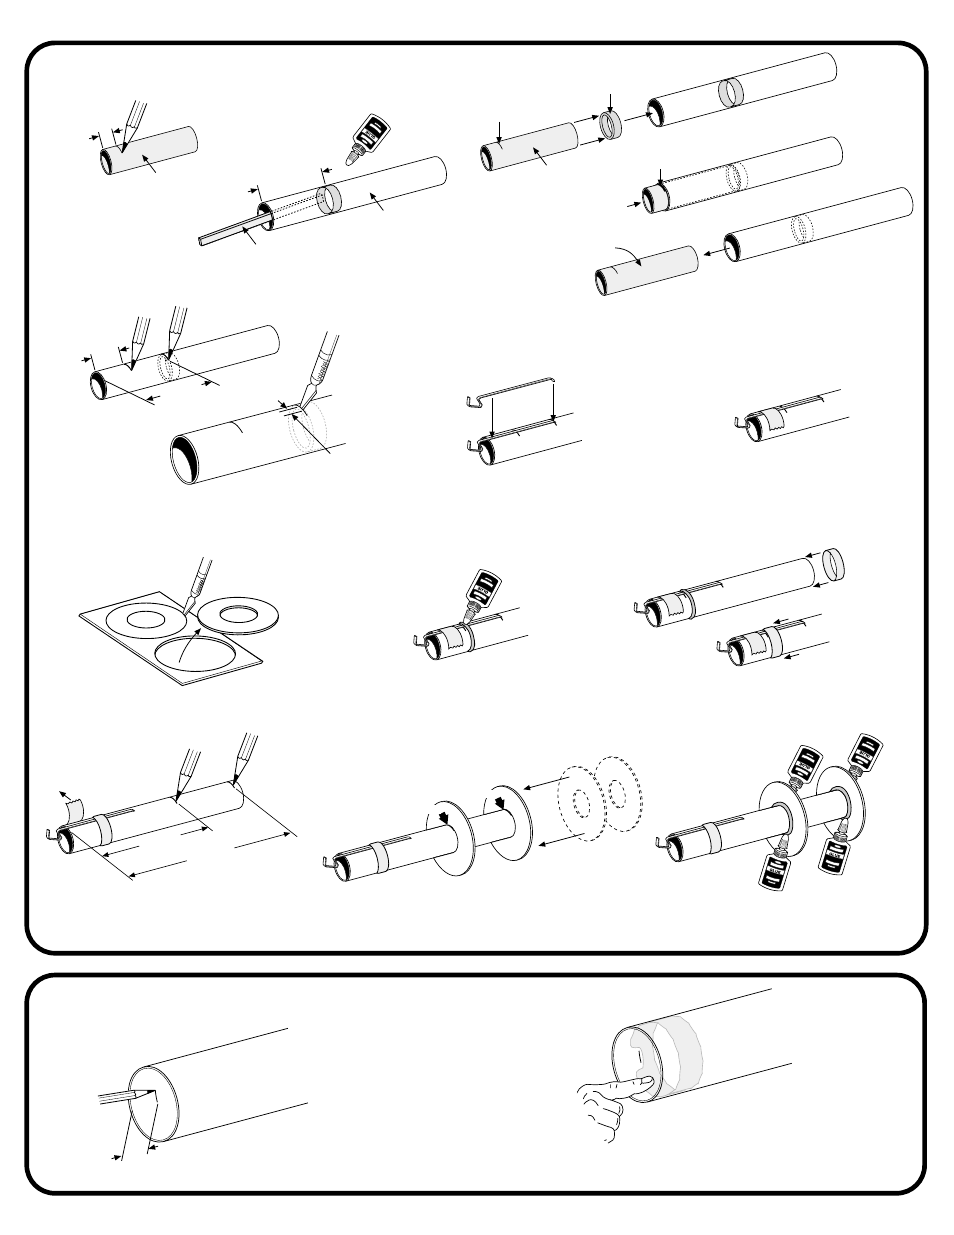
3/4"
(19 mm)
A. Make a mark inside the body tube
3/4" (19 mm) from end.
1.
ASSEMBLING ENGINE MOUNT
A. Mark yellow spacer
tool.
1/2"
(13 mm)
YELLOW
SPACER TOOL
ENGINE
MOUNT TUBE
SCRAP BALSA
2" (51 mm)
B. Use scrap balsa to smear
glue 2" (51 mm) inside engine
mount tube.
MARK
YELLOW
SPACER TUBE
GREEN ENGINE
BLOCK
MARK
REMOVE
IMMEDIATELY!
C. Push engine block into BT-20 engine mount
tube with spacer tool up to the mark. Remove
spacer tool.
1"
(25 mm)
2 1/4"
(57 mm)
1/8"
(3 mm)
D. Mark engine mount tube at 1" (25 mm) and
2 1/4" (57 mm) from rear end. Cut 1/8" (3 mm)
slit at the 2 1/4" mark.
E. Position engine hook.
F. Temporarily tape engine
hook into place.
G. Carefully remove rings from card.
H. Apply glue above the
1" (25 mm) line.
I. Slide the mylar retainer ring onto engine
mount tube up to 1" (25 mm) mark.
Let dry.
J. Place a pencil mark at 3 1/8" (79 mm)
and 4 7/8" (124 mm) from rear of
engine mount.
REMOVE
TAPE
3 1/8"
(79 mm)
4 7/8"
(124 mm)
K. Slide centering rings up to
the marks.
MARK
MARK
L. Apply glue fillets to both
sides of each centering ring.
Let dry.
2.
INSERTING ENGINE MOUNT
B. Use finger to smear glue ring around inside of tube
at pencil mark. Don't cover pencil mark with glue.