Hinge the ailerons get your model ready to fly, Cover your model with top flite, Econokote – Dynaflite GPMA0525 User Manual
Page 21: Film
servo horn to your elevator servo and secure it
with the screw.
❏
5. Position your elevator servo in the fuselage.
Make servo holders for the elevator servo as
shown on the plan from leftover 1/8" x 1/8" balsa
and glue them to the fuse bottom.
❏
6. Cut the elevator cable and the guide tube to
the correct length, then solder a brass threaded
coupler to the cable. Connect the threaded
coupler to the elevator servo with a nylon clevis.
❏
7. Mount the elevator servo to the fuse bottom
with Great Planes Double-Sided Foam Tape
(GPMQ4442, not included). For additional security,
before mounting the servo, some modelers prefer
to seal the wood grain in the area where the servo
is to be mounted with a light coat of epoxy. After the
epoxy cures, wipe with alcohol, then mount your
elevator servo with the foam tape.
❏
8. Secure the front end of the guide tube to the
fuselage with a piece of leftover balsa.
❏
1. Fill dents, scratches or low spots on your
model with lightweight, sandable balsa filler. You
can eliminate smaller dents or scratches by wetting
the area which will cause the balsa to swell. Sand
when dry.
❏
2. Sand your entire model, finishing with 320
or 400-grit sandpaper.
❏
3. Use compressed air or a paint brush to remove
balsa dust.
❏
4. Following the covering sequence below,
cover your model with a low heat iron-on
covering such as Top Flite EconoKote film.
Regular iron-on films intended for larger models
may shrink too much, damaging or warping your
structure.
Fuse covering sequence
Fuse bottom
One fuse side, then the other
Vertical fin (if you’ve built the straight-tail
version)
Sides of stab mount
Fuse top and stab mount
❏
5. After you cover the fuse, glue the stab halves
to the joiner wire with 30-minute epoxy. Before
the epoxy cures, make sure the ends of the stab
halves align with the stab mount. Wipe away
excess epoxy before it cures.
❏
6. Cover the top and bottom of one stab half,
then the other.
Wing covering sequence
Hatch sides, then top
Bottom, then top of one wing panel
Bottom, then top of other wing panel
Ailerons
❏ ❏
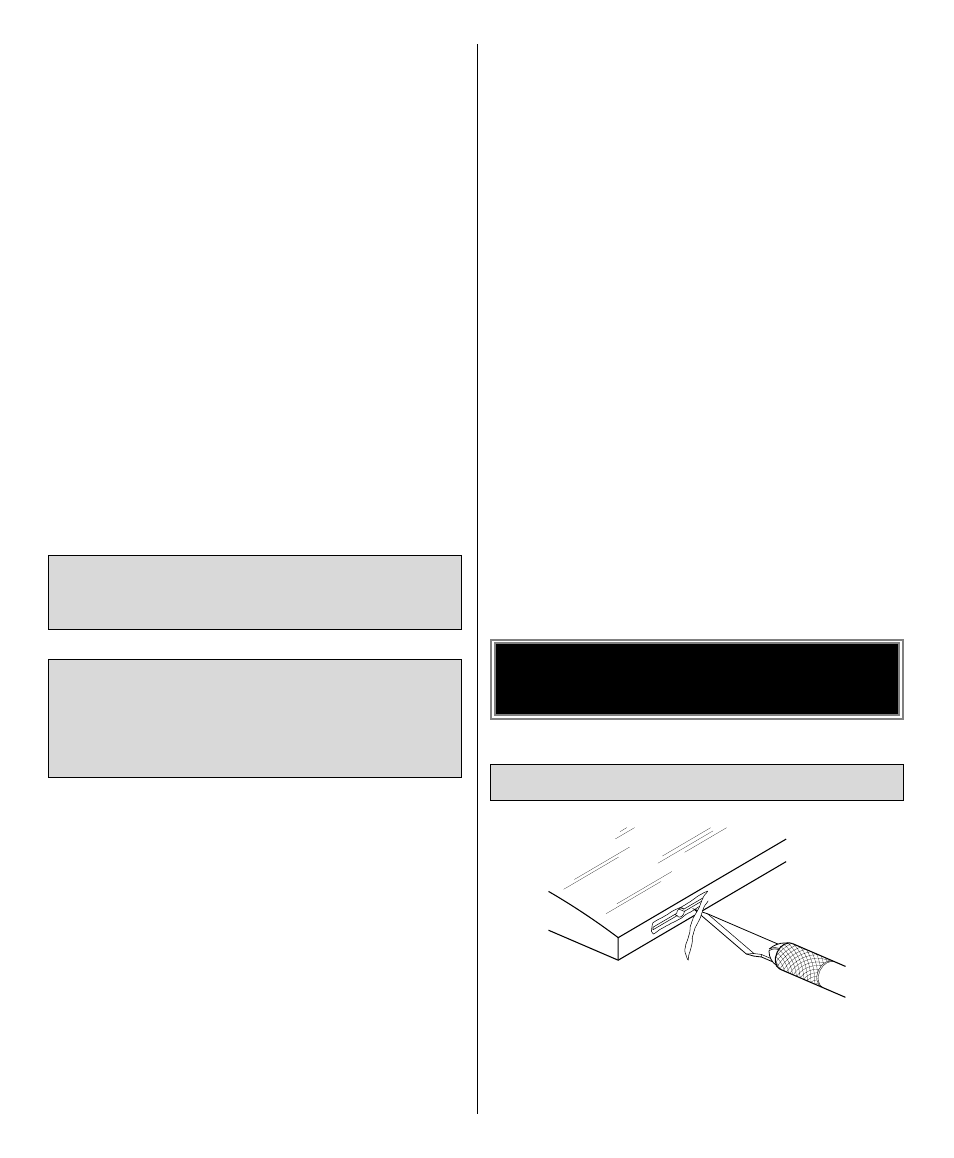
1. Use your hobby knife and a sharp #11
blade to remove a small strip of covering from the
hinge slots of one of the ailerons and the
matching half of the wing.
AWAY FROM THE SLOT
CUT THE COVERING
HINGE THE AILERONS
GET YOUR MODEL READY
TO FLY
Follow these instructions. Most importantly, do
not cover the stabilizer halves until after you
have glued them to the joiner wire on the fuse.
The instructions in this section provide the correct
sequence.
COVER YOUR MODEL WITH TOP
FLITE
®
ECONOKOTE
®
FILM
21