Crosman M4CQB User Manual
Owner’s manual, Model m4cqb airsoft gun 6mm plastic bb
7. ADJUSTING THE STOCK
• Your airsoft gun is shipped with the stock in the closed position and is capable of adjusting to differ-
ent lengths.
• Before adjusting the stock make sure your airsoft gun is “ON SAFE”, (see section 2A) and pointed in
a SAFE DIRECTION.
• Push the stock release lever and adjust the stock until it locks into the desired position.
8. AIMING AND FIRING SAFELY
A. FIRING SAFELY
• You and others with you should always wear eye protection designed for airsoft to protect your eyes.
• Always point your airsoft gun in a SAFE DIRECTION.
• Do not shoot at hard surfaces or at the surface of water. The plastic BBs may bounce off or ricochet
and hit someone or something you had not intended to hit.
• DO NOT re-use plastic BBs because they could possibly cause damage to your airsoft gun.
• Your airsoft gun is designed for target shooting and is suited for both indoor and outdoor use.
• Always remember to place your target carefully. THINK about what you will hit if you miss the target.
• When you are sure of your target and backstop, and the area around the target is clear, load and
charge the airsoft gun following sections 3 and 4. Take the airsoft gun “OFF SAFE” (section 2A) aim
and pull the trigger to fire.
B. ADJUSTING THE SIGHTS
REAR SIGHT
• The rear sight is adjust-
able for windage and
elevation.
• To adjust for windage,
use the dial on the side of
the sight.
• Turn clockwise to move
the point of impact to
the right.
• Turn counter-clockwise to
move the point of impact
to the left.
• To adjust for elevation, use the dial at the base of the sight.
• Turn clockwise to move the point of impact up.
• Turn counter-clockwise to move the point of impact down.
9. INSTALLING FOREARM SIDE COVERS
A. ADJUSTING FOREARM COVERS
• Your airsoft gun is shipped with the forearm covers in position.
• Before adjusting or removing the forearm covers ensure your airsoft gun is “ON SAFE”, (see section
2A) and pointed in a SAFE DIRECTION.
• Push the forearm cover release button, as shown in picture, and adjust the cover until it locks into
the desired position. Repeat this operation for both the right and left forearm covers.
NOTE: THE COVER RELEASE BUTTON REQUIRES FIRM CONTINUOUS PRESSURE TO ALLOW THE
COVERS TO BE MOVED.
B. REMOVING AND INSTALLING THE FOREARM COVERS
• Before adjusting or removing the forearm covers ensure your airsoft gun is “ON SAFE”, (see section
2A) and pointed in a SAFE DIRECTION.
• Push the forearm cover release button, as shown in picture, and slide the cover forward until it
no longer is locked onto the rail system. Repeat this operation for both the right and left forearm
covers.
• Reverse this operation to place the covers back onto the right and left forearm.
10. MAINTAINING YOUR AIRSOFT GUN
• DO NOT MODIFY OR ALTER YOUR AIRSOFT GUN. Tampering with the airsoft gun or attempts to
change the airsoft gun in any way may make it unsafe to use, may cause serious injury or death
and will void the warranty.
• If you drop your airsoft gun, visually check to see that it works properly before you use it again. If
anything seems changed, like a shorter or weaker trigger pull, this may mean parts are worn out or
broken. Call Customer Service at Crosman for assistance before using your airsoft gun again.
11. TROUBLE SHOOTIN G/INCREASING YOUR SHOOTIN G ENJOYMENT
• Occasionally shake the gun to ensure smooth BB feeding.
• This is a high precision airsoft rifle. Prevent dust and dirt from getting into the magazine to help
maintain the performance of your airsoft rifle.
• If the efficiency of BB feeding seems to decrease, remove all the BBs from the magazine and spray
silicone oil for 1 to 2 seconds. (Note that the hop-up operation may become unstable for a while
after using silicone oil).
• An odor may be generated from the motor initially from a new airsoft gun, this is normal.
• If the airsoft gun does not fire in semi-auto mode, follow safe shooting rules and turn the gun to full
auto mode for 5 to 10 shots before returning to semi-auto mode.
• Change the battery if firing cycle becomes slow.
• Give the airsoft gun a rest for 5 to 10 minutes after about 500 BBs have been fired.
CLEARING A JAM
Never look down the end of barrel to see if a jam has been cleared.
1. Make sure the airsoft gun is “ON SAFE” and pointed in a SAFE DIRECTION.
2. Remove magazine.
3. Insert the tapered end of the cleaning rod into the barrel, with the angle toward the breech
(where the magazine connects).
4. CAREFULLY and slowly apply more pressure until you push the BB out of the breech.
5. Reinstall the magazine and test gun.
MODEL M4CQB
AIRSOFT GUN
6MM PLASTIC BB
OWNER’S MANUAL
READ ALL INSTRUCTIONS AND WARNINGS IN THIS MANUAL BEFORE USING THIS AIRSOFT GUN
Distributed by
Crosman Corporation
7629 Routes 5 & 20
Bloomfield, NY 14469
United States of America
crosman.com
1-800-724-7486
Made in Taiwan
M4CQB-515
This is not a toy. Adult supervision is required. Misuse
may cause serious injury, particularly to the eye. Eye protection must be
worn by the user and any person in range. May be dangerous up to 100
yds. Read the owner’s manual before using.
Do not brandish or display this airsoft gun in public – it
may confuse people and may be a crime. Police and others may think it
is a firearm. Do not change the coloration and markings to make it look
more like a firearm. That is dangerous and may be a crime.
This product contains a chemical known to the state
of California to cause cancer and birth defects (and other reproductive
harms).
YOU AND OTHERS WITH YOU SHOULD ALWAYS WEAR SHOOTING GLASSES TO PROTECT YOUR EYES.
READ ALL INSTRUCTIONS BEFORE USING.
THIS AIRSOFT GUN IS INTENDED FOR USE BY THOSE 16 YEARS OF AGE OR OLDER.
BUYER AND USER HAVE THE DUTY TO OBEY ALL LAWS ABOUT THE USE AND
OWNERSHIP OF THIS AIRSOFT GUN
NOTE: Charge the battery 4-6 hours prior to initial use. This airsoft gun will not operate properly
without a fully charged battery.
DO NOT OVERCHARGE THE BATTERY. UNPLUG THE BATTERY CHARGER WHEN NOT IN USE.
Please read this owner’s manual completely. Remember to treat this airsoft gun with the same re-
spect you would a firearm. Always carefully follow the safety instructions found in this owner’s manual
and keep this manual in a safe place for future use.
If you have any questions regarding your new airsoft gun, please contact Crosman Customer Service
at: 1-800-724- 7486, 585-657-6161 or www.crosman.com.
1. LEARNING THE PARTS OF YOUR NEW AIRSOFT GUN
Learning the names of the parts of your new airsoft gun will help you to understand your owner’s
manual. Use this manual to increase your enjoyment of this airsoft gun.
1. Muzzle
2. Charging Handle
3. Retractable Stock
4. Stock Release lever
5. Trigger
6. Trigger Guard
7. 300 Round Magazine
8. Magazine release button
9. Safety (see Fig. 2)
10. Forearm/Rail System
and Covers
11. Magazine cap (Fig. 4)
2. OPERATING THE SAFETY
A. TO PUT THE AIRSOFT GUN “ON SAFE”
• Locate the safety on the left side of the airsoft gun.
• Turn the safety lever to “SAFE” for “ON SAFE. (Fig 2A). The safety is not “ON SAFE” unless it is
pointing to “SAFE”.
Keep the airsoft gun in the “ON SAFE” position until you are actually ready to shoot. Then turn the
safety to the “OFF SAFE” position.
Keep the airsoft gun in the “ON SAFE” position until
you are actually ready to shoot. Then turn the safety to the “OFF SAFE”
position.
Like all mechanical devices, an airsoft gun safety can fail. Even when the safety is “ON SAFE”, you
should continue to handle the airsoft gun safely. NEVER point the Airsoft gun at any person. NEVER
point the airsoft gun at anything you do not intend to shoot.
B. TO TAKE THE AIRSOFT GUN “OFF SAFE”
NOTE: This airsoft gun fires in semi or full auto-mode. Full auto means it will continue to fire plastic
BBs as long as you hold the trigger. Semi- auto means you will have to pull the trigger each time you
want to fire a shot.
• Locate the safety on the left side of the receiver. (Fig. 2a)
• Turn the lever to “SEMI” for semi-auto mode. (Fig. 2b)
• Turn the lever to “AUTO” for full auto mode. (Fig. 2c)
• The airsoft gun is “OFF SAFE” and ready to fire when pointing to either “semi” or “auto.”
3. CHARGING, LOADING AND REMOVING THE BATTERY
A. CHARGING THE BATTERY
NOTE: The battery charging time is 4-6 hours prior to initial use. To prolong battery life and maintain
the best shooting performance rest the gun for 5-10 minutes after firing about 500 rounds. For
optimum performance completely use up the battery before recharging. DO NOT OVERCHARGE THE
BATTERY. UNPLUG THE BATTERY CHARGER WHEN NOT IN USE.
B. LOADING THE BATTERY
• Make sure the airsoft gun is “ON SAFE” (section 2A) and is UNLOADED.
• Point the airsoft gun in a SAFE DIRECTION.
• Remove butt plate cover from rear of the stock by depressing the two tabs on both sides of the
stock.
• Insert the two battery cells on each side of the buffer tube as shown.
• Connect the battery connector to the gun connector by lining up the electrical tabs.
• Place the connectors inside the buffer tube.
• Snap the butt place back into place as shown.
C. REMOVING THE BATTERY
• Make sure the airsoft gun is “ON SAFE” (section 2A) and UNLOADED.
• Point the airsoft gun in a SAFE DIRECTION.
• Remove butt plate cover from rear of the stock by depressing the two tabs on both sides of the
stock.
• Remove the two battery cells by slowly sliding the cells out of the buffer tube as shown.
• Disconnect the battery connector by depressing the electrical tabs.
• Replace the gun connector and electrical wires inside the buffer tube.
• Snap the butt place back into place as shown.
4. LOADING AND UNLOADING PLASTIC BBS
A. LOADING
Use 6 mm plastic BBs only in this airsoft gun. Use of any other ammunition can cause injury to you or
damage to the airsoft gun. We recommend using Crosman or GameFace .20g or .25 Heavy BBs.
Use 6 mm plastic BBs only in this airsoft gun. Use of any
other ammunition can cause injury to you or damage to the airsoft gun.
We recommend using Crosman .20g or .25 Heavy BBs.
Make sure the airsoft gun is “ON SAFE” (section 2A).
• Point the airsoft gun in a SAFE DIRECTION.
• While supporting the BB magazine, push the magazine release button
forward and remove the magazine.
• Using a speed loader, insert 6 mm plastic BBs into the opening at the
top of the magazine.
B. UNLOADING PLASTIC BBS
• Make sure the airsoft gun is “ON SAFE” (section 2A).
• Point the airsoft gun in a SAFE DIRECTION.
• While supporting the BB magazine, push the magazine release button and remove the magazine.
• Point the clip down in a safe direction and push back and hold the BB retainer button.
NOTE: BBs will release rapidly.
• Never assume that because the airsoft gun no longer fires a BB and/or the loading chamber is
removed, that a BB is not lodged in the barrel. Always treat the airsoft gun as though it is loaded
and with the same respect you would a firearm.
• Never assume that because the airsoft gun no longer fires a BB and/or the loading chamber is
removed, that a BB is not lodged in the barrel. Always treat the airsoft gun as though it is loaded
and with the same respect you would a firearm.
Never assume that because the airsoft gun no longer
fires a BB and/or the loading chamber is removed, that a BB is not
lodged in the barrel. Always treat the airsoft gun as though it is loaded
and with the same respect you would a firearm.
5. SELECTING THE FIRING MODE
NOTE: This airsoft gun fires in semi or full auto-mode. Full auto means it will continue to fire plastic
BBs as long as you hold the trigger. Semi- auto means you will have to pull the trigger each time you
want to fire a shot.
• Locate the safety on the left side of the receiver. (Fig. 2a)
• Turn the lever to “SEMI” for semi-auto mode.
• Turn the lever to “AUTO” for full auto mode.
• The airsoft gun is “OFF SAFE” and ready to fire when pointing to either “semi” or “auto.”
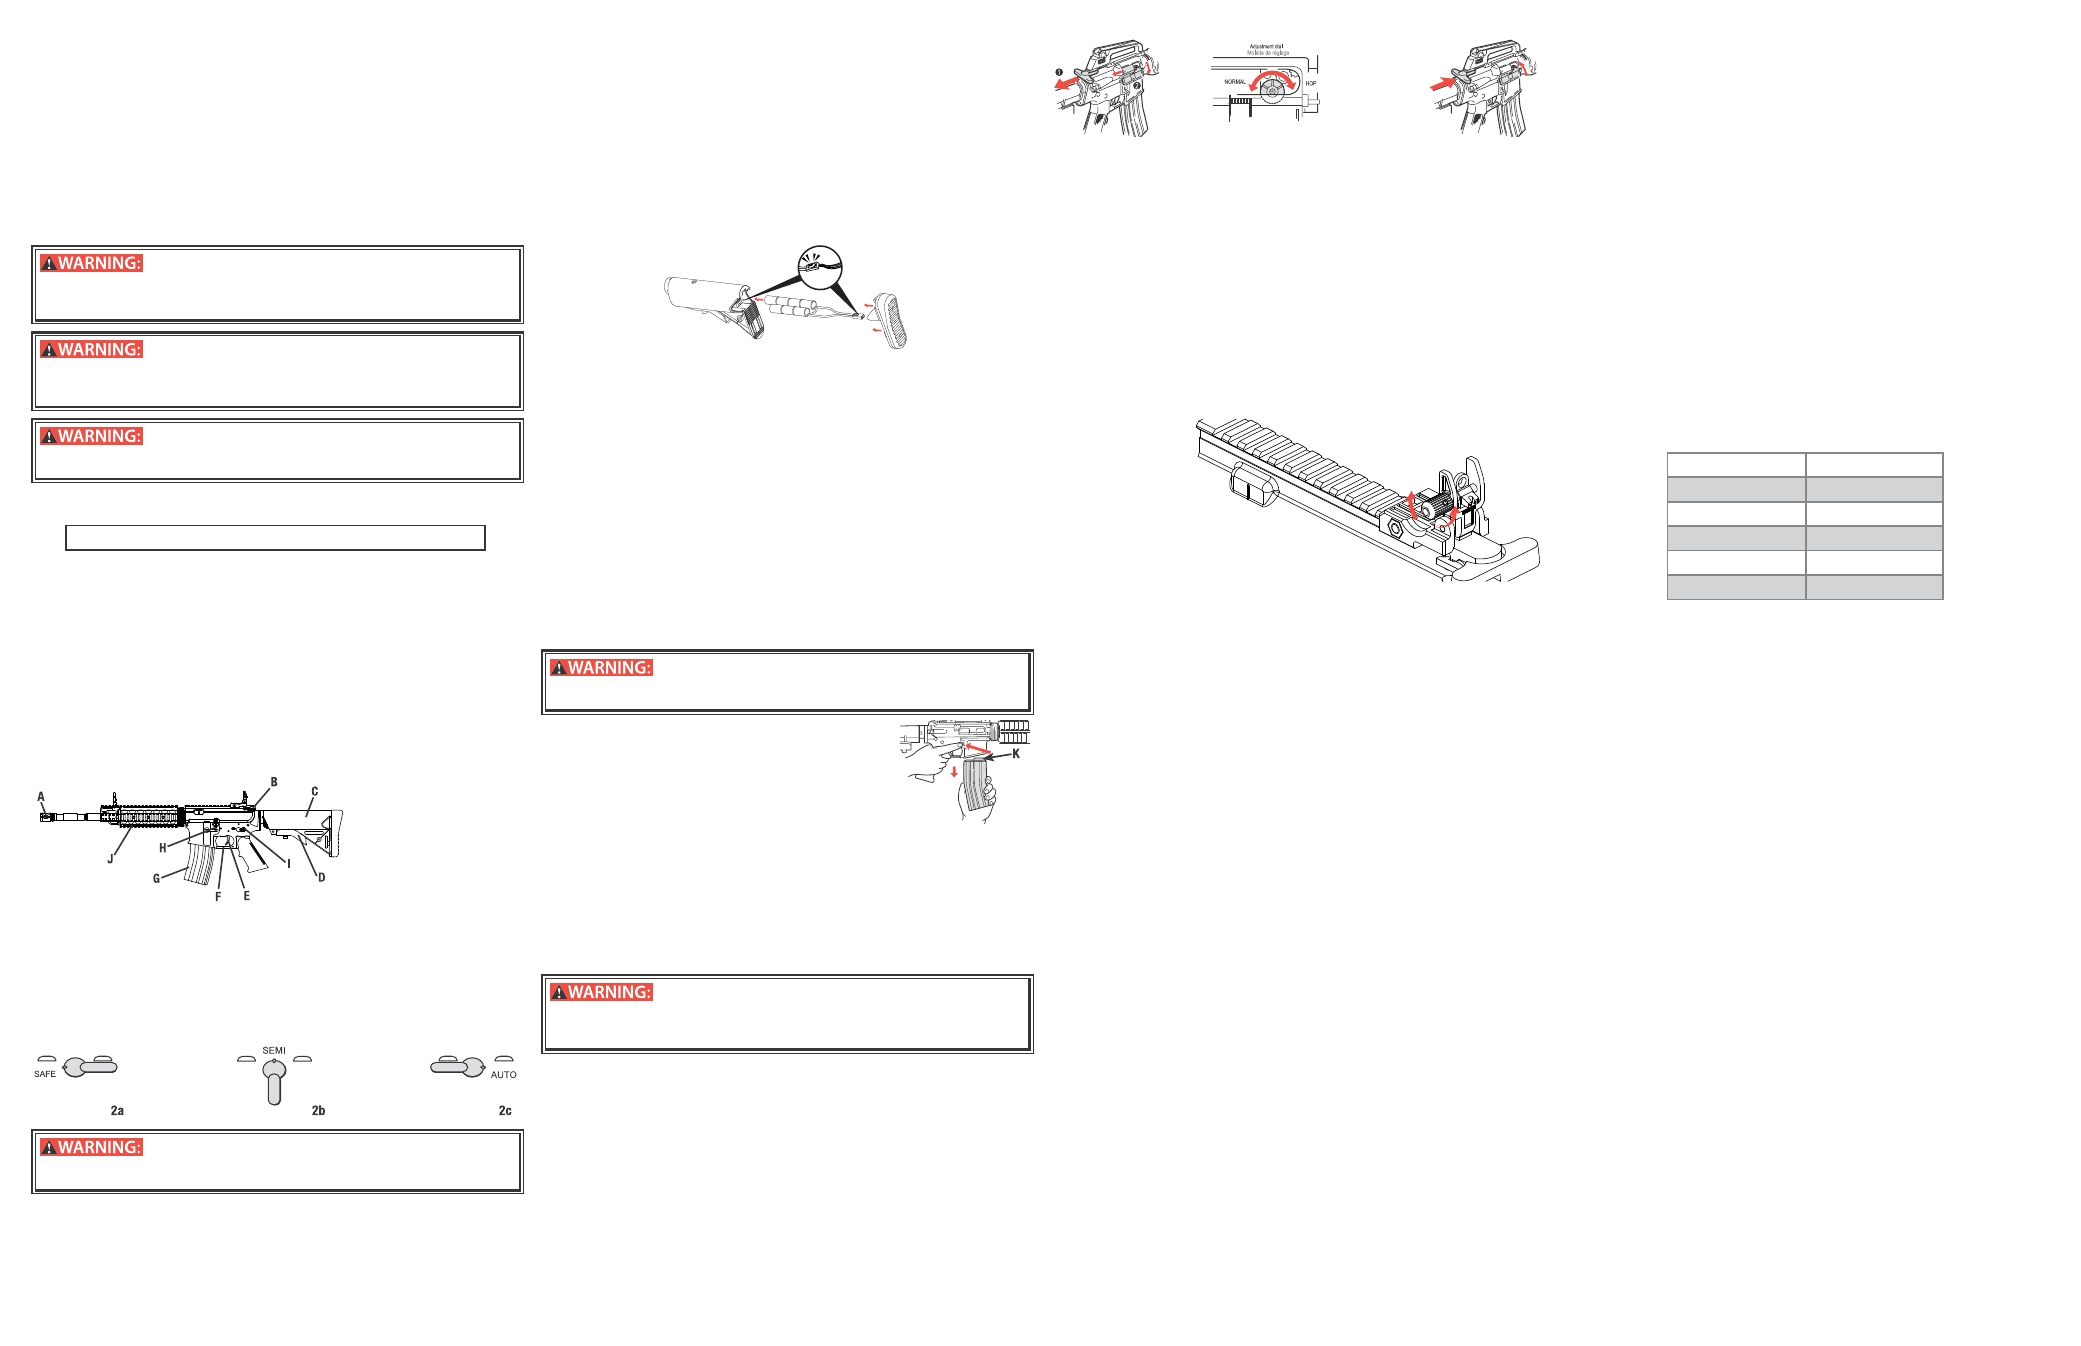
6. USING THE HOP-UP MODE
Your airsoft gun is manufactured with an adjustable hop-up system. The purpose of this system is
to change the spin on the BB as it leaves the muzzle, allowing you to adapt your shot for different
distances.
• Pull out and hold the charging handle to open the ejection port cover.
• Turn the hop-up adjustment dial clockwise for more spin, counter-clockwise for less spin.
12. REVIEWING SAFETY
• Do not ever point the airsoft gun at any person. Do not ever point the airsoft gun at anything you do
not intend to shoot.
• Always treat the airsoft gun as though it is loaded and with the same respect you would a firearm.
• Always aim in a SAFE DIRECTION. Always keep the muzzle of the airsoft gun pointed in a SAFE
DIRECTION.
• Always keep the airsoft gun “ON SAFE” until you are ready to shoot in a SAFE DIRECTION.
• Always check to see if the airsoft gun is “ON SAFE” and unloaded when getting it from another
person or from storage.
• Always keep your finger off the trigger and out of the trigger guard until ready to shoot.
• You and others with you should always wear eye protection to protect your eyes.
• Always wear eye protection designed for airsoft over your regular glasses.
• Use 6 mm plastic BBs only.
• Do not reuse plastic BBs because they could cause possible damage to your airsoft gun.
• Do not shoot at hard surfaces or at the surface of water. The plastic BBs may bounce off or ricochet
and hit someone or something you had not intended to hit.
• Replace the backstop if it becomes worn. Place the backstop in a location that will be safe should
the backstop fail.
• Your backstop should be checked for wear before and after each use. All backstops are subject
to wear and will eventually fail. Replace your backstop if the surface is worn or damaged or if a
ricochet occurs.
• Do not attempt to disassemble or tamper with your airsoft gun.
• DO NOT MODIFY OR ALTER YOUR AIRSOFT GUN. Attempts to modify the airsoft gun in any way may
make your airsoft gun unsafe to use, cause serious injury or death and will void the warranty.
• Using unauthorized repair centers or modifying the function of your airsoft gun in any way may be
unsafe and will void your warranty.
• Do not put the airsoft gun away loaded. Make sure ALL of the plastic BBs are unloaded from the
airsoft gun.
• Always store this airsoft gun in a secure location.
SPECIFICATIONS
MECHANISM/ACTION
Electronic
CALIBER/AMMUNITION
6mm Plastic BBs
MAGAzINE
Up to 300 6mm BBs
SAFETY
Lever
VELOCITY
Up to 400 fps
BATTERY
9.6V battery / 1400 MAH
PERFORMANCE: Many factors can affect velocity, including brand of projectile, type of projectile and
barrel condition.
DO NOT RETURN THIS PRODUCT TO THE STORE.
Our friendly customer service representatives will be glad to help. You can get answers to fre-
quently asked questions at www.crosman.com or you can contact us directly at 1-800-7AIRGUN
(1-800-724-7486)
CUSTOMER SERVICE
If your airsoft gun is not functioning, we recommend that you call Crosman Corporation Customer ser-
vice at 1-800-724-7486 or 585-657-6161. (International customers should contact their distributor.)
DO NOT ATTEMPT TO DISASSEMBLE IT! If you take it apart you probably will not be able to reas-
semble it correctly. Crosman assumes no warranty responsibility under such circumstances.
For optimum performance use Crosman ammunition only. These include CROSMAN, COPPERHEAD,
and BENJAMIN.
Using other than Crosman branded ammunition may cause your product to malfunction and may void
your warranty.
LIMITED 30 DAY WARRANTY
This product is warranted to the retail consumer for 30 days from date of retail purchase against
defects in material and workmanship and is transferable.
WHAT IS COVERED
Replacement parts and labor. Transportation charges to consumer for repaired product.
WHAT IS NOT COVERED
Transportation charges to Crosman for product. Damages caused by abuse, modification or failure
to perform normal maintenance. Any other expense. CONSEQUENTIAL DAMAGES, INCIDENTAL
DAMAGES, OR INCIDENTAL EXPENSES, INCLUDING DAMAGE TO PROPERTY. SOME STATES DO NOT
ALLOW THE EXCLUSION OR LIMITATION OF INCIDENTAL OR CONSEQUENTIAL DAMAGES, SO THE
ABOVE LIMITATION OR EXCLUSION MAY NOT APPLY TO YOU.
WARRANTY CLAIMS
USA Customers: Attach your name, address, description of problem, phone number and
copy of sales receipt to product. Package and return to Crosman Corporation, Routes 5 & 20,
Bloomfield, NY 14469.
International Customers: Please return product to your nearest distributor. If you do not know your
distributor, please call 585-657-6161 and ask for our International Department for assistance.
IMPLIED WARRANTIES
ANY IMPLIED WARRANTIES, INCLUDING THE IMPLIED WARRANTIES OF MERCHANTABILITY AND FIT-
NESS FOR A PARTICULAR PURPOSE, ARE LIMITED IN DURATION TO 30 DAYS FROM DATE OF RETAIL
PURCHASE. SOME STATES DO NOT ALLOW LIMITATIONS ON HOW LONG AN IMPLIED WARRANTY
LASTS, SO THE ABOVE LIMITATIONS MAY NOT APPLY TO YOU.
To the extent any provision of this warranty is prohibited by federal, state, or municipal law which
cannot be preempted, it shall not be applicable. This warranty gives you specific legal rights, and you
may also have other rights which vary from state to state.
CROSMAN is a registered trademark of Crosman Corporation in the United States