Warning – Crosman 1720T User Manual
Page 5
5
8. Changing the Bolt Direction
The bolt direction on your 1720T PCP pistol is capable of being changed to the opposite hand. The 1720T is
factory assembled to accommodate a right handed shooter by having the bolt pointing left. This allows cock-
ing of the bolt and loading pellets with the left hand while maintaining the grip hold with the right. Disassembly
of the Breech and Barrel assembly from the Reservoir Tube assembly is required to access the parts con-
tained within the Breech that facilitate the change to the opposite hand. Crosman Corporation recommends
the use of an approved Service Station to perform the change. An approved Service Station may be found
through www.crosman.com or by calling Customer Service at 1-800-724-7486.
9. Advanced Tuning Techniques
A. Adjusting the Trigger (Overview)
The Marauder pistol trigger assembly can be adjusted to achieve a variety of trigger profiles. It has been fac-
tory set for a two stage profile but can also be changed to a single stage. Unless you are experienced in mak-
ing such adjustments, Crosman recommends that adjustments to factory settings be made only by a qualified
gunsmith after reading all instructions.
WARNING:
Adjusting the trigger assembly can result in a light trigger pull and or decreased sear
engagement that could make the gun more susceptible to discharge when dropped or jarred WITH OR
WITHOUT THE SAFETY ENGAGED. Make only the adjustments identified in this manual.
NOTE: These adjustment features are for advanced shooters. Most shooters can use the factory settings and
should not need to make modifications.
• Put the air pistol“ON SAFE”, remove the clip and keep the air pistol pointed in a SAFE DIRECTION.
• Depressurize the air pistol (see section 3D).
• Remove the right side Grip Screw and Grip using a straight blade screw driver.
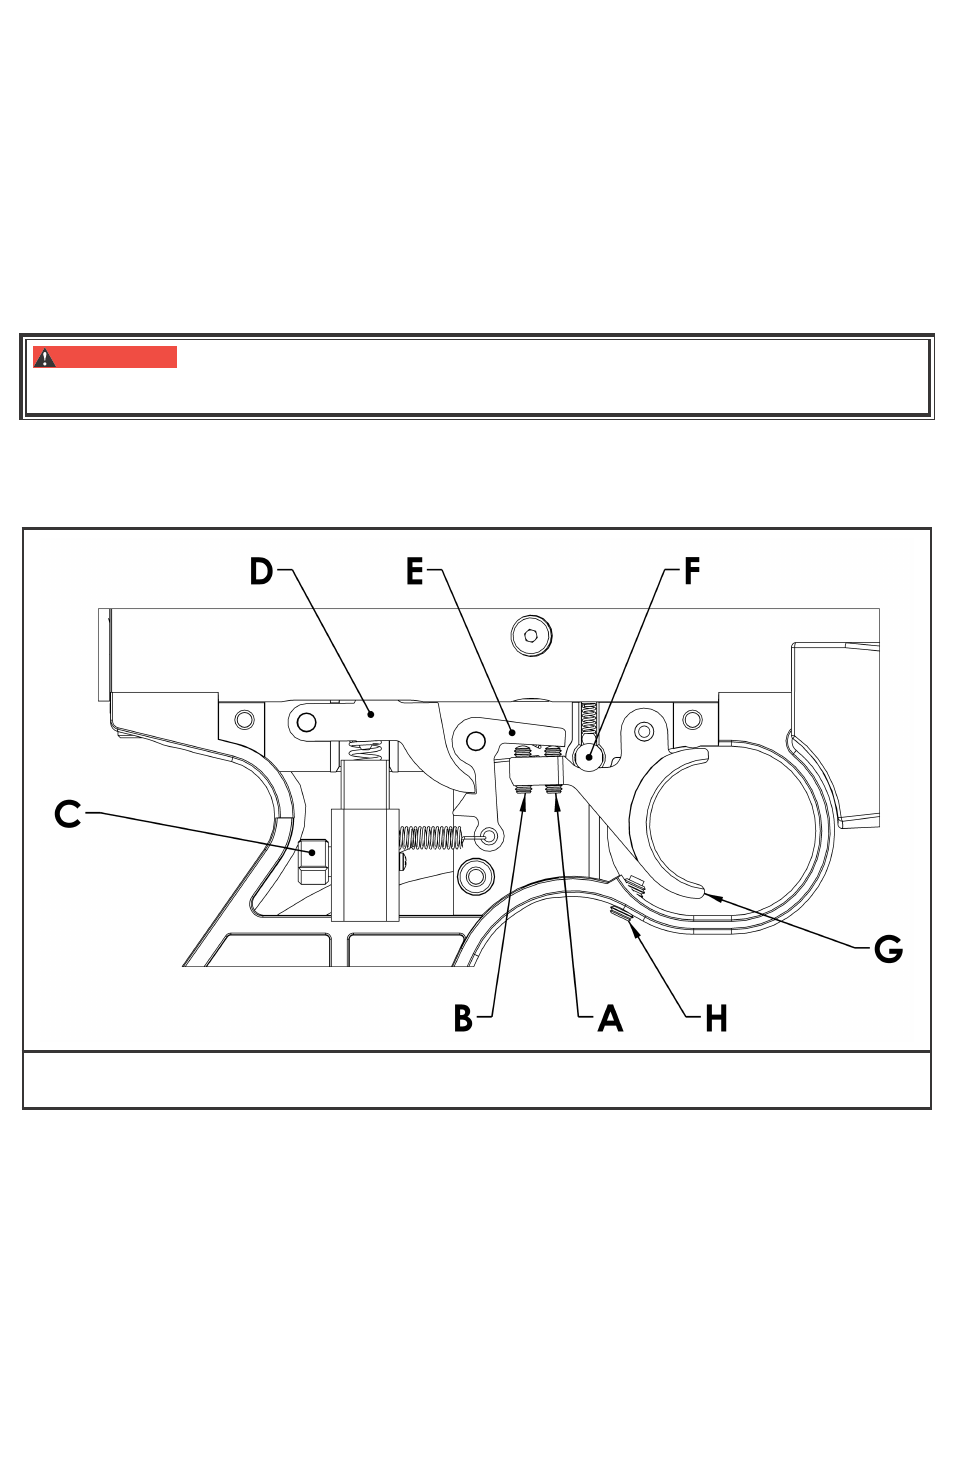
Fig 9
A. FIRST STAGE ADJUSTER B. SECOND STAGE ADJUSTER C. TRIGGER WEIGHT ADJUSTER
D. SEAR E. LINK F. SAFETY G. TRIGGER H. TRIGGER OVERTRAVEL SCREW
Trigger Pull
Locate the Trigger Weight Adjuster Screw C (Fig. 8). Viewed from the shooting vantage point, turn clockwise
(Fig 9A) to increase trigger pull weight and counterclockwise to decrease trigger pull weight. This adjustment
will not affect sear engagement.