Connections, Cd*deck synchro recording, Ct-s450s only) – Pioneer CT-S250 User Manual
Page 5
Attention! The text in this document has been recognized automatically. To view the original document, you can use the "Original mode".
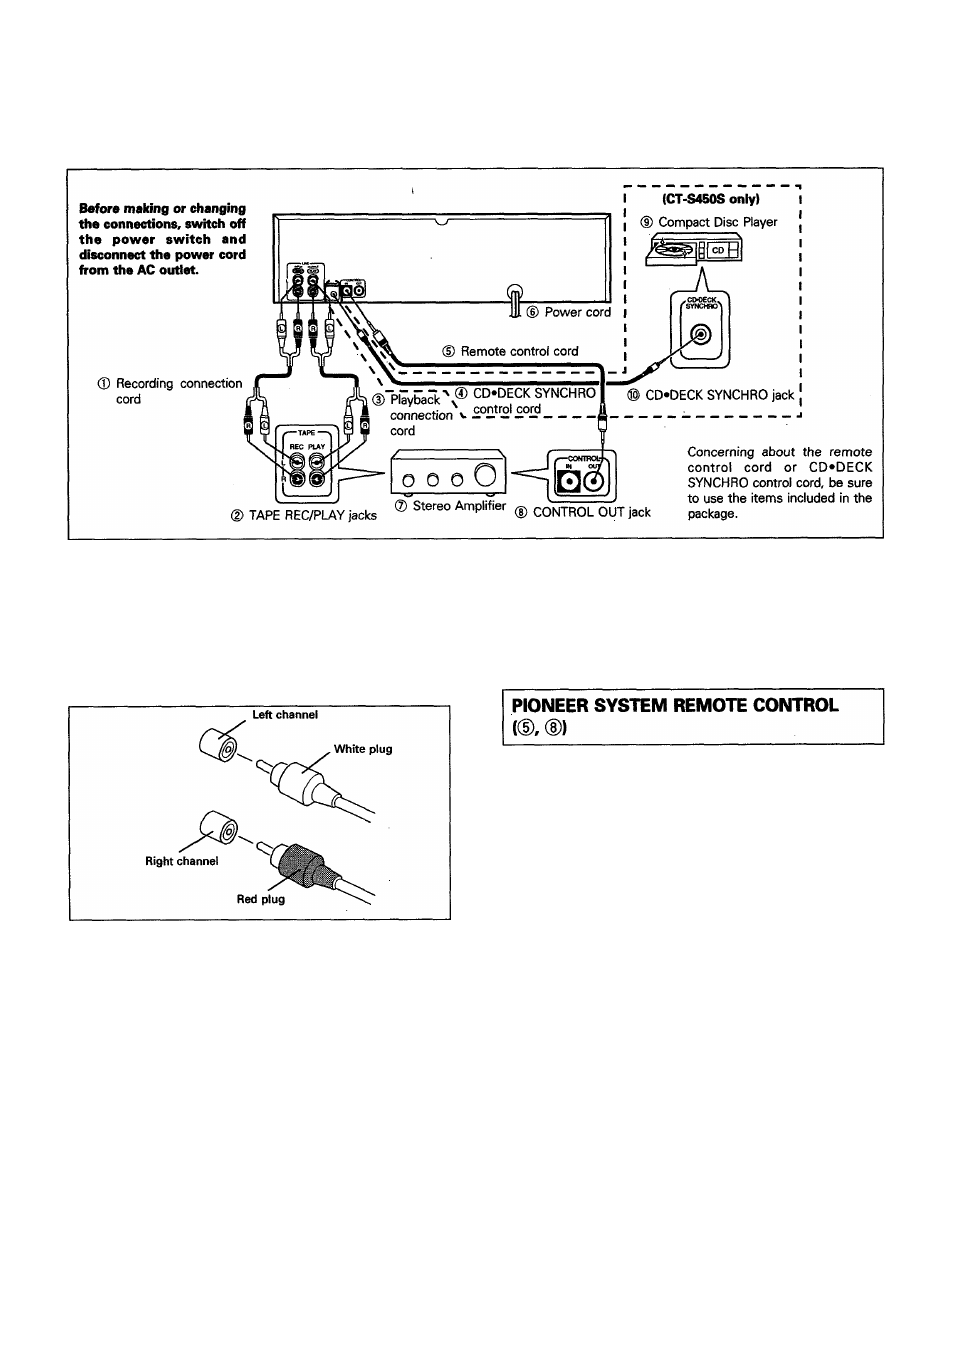
CONNECTIONS
Read through the operating instructions of the stereo components
which you intend to connect to this unit.
Make sure that all of the connection plugs are inserted securely,
as improper connections may generate noise.
CONNECTING THE RECORDING AND
PLAYBACK CORDS {®, (D)
Connect the TAPE jacks of your amplifier to the LINE jacks of the
cassette deck. Be sure to connect the REC (INPUT) jacks of the
deck to the recording (output) jacks of the amplifier, and the PLAY
(OUTPUT) jacks of the deck to the play (input) jacks of the amplifier.
•
Connect the plugs properly:
Left channel — White plug
Right channel — Red plug
CD*DECK SYNCHRO RECORDING
(
0
, ®)
(CT-S450S only)
•
CD»DECK SYNCHRO recording can be carried out when this
unit is connected to a Pioneer CD player equipped with a
CD»DECK SYNCHRO jack.
Connection
Connect the CD»DECK SYNCHRO jack of this unit to the CD»DECK
SYNCHRO jack of the CD player using the supplied CD»DECK
SYNCHRO control cord.
NOTES:
•
Keep the input and output jacks connected between the amplifier
and this unit, otherwise CD»DECK SYNCHRO recording cannot
be carried out.
•
Even when the CD player is connected to the amplifier with an
optical fiber cable, connect the CD player to the amplifier or this
unit with the pinplugs of the input and output cords.
CONTROL IN jack
Use the enclosed Remote Control Cord to connect this jack to the
CONTROL OUT jack of another component which bears the H
mark (indicating that it is equipped with PIONEER System Remote
Control). You will then be able to operate this unit using the Pioneer
system remote control unit.
CONTROL OUT jack
The intermediary jack outputs signals from the CONTROL IN jack
of this unit to the input jack of another unit. Connect this jack to the
CONTROL IN jack of another component compatible with Pioneer
System Remote Control.
NOTES:
•
Be sure to connect both of the control cord's plugs securely to
the CONTROL IN and CONTROL OUT jacks. Do not connect
only one end of the cord.
•
When connecting to the amplifier bearing the
^ mark with the
System Remote Control cord ®, the recording connection cord
© or playback connection cord @ must be connected to the
unit. If connections are incomplete, the System Remote Control
cannot function.
•
When connecting to a CD player bearing the
H mark with the
System Remote Control cord, the CD player's audio outputs
must be connected to the amplifier with a connection cord.
5
En