Checkline TI-45N User Manual
Page 6
TI-45N Operating Instruction Guide
6
4.0
G
ETTING
S
TARTED
4.1 Setting Units Of Measure
Remove the Battery Cover on the back side of the gauge
by pressing it down with your thumb and sliding it in the
direction indicated by the arrow. The Units Selector Switch
is located in the Battery Compartment. Slide the switch to
either the Inch (up) or mm (down) position as desired.
Inch is the factory default unit of measure.
4.2 Installing The Battery
Remove the Battery Cover on the back side of the gauge by pressing it down
with your thumb and sliding it in the direction indicated by the arrow. Place
one (1) AA-size battery (1.5 Volt) into the battery compartment in the
orientation shown on the sketch. Replace the Battery Cover.
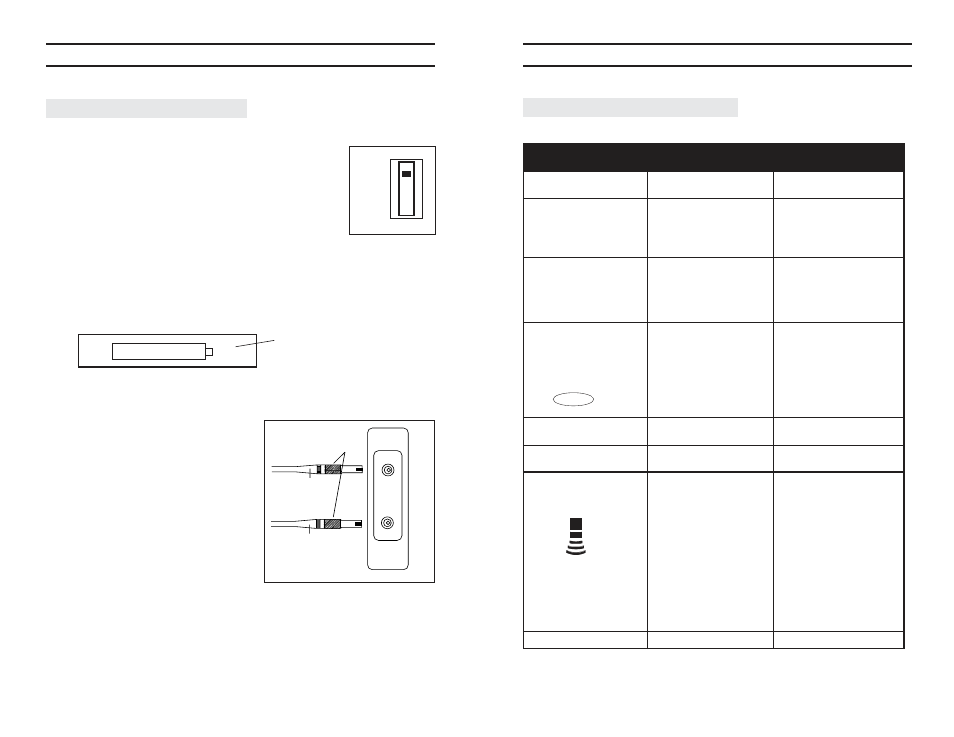
4.3
Connecting The Probe
Grasp the knurled aluminum shell of
the green colored connector on the
probe cable. Insert connector into the
upper receptacle marked “R” (Receive).
Insert the red connector into the
receptacle marked T” (Transmit).
Refer to illustration at right.
AA Battery
mm
Inch
+
–
Correct Battery Orientation
Battery
Compartment
Green
Green
Red
Red
Knurled Aluminum Shells
TI-45N Operating Instruction Guide
19
8.0 T
ROUBLE
-S
HOOTING
G
UIDE
Description of Problem
Possible Cause
Action To Be Taken
Gauge will not power
Battery voltage may be
Replace with new AA
up
too low
battery
Gauge will not power
• New battery may be
• Check battery voltage
up even though battery
too weak
(should be
≈
1.5 Volt)
has been replaced
• Back-up battery (lithium)
• Return gauge for a new
could be too weak
lithium battery
Good Coupling
• Probe or cable could be
• Clean probe & surface
Indicator flashes on/off
defective
and retry measurement
• Foreign substance may
• Return to manufacturer
be trapped between
for inspection/repair
probe and sample
Good Coupling
• Insufficient couplant fluid
• Add more couplant
Indicator not shown
• Paint or coating is too
• Grind off paint and/or
thick or voids and/or
corrosion
corrosion lies under paint
“......” is displayed
Probe could be degraded
Return to manufacturer
when ZERO key is
or defective
for inspection or repair
pressed
Displayed thickness
Acrylic probe face is
Carefully sand face of
value is unstable
deteriorated
probe using #500 paper
Can’t obtain measure-
Pipe diameter (OD) may
Consult factory
ment on small dia. pipe
be less than 1”
(25 mm)
Coupling indicator does
• Insufficient amount of
• Apply additional couplant
not appear while measure-
couplant
ment is being taken
• Test material surface is
• Grind/polish measuring
too rough
surface to 50-100-s
smoothness
• Test material bottom
• Change measurement
surface is too rough
point
• Too much ultrasonic
• Change measurement
attenuation due to
point
material composition
• Test material thickness is
• Change measurement
outside the proper
point
measuring range
Fluxuating readings
Defective probe
Return to manufacturer