California Faucets Solima In- Wall Vessel Faucet User Manual
Page 2
CF-TO-V7002-9_ii_111130.doc
Pg
2
2
3
4
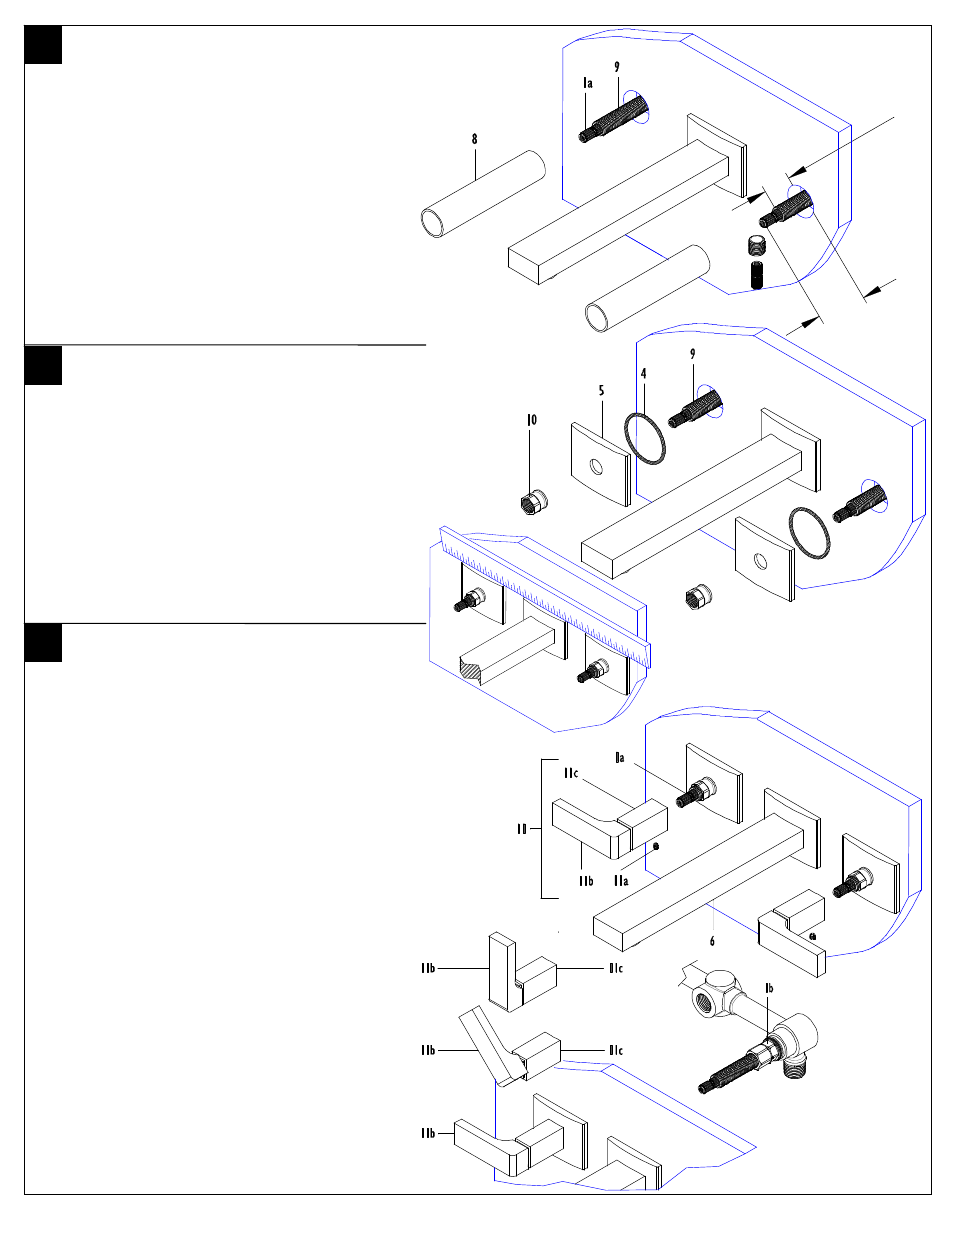
TRIMMING VALVE STEM
• Remove MUDGUARD (8) from valve STEM (1a)
• Unscrew ALL-THREAD (9) from valve STEM (1a)
• Cut STEM (1a) 1-3/8” from finished wall surface
• Reattach ALL-THREAD (9) onto valve STEM (1a),
using a marking device (i.e. pencil or marker)
indicate a distance of ¾” from finished wall on ALL-
THREAD (9)
• Unscrew ALL-THREAD (9) from valve STEM (1a)
and cut off excess ALL-THREAD (9) at indicated
mark & reattach ALL-THREAD (9) onto valve
STEM (1a)
INSTALLING ESCUTCHEON
• Insert O-RING (4) into ESCUTCHEON (5) and
place onto ALL-THREAD (9)
• Secure ESCUTCHEON (5) onto wall by tightening
lock NUT (10)
• To align ESCUTCHEONS (5), use a ruler or
straight edge to align the spout and handle
escutcheons of the faucet as shown
• After alignment retighten lock nuts and spout
setwscrew
INSTALLING HANDLE
• Loosen SETSCREW (11a) from POST (11c)
IMPORTANT: Handle BLADE (11b) shall be aligned with wider
portion of handle POST (11c)
• Slide HANDLE (11) down onto and engage valve
STEM (1a)
• Handle POST (11c) shall completely cover lock
NUT (10) and seat against ESCUTCHEON (5)
• Tighten SETSCREW (11a) and rotate handle
BLADE (11b) to check operation, open position is
when BLADE (11b) is rotated forward
• To obtain proper alignment it may be necessary to
tighten valve STEM (1a) so that handle BLADE
(11b) is aligned with SPOUT (6). This may be
achieved as follows:
• Slightly loosen lock NUT (10) and remove
ESCUTCHEON (5)
• Using ¾” (19MM) 6-piont deep socket (not
included) tighten valve STEM BASE (1b) to achieve
proper alignment of handle BLADE (11b)
• Once proper alignment is achieved, reattach
ESCUTCHEON (5) and HANDLE (11) as
mentioned above
1-3/8”
www.calfaucets.com 5271 Argosy Ave. Huntington Beach, CA 92649 800-822-8855
3/4”