California Faucets Exposed Shower Column User Manual
Shower column 9150
Shower Column 9150
IMPORTANT
All
products are engineered to provide quality performance provided
they are installed and operated properly. To fully enjoy the comfort, safety, and reliability of your
new shower cloumn set, please follow the instructions below.
R
California Faucets reserves the right to make modification and specification changes at any time.
Please visit www.calfaucets.com for most current technical data.
Page 1
9150_ii_131014
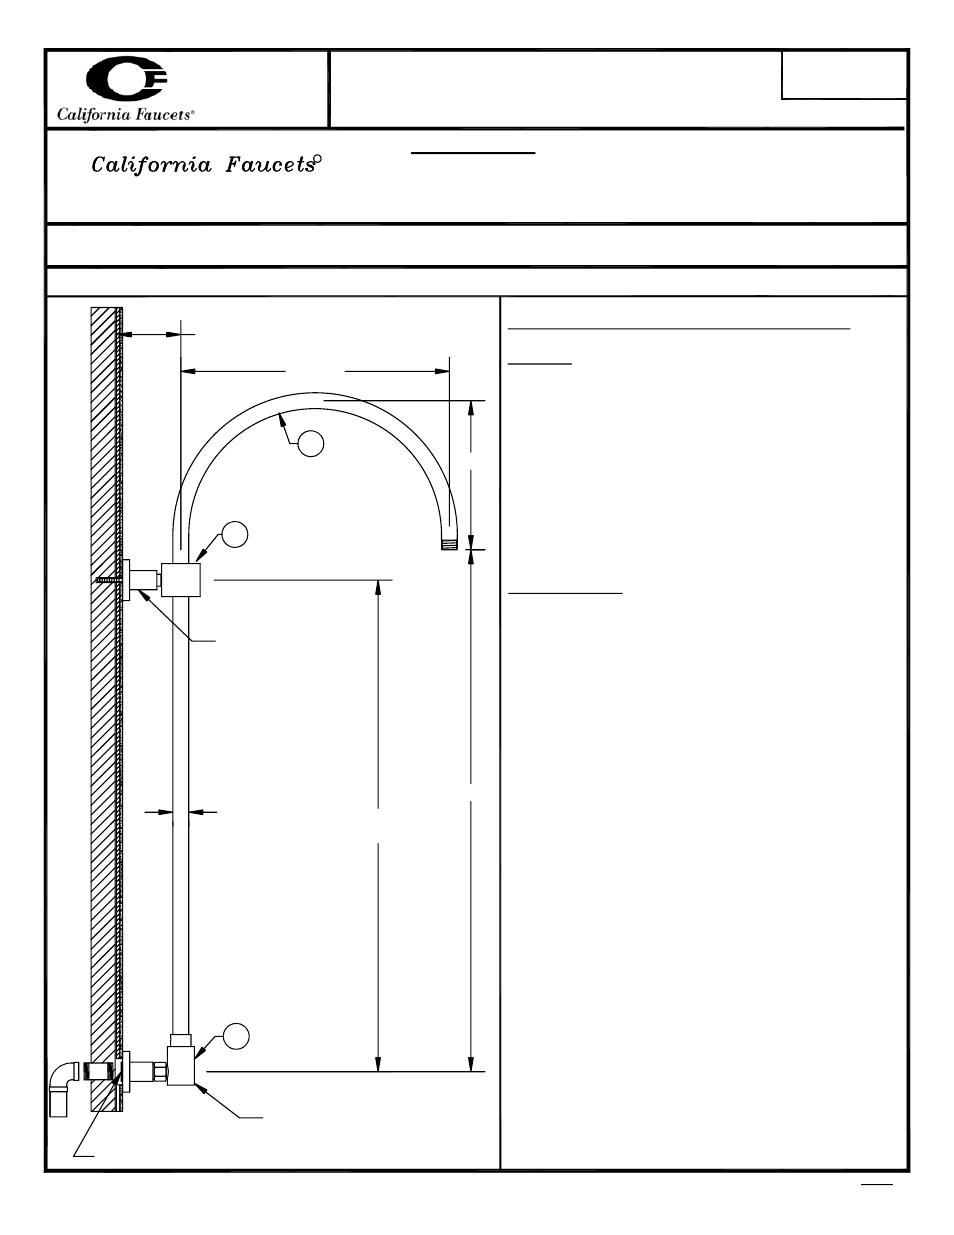
See fig.1 (pg.2)
See fig.2 (pg.2)
1
2
3
INSTALLATION
INSTRUCTIONS
RECOMMENDED INSTALLATION BY A PROFESSIONAL PLUMBING CONTRACTOR
7-3/4"
27-1/2"
ø 13/16"
13-3/16"
1/2" NPT for connection to valve
Installation Instructions for Shower Column 9150
Rough In
-Establish installation location and positioning of valves and
shower column, taking the ceiling height, personal pref-
erences of the customer and any applicable plumbing
codes into consideration.
-Install adequate bracing in the wall to provide a solid and
secure installation of the wall bracket post and inlet piping
of the shower column. Note: recommended fixed distance
from center of inlet nipple to center of wall bracket post is
26".
-Install piping and valves. Note: finished wall to center of
shower column is Min. 2-3/4" to Max. 3-1/2".
Trim Installation
-Install shower column wall supply nipple to the water supply
piping from valve. (see fig. 2) Apply some soapy water to
the o-ring in the center of the flange escutcheon and slide it
onto the nipple and push snug to the finished wall. (Wipe
off any excess soapy liquid with a soft cloth).
-Install wall bracket post with screw through center of post
and fix securely to the wall. (see fig. 1) Apply some soapy
water to the o-ring in the center of the flange escutcheon
and slide it onto the nipple and push snug to the finished
wall. (Wipe off any excess liquid with a soft cloth.)
-Apply some soapy water to the o-rings (top and bottom)
inside the wall BRACKET (2) and slide it onto the shower
COLUMN (1) at the approximate height of 26". Insert wall
bracket inner post into wall bracket outer post on wall.
(Wipe off any excess soapy water with cloth).
-Install the wall supply inlet BRACKET (3) onto the shower
column and connect it to the wall supply inlet nipple
protruding from the wall. (see fig. 2) Shower column may
need to be adjusted up or down to align the connections.
Position the shower column in the desired position and
tighten the hexagonal nuts on the inlet and outlet ends
of the wall supply bracket.
-Check vertical alignment of shower column between
wall supply inlet and wall bracket and adjust so both are
equal. Note: finished wall to center of shower column is
Min. 2-3/4" to Max. 3-1/2". Tighten the two set screws in
the wall bracket post.
-Check perpendicular alingment to wall and tighten setscrew
at inlet BRACKET (3).
-Install shower head (not supplied as part of this set).
26"
Recommended
Tel: 714-891-7797
Fax: 714-891-2478
Toll Free: 800-822-8855
www.calfaucets.com
2-3/4" Min. to 3-1/2" Max.