Backrest unit instruction manual, Swivel sleeve instruction manual – TAMA 1st Chair Drum Throne User Manual
Page 2
BACKREST UNIT INSTRUCTION MANUAL
1.
2.
3.
4.
5.
1.
2.
3.
4.
5.
Use a Phillips screwdriver to remove the four screws that
secure the Seat holder on the bottom of the seat, and the
two screws that will be used to secure the Base unit of the
Backrest. Sandwich the included Reinforcing plate between
the Seat holder and the seat, and secure the Seat holder
once again. (The Reinforcing plate is already attached
on HT741 model, so there is no need to remove the Seat
holder.)
Secure the Base unit over the Reinforcing plate as shown in
photo 2. Be sure the Phillips-head screws that secure the
Seat holder and Base unit are tightened firmly. Retighten
these screws periodically to prevent unforeseen accidents.
Loosen the height adjusting T-nut (F), and align the Arm
retainer shown in photo 3.
Attach the Backrest arm unit to Base unit, and turn the
retainer 90 degrees with the Backrest arms sandwiched.
Tighten T-nut (F) to lock the arms in position (Photo 4).
Before storage, loosen T-nut (F) and turn the Arm retainer to
the orientation shown in Photo 3 to allow the Backrest to be
moved. Also you can fold the Backrest onto the seat without
removing for storage (Photo 5).
Loosen the height adjusting T-nut (F), and slide the Backrest up
or down to the required height. Tighten the T-nut (F) to lock the
Backrest in position.
Turn the Angle adjusting knob (G) clockwise to tilt the backrest
towards your back, or vice versa.
Adjust the angle to a comfortable position. The angle of the
backrest can be memorized by tightening the Lock nut (H).
シート部裏面のシートホルダーを固定している4 つの+ネジと、
バックレストのベース部を固定するための2 本のネジをプラス
ドライバーで外して下さい。シートホルダーとシートの間に付
属の補強プレートを挟むようにして、再びシートホルダーを固
定します。
(補強プレートが装着済みのモデルの場合は、シート
ホルダーを外す必要はありません。)
ベース部を補強プレートの上から写真 2 のように固定します。
シートホルダーやベース部を固定している+ ネジは、しっかり
と固定して下さい。また、思わぬ事故を防ぐために、これらのネ
ジは時々増し締めをして下さい。
T 型ナット(F)を緩め、アーム押えを写真 3 の向きにあわせて下
さい。
バックレストのアーム部をベース部にあてがい、バックレストの
アームを挟むようにアーム押えを90 度回転させた後、T 型ナッ
ト(F)を締めてバックレストを固定します。
(写真 4)
収納時には T 型ナット(F)を緩め、アーム押えを写真 3 の向き
に戻せばバックレストのみを本体から取り外すことができま
す。また、バックレストは収納時に写真 5 のようにシートの上部
に重なるように折り畳む事もできます。
(写真5)
T 型ナット
(F)
を緩め、バックレストを上下にスライドさせること
によって背もたれの高さを調整できます。 お好みの高さに調整
した後、T型ナット
(F)
をしっかりと締めて下さい。
角度調整ノブ(G)を右側に回していくと、バックレストを背中に
向かって傾けることができます。お好みの位置に調整して下さ
い。ロックナット(H)を締め付けておけば、バックレストを取り
外しても角度をメモリーできます。
Installation
Height Adjustment
Angle Adjustment
取付方法
高さ調整
角度調整
Backrest
バックレスト
T-nut (F)
T 型ナット(F)
Angle Adjusting Knob (G)
角度調整ノブ(G)
Please prepare a Phillips screwdriver (#1).
ご用意いただく物:プラスネジドライバー(1号)
To avoid tipping over to rear when using the backrest,
ensure one leg is a facing in the direction of the backrest,
as shown in Photo 1. Do not lean on the backrest any
harder than necessary.
転倒を防ぐために、バックレストを使用する際には、必ず写真 1
のように一本の脚をバックレストと同じ向きに向けて下さい。
また、バックレストには必要以上に強くもたれかからないよう
にして下さい。
CAUTION!
注 意!
Seat Bracket
シートホルダー
T-nut (F)
T 型ナット(F)
Angle Adjusting Knob (G)
角度調整ノブ(G)
Arm Retainer
アーム押え
Lock Nut (H)
ロックナット(H)
Base Unit
ベース部
Reinforcing Plate
補強プレート
Photo 2
( 写真 2)
Photo 1
( 写真 1)
Photo 6
( 写真 6)
Photo 7
( 写真 7)
Photo 8
( 写真 8)
Photo 3
( 写真 3)
Photo 4
( 写真 4)
Photo 5
( 写真 5)
SWIVEL SLEEVE INSTRUCTION MANUAL
1.
2.
3.
4.
5.
A.
B.
1.
2.
3.
4.
5.
A.
B.
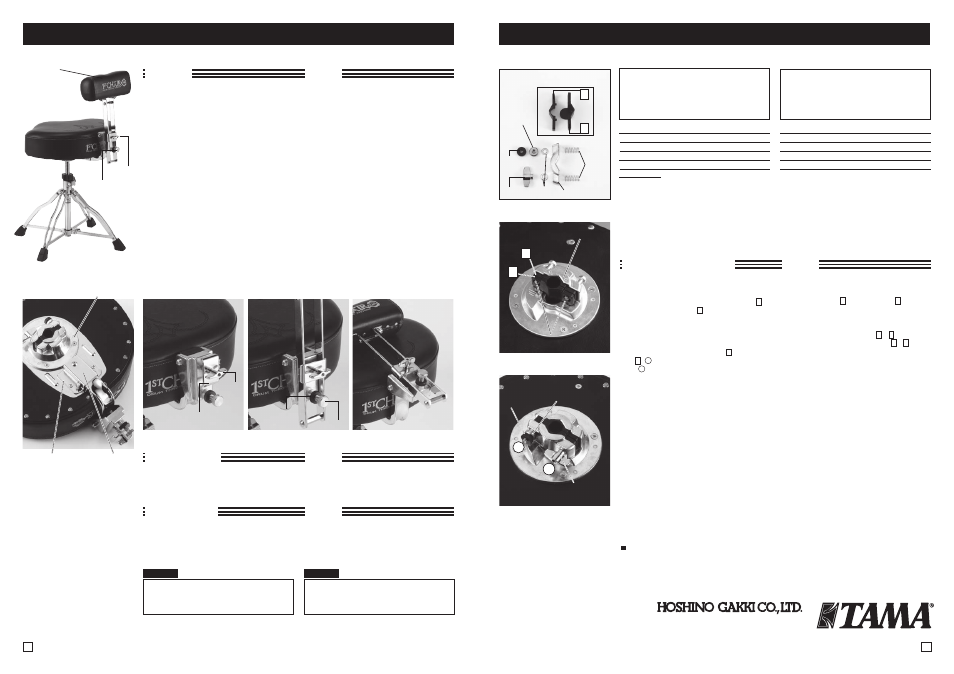
Loosen the Metal nut (C), Plastic nut (D) and the T-nut (E) of
the Seat mounting bracket, and remove the Washers, the
Pressure casting and the Springs (see photo 6).
Place the Swivel sleeve into the Seat bracket so that A fits
on the Seat bracket side and B on the Pressure casting side
(see photo 7).
After inserting the Bolts from the Seat bracket side, attach
the Springs, the Pressure casting, the Washers, the T-nut (E),
Metal nut (C) and Plastic nut (D) to the Bolts. First tighten
the T-nut (E) until the inner surface of A verges on that
of B ( 1 ), then tighten the Metal nut (C) and Plastic nut
(D) ( 2 ). This is the standard alignment (see photo 8).
Loosen the T-nut (E) slightly. After place the seat onto the
throne rod, tighten the T-nut (E).
For transporting the throne, the throne seat and base can
be separated by loosening the T-nut (E) slightly. The Swivel
sleeve can then remain inside of the Seat mounting bracket.
When you use your 1st CHAIR with Swivel sleeve, please
refer to P1 (“Setting up 2a.”).
When you attach Swivel sleeve again after replacing it once,
please refer to the following instruction.
This instruction manual was issued on January 2009.
Specifications and improvements are subject to change
without notice.
シートホルダー部のメタルナット
(C)とブラスチックナット
(D)、
T 型ナット(E)を緩め、ワッシャー、スライドプレート、スプリン
グを外します(写真6)。
スイーベル・スリーブの A がシートホルダー側、 B がスライドプ
レート側になるようにシートホルダー内に挿入します(写真7)。
次にボルトをシートホルダー側から挿入し、スプリング、スライ
ドプレート、ワッシャー、メタルナット(C)、プラスチックナット
(D)の順にボルトに取り付けます。まず A と B の内面が軽く接
するまでT 型ナット(E)を締め(①)、その後、 A と B が平行に
なるように、メタルナット(C)とブラスチックナット(D)を締め
ます(②)。この状態が標準の締め具合です(写真8)。
T 型ナット(E)を少し緩め、シート部にスクリューロッドを挿入
した後、T 型ナット(E)を締めて固定します。
収納時にはT 型ナット(E)を緩めてスクリューロッドを抜き、脚
部からシート部を外してください。スイーベル・スリーブはシート
ホルダー内に保持されます。
取り付けた状態で使う場合は、1ページ目の組立方法 3 をご参
照下さい。
一旦外してから再び取り付ける場合は、以下の手順で行って下
さい。
●この取扱説明書は、2009年1月現在のものです。 製品改良のため、
予告なく仕様を変更することがありますので、予めご了承ください。
星野楽器株式会社 〒461-8717 愛知県名古屋市東区橦木町3-22
http://www.tama.com/
Setting up the Swivel sleeve
取付方法
Backrest
バックレスト
The Swivel Sleeve works only for 1st
CHAIR Standard Models, NOT for 1st CHAIR
Hydraulix models. This attachment is
designed specifically for the 1st CHAIR’s
22.2mm (7/8”) diameter rod.
1st CHAIR standard models and individual seats
come standard with Swivel sleeve.
The SSL22S Swivel sleeve allows drum throne seats to
swivel naturally with a player’s motion while maintaining
the security of the 1st CHAIR Sit Tight seat bracket.
Please remove the Swivel sleeve from the seat
bracket when you like to keep the throne seat in a
fixed position.
スイーベル・スリーブは1st CHAIR スタンダードモデ
ル専用のアタッチメントです。Hydraulix モデルには付
けられませんので、ご注意ください。また、スイーベル・
スリーブは22.2mm 径のパイプ専用です。1st CHAIR
シリーズ以外の脚部を使用した場合、上部パイプの径
が異なるとご使用になれませんのでご注意ください。
スイーベル・スリーブは、1st CHAIR シリーズの特徴であ
るシートホルダー部の固定力と耐久性はそのままに、プレ
イ中の体の動きに応じてシート部を自然に回転させるた
めのアタッチメントです。
シート部を固定させたい場合
は、スイーベル・スリーブを取り外してご使用ください。
スタンダードモデルの1st CHAIR 完成品、及びシート部単
品には、スイーベル・スリーブが予め取り付けられています。
Swivel Sleeve
スイーベル・スリーブ
A
B
Metal Nut (C)
メタルナット(C)
T-nut (E)
T 型ナット(E)
Washer
ワッシャー
Pressure Casting
スライドプレート
Plastic Nut (D)
プラスチックナット(D)
Spring
スプリング
Seat Bracket
シートホルダー
Bolts
ボルト
Metal Nut (C)
メタルナット (C)
T-nut (E)
T型ナット (E)
Prastic Nut (D)
プラスチックナット (D)
A
B
1
2
3
4