STIEBEL ELTRON SOL 25 PLUS User Manual
Page 31
WWW.STIEBEL-ELTRON-USA.COM
SOL 25 PLUS |
31
EN
G
L
IS
H
been premixed and require no further treatment. Never mix water
with the heat transfer fluid, otherwise the essential characteristics
and corrosion protection can no longer be guaranteed. The system
must not be topped off with water.
Follow these steps to complete the final charging and venting
(purging of air) of the system:
1. Energize the pump station to activate the electric pump to
circulate the solar medium through the system.
2. Open the manual air vent valves on the SOL 27 Premium inlet
and outlet connectors and open the ball valve for the flow meter.
3. To purge air from the system, the size of the air bubbles can
be reduced (as the system loop pressure increases), by slowly
constricting the return flow to the drain bucket via partially closing
the lower drain & fill valve while the pump is operating. Also
open the bleed screw on the circulator pump.
4. Continue purging the system until no more bubbles are
expelled from the drain hose. Allow system pressure to build
up to approx. 20-44 psi. This process usually takes 20-30 minutes.
Continue looking for leaks.
5. Tighten the safety-leak-cap valve fully and then
back off 1/4-turn.
6. Close the bottom fill & drain valve after completing this
ventilation step, but before shutting off the pump.
7. Keep the circulator pump running and then close the top fill &
drain valve.
8. Open the air vent valve at the highest point, until only solar
medium is expelled.
9. Shut off the circulating pump.
10. Open the valve to the expansion tank to connect it to the solar
loop. The system pressure will drop slightly.
11. Use the charging pump to raise the system pressure (in a cool
state) to its operating pressure of 50 psi (50 to 58 psi).
12. Use a permanent marker to record the pressure, date, and
time on the expansion tank.
13. It is further recommended that the installer measure and
record the glycol/water mixture using a refractometer or
hydrometer. It is critically important that the mixture be correct
before turning the system over to the final customer.
14. Set the red dial on the pressure gauge to the expansion tank’s
precharge pressure. This should be the lowest pressure that the
system ever reaches in the coldest day of operation.
15. Let the solar heating system rest overnight and vent again in
the morning, via the manual air vent valves, before solar radiation
warms the collectors.
16. Turn check valves in the pumping station to their normal
position to allow one-way flow.
17. Make sure the controller and pumping station are energized
and that the proper settings for the controller have been entered.
18. Cover both fill & drain valves with the caps supplied and tool
tighten (not hand removable).
19. If the system does not start automatically, there may still be
air in the system. Repeat the venting process, if required.
and possible burns from escaping steam. If the sun shines during
start-up, cover the collectors or wait until there is some shade.
The following procedure makes use of a charging pump, screen
filter, and large pail or trough to circulate fluid through the system.
The sump can have a coarse-mesh screen to prevent large particles
from entering the pump. The outlet of the pump can be fitted with
5-micron sediment filter. The intake sump should be set near the
bottom of the pail.
1. Connect the charging pump’s outlet to the to fill & drain valve
in the pumping station.
2. Connect a hose to the boiler drain at the bottom of the loop
(bottom fill & drain valve), at the outlet side of the storage tank’s
heat exchanger.
3. Use a clean, dry pail or catch basin. During this process, hold
the drain hose firmly to the container or clamp them. Make sure
you have sufficient Dowfrost medium (propylene glycol mixture) to
fill the entire system’s volume, plus extra for purging.
4. Keep all other vents and valves closed during the flushing
operation.
5. Close the flow meter adjusting screw at the pump assembly
(horizontal position).
6. Start charging the system and observe the loop fluid draining
back into the pail. Make sure that the fluid level in the container
always remains higher than the intake hose.
7. The flushing process should continue until the fluid draining
back appears clean and free of contaminants. The screens/filters
may require cleaning during this process.
8. When the system is fully flushed, proceed to the final charging
phase, described below.
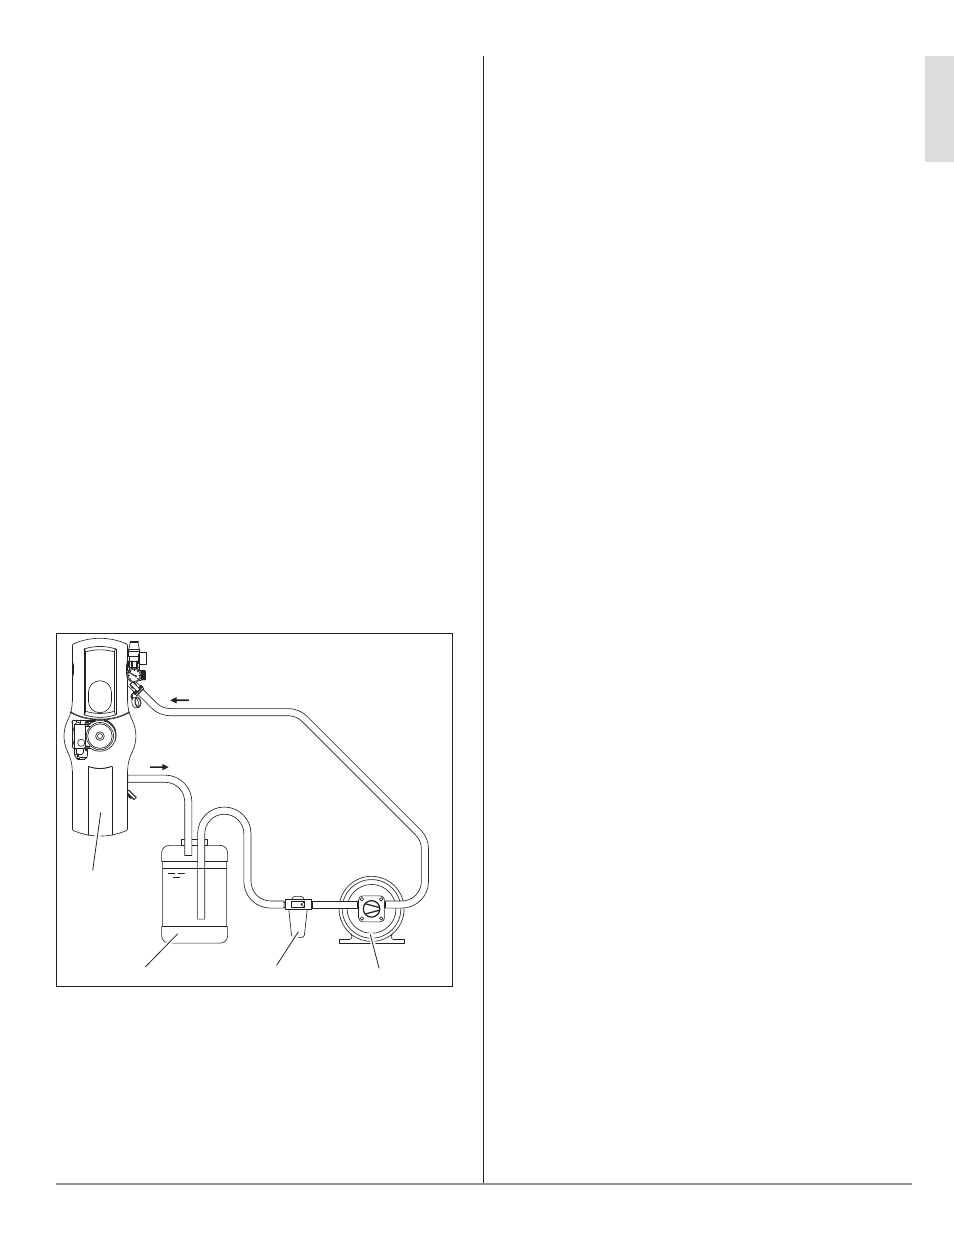
1
Solar-Kompaktinstallation
2
Wärmeträgerflüssigkeit
3
Füllpumpe
4
Filter
26_05_01_0515
2
1
3
4
1 Solar compact installation
2 Heat transfer medium
3 Filter
4 Fill pump
8.4 Final Charging and Venting The System
The solar heating system must be filled exclusively with the
premixed propylene glycol heat transfer medium. The bottles have